How to Automate Blog Posts in 2026 [Step-by-Step Guide]
Set weekly drafts, polish them fast for SEO, and auto-share every post.


![How to Automate Blog Posts in 2026 [Step-by-Step Guide]](/_next/image?url=https%3A%2F%2Fcms.rightblogger.com%2Fwp-content%2Fuploads%2F2025%2F12%2Fautomate-blog.jpg&w=3840&q=75)
You sit down to blog and it hits you again… what should I write, when will I write it, and how am I going to format, publish, and then blast it out on social? By the end of this process, it feels like an entire second job. That’s where learning how to automate blog posts really becomes effective.
Automation means using tools and AI to handle the repetitive work, like planning keyword research-backed topics, drafting posts, AI SEO-optimizing them, scheduling your content to publish, and sharing on social media to promote. With the right blog automation tools, you still control the ideas, the voice, and the final edits (which we always recommend).
Put simply, automated blogging means removing the boring parts from your process, and handing them over to AI tools that can do it for you. Our full blog automation tutorial video breaks this down quickly:

RightBlogger is built for automating your blog. Our Content Planner and autoblogging features can keep a steady stream of posts going on your site while you handle the human parts.In this guide, you will see a simple path to follow: first set up automations in RightBlogger, then review and optimize those posts for Google and AI search, and finally add social media automation so every new article gets promoted.
Key Takeaways to Automating Your Blog & Getting More SEO Traffic
- You can automate your blog with tools like RightBlogger, Outrank, and Arvow, so the automation tools handle generating research-backed ideas, writing blog post drafts, and scheduling for publishing, while you keep full control of your voice and final edits.
- The best blog automation tools have a Content Planner and automations that create a steady stream of keyword‑driven blog posts (and can scan your YouTube channel) to produce content that matches real search demand.
- A quick review and optimization process, where you add in personal stories, custom AI-generated images, and scan internal links, keeps your blog automation quality high and stops your site from feeling generic or spammy.
- Using features like SEO Reports and Auto Optimize inside your blog automation process helps you rank higher in Google and get picked up more often as a source in AI platforms like ChatGPT.
- Using social media automation tools, like BlogToPin for Pinterest and social schedulers like Buffer for X and LinkedIn, keeps every new blog post promoted without daily manual work.
This guide is written primarily for non‑technical bloggers, busy marketers, and entrepreneurs that wear many hats. No jargon, just clear steps that lead to more traffic, and more time to spend on the things that matter most in your business.
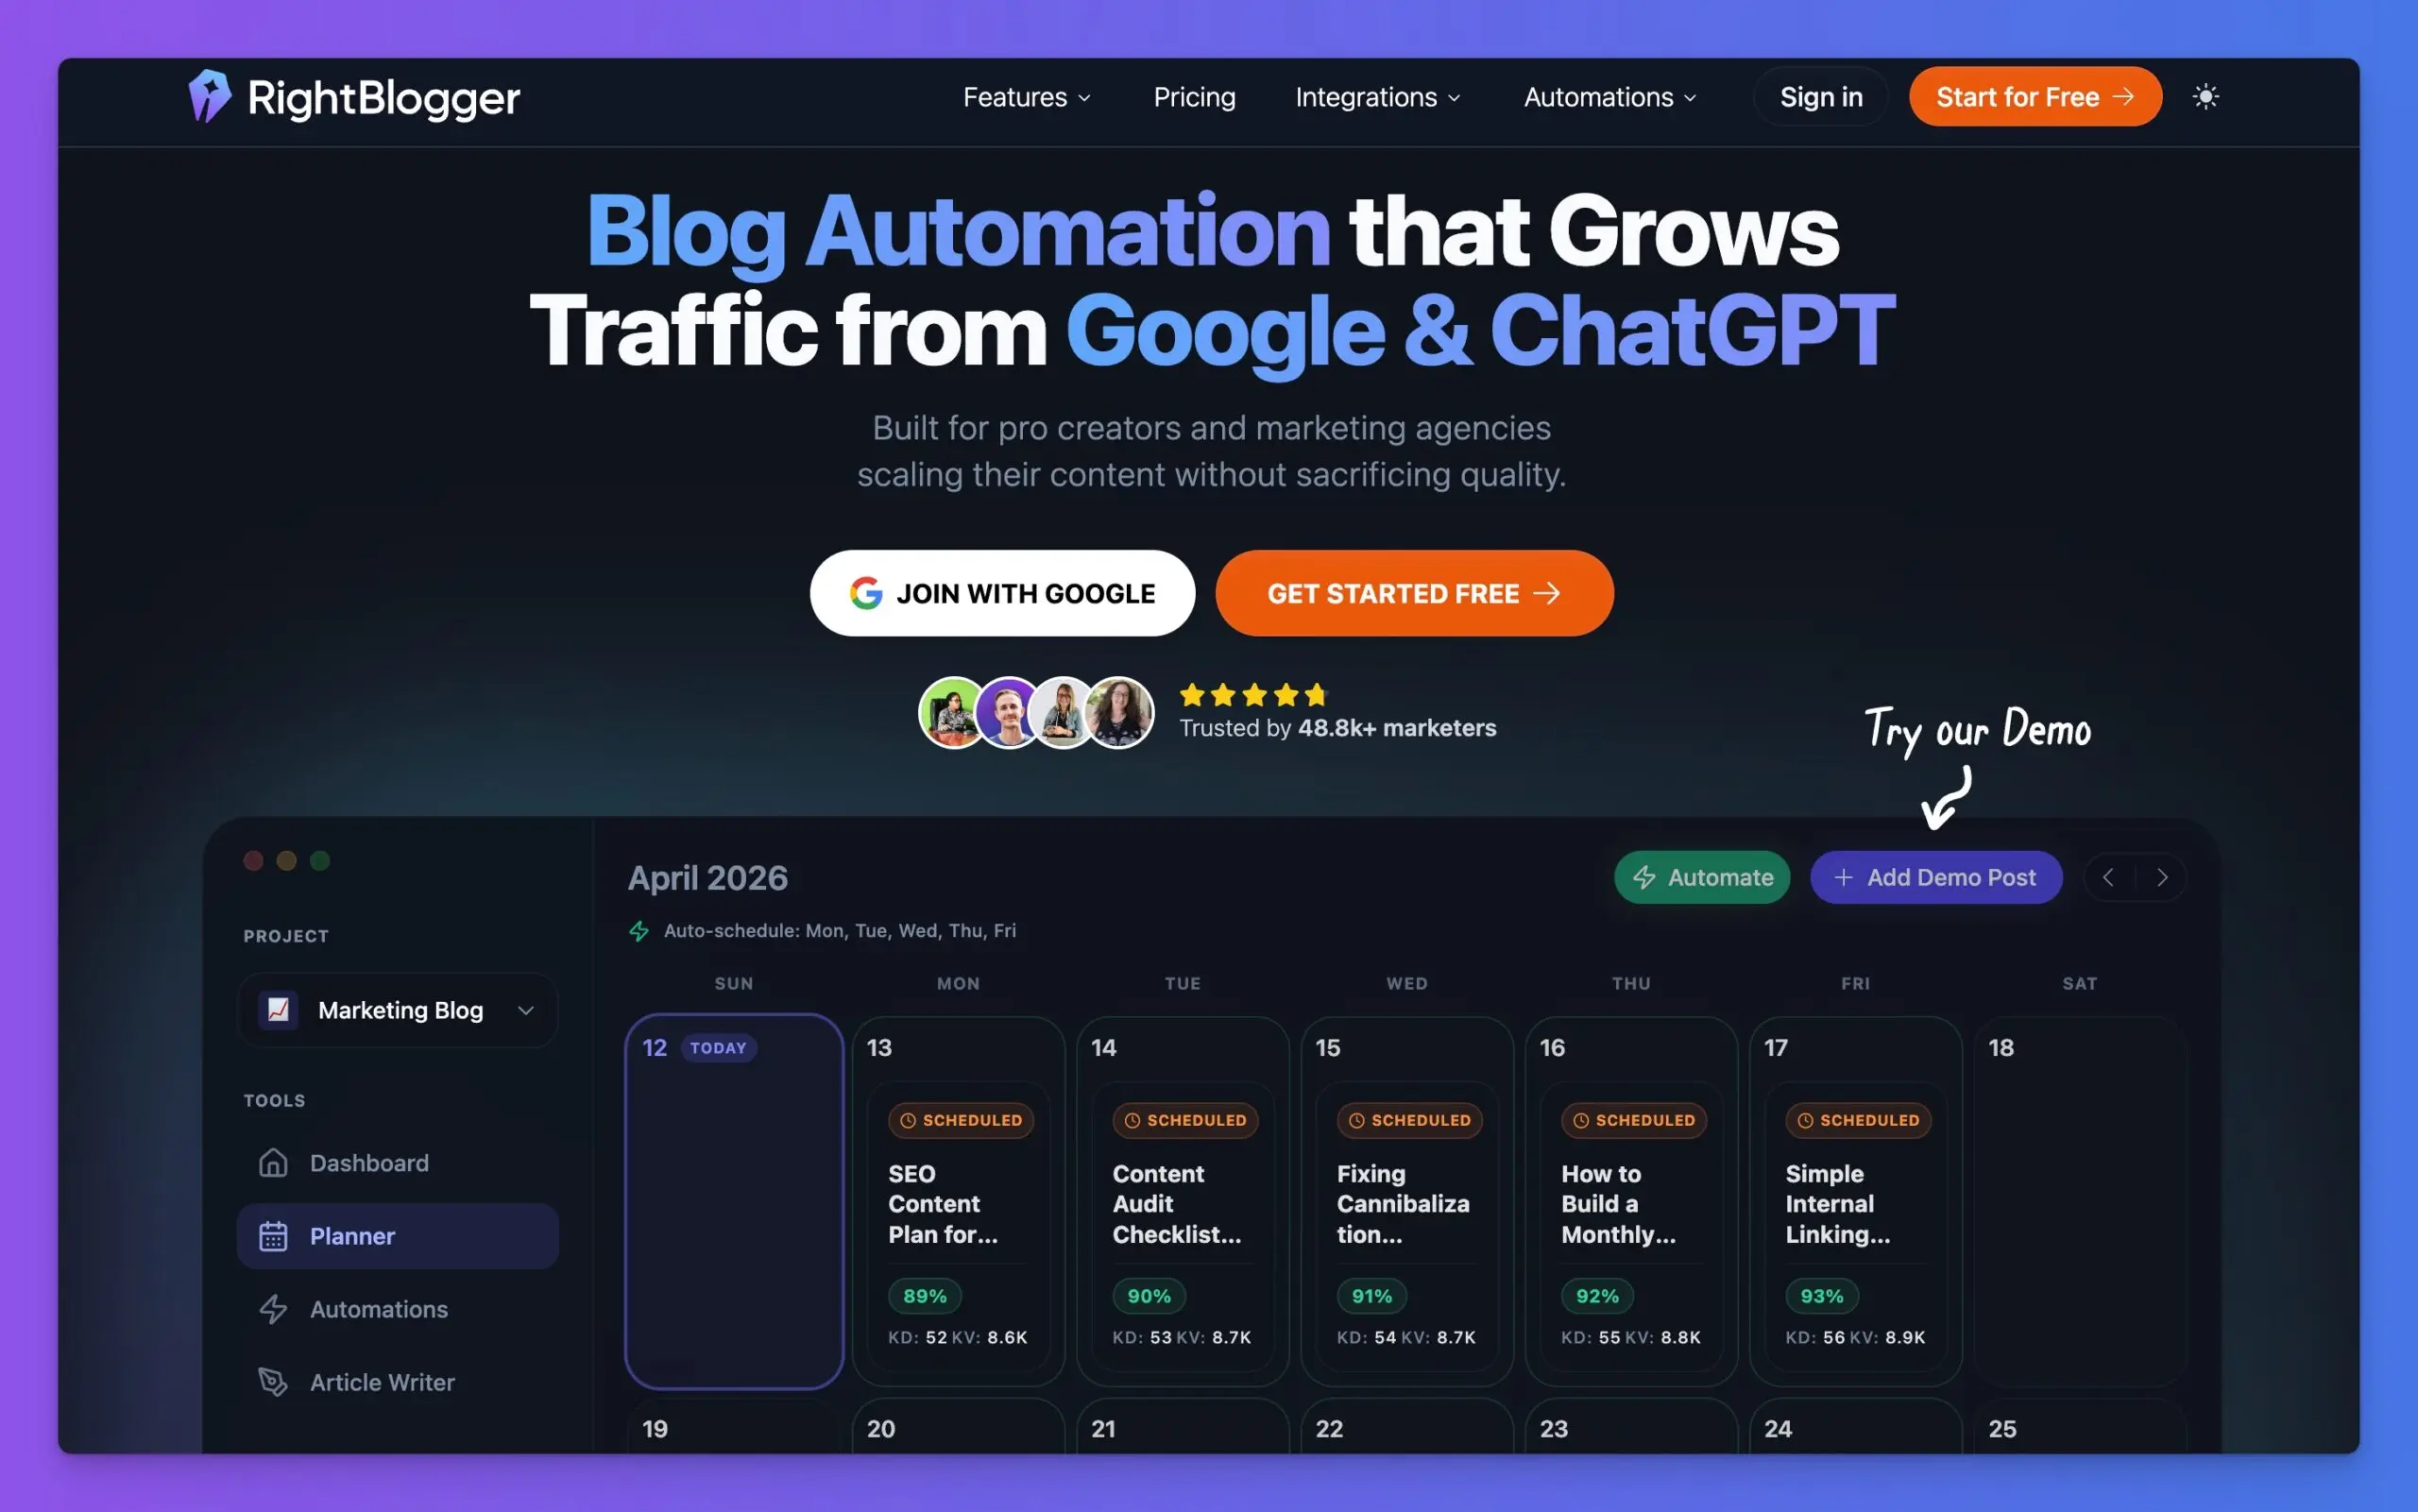
How to Automate Your Blog Posts with RightBlogger’s Content Planner (Step-by-Step)

The content planner is the engine of your automated blog. Once it is set up, new posts can be drafted and sent to your site on a schedule, even while you are busy with client work or family.
If you want a bigger picture of how autoblogging features work in RightBlogger, you can skim our Content Planner overview, then come back to walk through the steps below.
Connect Your Blog Automation and Choose How Often New Posts Publish

Start by connecting RightBlogger to your blog so the planner knows where to send content. We support many integrations like WordPress and Webflow, if there is a CMS missing just send us a message.
- Connect your CMS: Inside your RightBlogger project, open the CMS integration settings. Connect your WordPress, Webflow, Ghost, Wix, or Duda site. You will usually paste in your site URL and an API key or app password.
- Pick draft or publish: In those integration settings, choose if new posts should arrive as drafts or publish right away. Most people should start with draft mode so you can review and tweak each article before it is public.
- Open the Content Planner: From the left sidebar in RightBlogger, click Content Planner. You will see a calendar view of your content schedule.
- Create your first automation: At the top of the planner, click the Automation button. Enter the homepage URL of the blog you want to connect. This tells RightBlogger which site you are planning for so it can generate ideas. We also support other sources like YouTube with more coming soon.
- Choose your posting rhythm: Next, pick how often you want new posts: daily, weekly, or monthly. A good starting point for most solo bloggers is one post per week. (Running a niche site? You may want to start faster.) You can always speed up later once you see how your review flow feels.
- Select the right integration: If you run more than one site (or manage client blogs), choose the correct publishing integration from the drop‑down list so posts go to the right blog.
- Create the automation: Click Create automation. RightBlogger will start planning and scheduling new posts into your calendar based on the frequency you picked.

From now on, you will see fresh posts appear in the planner at regular intervals. Each one is linked to your site integration and ready for your review. If your needs change, you can open the automation settings any time to adjust the frequency or pause it.
We also include options to choose a specific day of the week when your posts will appear.
After an automation pushes a post to your website, you’ll also get an email alert so you can easily review the content that has been posted or polish a draft to publish. RightBlogger also has an AI quality check phase that verifies what’s published for any quality-related issues (like if the AI didn’t finish writing or something is wrong with the output), which you’ll also be alerted about.
Use AI Topic Research, Keyword Ideas, and YouTube Imports to Fill Your Calendar
Once your blog automation is live, RightBlogger stops you from staring at a blank page. It taps into built‑in AI and SEO research so the topics in your calendar have real search demand. Most of this is powered by our Smart Suggest tool, so if you want to manually get ideas that’s a good start.
Here is what that looks like in practice.
- The automation pulls keyword‑based ideas that people already search for on Google. Your blog does not fill up with random diary posts that never bring traffic.
- Each idea turns into a scheduled post on the planner, tied to the dates you picked when you set up the automation.
- On every scheduled post, you will see keyword data like search volume and difficulty. That quick view helps you focus on posts with real traffic upside.
- Icons in the calendar show which automation created each post. For example, a small YouTube icon appears on posts that came from your video channel.

If you publish on YouTube, you can add a second automation just for videos. Connect your YouTube channel inside the YouTube tab in the automations screen.

From then on, every new video will turn into a blog post that includes the video embed and a full article underneath.
You also get email alerts when new posts from your automations go live. That way you know what has just published without logging in every day.
The result is simple: more ideas, more draft posts ready to go, and far less manual planning.
We believe your input, edits, and opinions are key to your blogging process. Many people make this mistake when using AI for blogging. Be sure to review every post, add your images, and make any edits you need before publishing.
Keep Quality High: Review, Edit, and SEO-Optimize Your Automated Posts
Many bloggers worry that automation will make their site feel generic or spammy. The fix is simple. Think of your setup as “AI plus you.” RightBlogger handles topic research, drafting, and scheduling. You handle stories, opinions, and final checks.
Before any scheduled post goes live, spend a few minutes reviewing it and tuning it for search.
Add Your Stories and Examples Before Blog Posts Go Live
RightBlogger’s blog automation process makes it easy to pop in and polish each article.
- In the Content Planner, click any upcoming post on the calendar.
- In the post details, click Edit post.
- Choose the option to open the content in the article writer.
Once you are inside the editor, add the parts only you can provide:
- Short personal stories or examples
- Screenshots or images from your own work
- Strong opinions or warnings based on real experience
- Internal links to other helpful posts on your site that RightBlogger may have missed
A simple review checklist helps you move fast:
- Check the title and opening hook. Would it make you click?
- Add at least one real story or example.
- Make sure each tip matches how you actually work.
- Add internal links where they support the reader.
Autoblogging is there to save time, not replace you. Even a 10‑minute pass keeps your brand voice sharp and builds trust with readers.
If you want to see how this human‑plus‑AI approach compares with other tools, this breakdown of the best autoblogging tools is a helpful deeper dive comparison of the top tools out there for blog automation today.
Use SEO Reports and Auto Optimization to Win More Google and AI Traffic
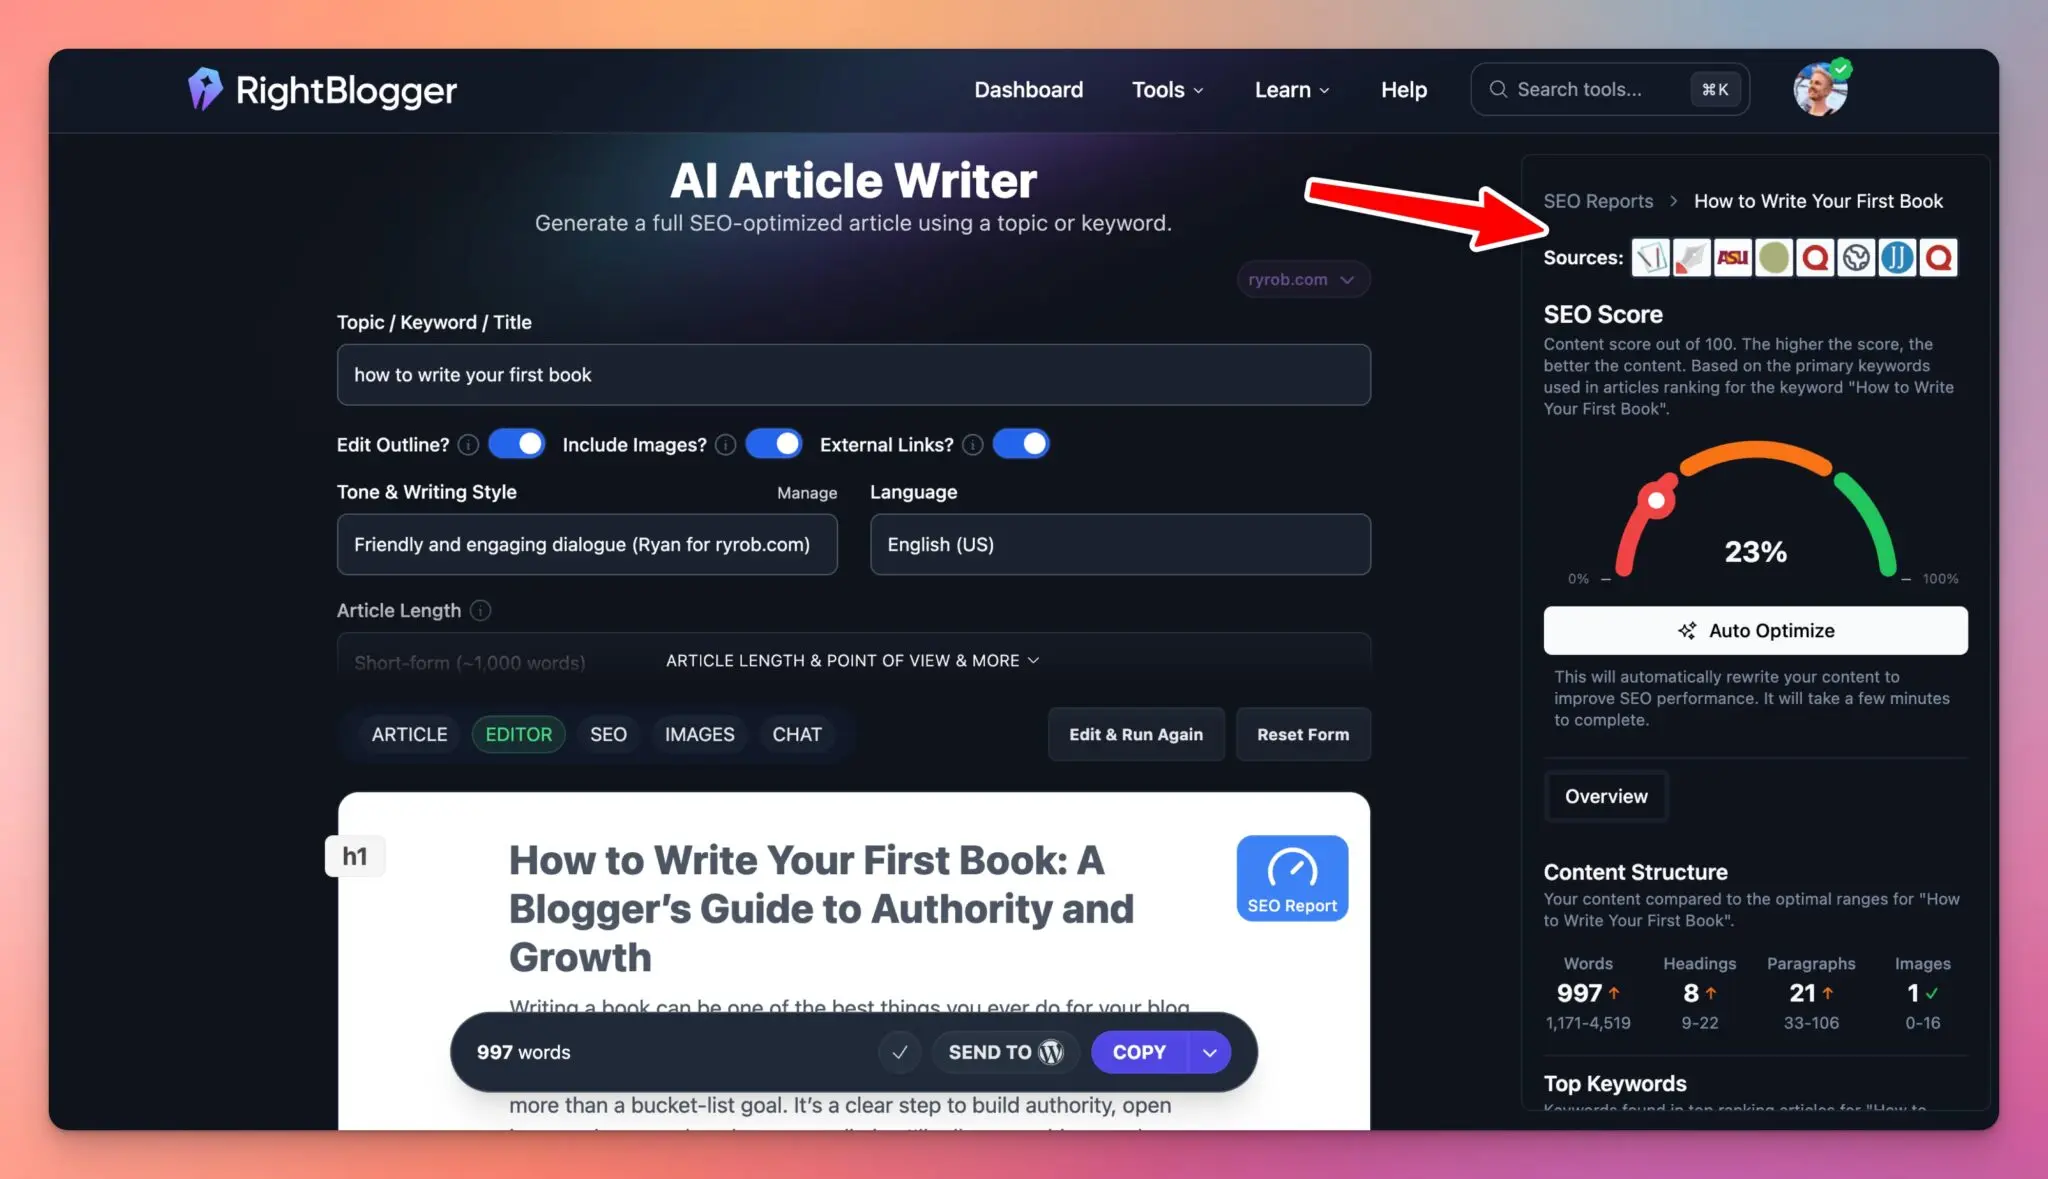
After you add your voice, spend a couple of minutes on SEO. This step can turn an average article into a long‑term traffic asset.
Inside RightBlogger:
- Open your post and click the SEO Report button.
- Enter your main topic or keyword if needed.
- Let the tool scan for important related phrases that are missing.
- Click Auto optimize to update the content. (For a deeper look at this feature, see our guide to automated AI SEO optimization.)
The report gives your article a score. Maybe it starts at 64 percent. After auto optimization, you might see it jump into the 90 percent range. In simple terms, that higher score means your post now covers the topic more fully, with better keyword coverage and structure.
Better‑optimized posts tend to rank higher in Google, pull in search traffic for years, and also show up more often as trusted sources for AI tools and LLMs.
Make this a quick habit before each automated post goes live: run an SEO report, hit auto optimize, then skim the article once more.
Automate Blog Promotion: Turn Each New Post into Social Media Content
Publishing on autopilot is great, but traffic really grows when every new article also shows up on your main social channels. You do not need complex funnels for this. A couple of simple tools can turn each post into pins and social updates automatically.
Of course there are hundreds of tools you can use to automate social posting.
Auto Post Your Blog Content to Pinterest with BlogToPin

Pinterest can send steady traffic to blogs in visual niches like food, DIY, travel, parenting, and fashion. The problem is that designing and uploading pins for every post takes time.
A tool like BlogToPin solves that by turning each new blog post into a Pinterest pin for you. At a high level, the setup looks like this:
- Connect your blog or RSS feed inside BlogToPin.
- Connect your Pinterest account and boards.
- Choose or tweak a pin template or style.
- Let the tool auto create and schedule pins whenever a new post appears.
Once it is running, your Pinterest account stays active and your pins grow over time while you stay focused on content in RightBlogger.
Use Social Schedulers to Auto Share Posts to X, LinkedIn, and More
For X, LinkedIn, and other text‑first platforms, a social scheduler is your friend. Tools like Buffer, Publer, or SocialBee can watch your RSS feed and post on your behalf.
A simple setup looks like this:
- Connect your blog’s RSS feed.
- Write two or three short post templates that pull in the blog title and URL.
- Choose which accounts to post to and how often.
- Turn on automatic posting when a new article is detected.
Then, once a week, log in to reply to comments and DMs. Your posting can be automated, but your replies should still feel human.
With publishing handled by RightBlogger and promotion handled by schedulers, your blog can market itself all week with only a small time investment.
We are also building automated social promotion tools in RightBlogger. If you want to share content manually, you can use the social media tools available in RightBlogger.
Simple Weekly Routine to Keep Your Automated Blog Under Control
Automation should feel like a helper, not a runaway train. A short weekly check in keeps everything on track without eating your weekend.
For more detail on calendar controls, you can always refer to this practical guide to scheduling posts in RightBlogger.
Your 30 Minute Weekly Automation Checkup
Set a recurring 30‑minute block on your calendar. During that time:
- Open the Content Planner and skim the next one to two weeks of posts.
- For each upcoming post, review the outline or draft, add personal examples, and run an SEO report plus auto optimization if you have not already.
- Check your email or CMS to confirm the last few posts published correctly from the automations.
- Open your social scheduler and confirm that new posts are being shared to Pinterest, X, and LinkedIn.
- Glance at basic analytics like page views and clicks from social to see which topics work best.
This one habit keeps your automated system healthy and easy to trust.
When to Pause, Adjust, or Add New Automations

You are always in charge of your blog automations. Change them when:
- Topics drift off brand or no longer match your offers (you can actually guide the AI with the additional instructions field during ideation.)
- Quality drops because the pace is too fast to review.
- Your schedule feels heavy and posts pile up in drafts.
Inside RightBlogger, you can open an automation and shift from daily to weekly, or from weekly to monthly. You can also switch the site integration if you add a new blog.
On the flip side, add a new automation when you launch a content series or YouTube channel, so every episode or video turns into a supporting blog post.
Every few months, take a step back. Look at your goals for the site and make sure the topics in your planner still match your niche and what you sell. Automation is a tool you control, not something that controls you.
Frequently Asked Questions About Blog Automation
What is blog automation?
Blog automation is the process of using AI tools and software to handle repetitive blogging tasks like topic research, content drafting, SEO optimization, publishing, and social media promotion. The goal is to maintain a consistent publishing schedule without spending hours on manual work each week. You still control the ideas, voice, and final edits, but the tools handle the heavy lifting.
Can I automate blog posts without losing quality?
Yes, if you treat automation as “AI plus you.” The best approach is to let tools handle drafting and scheduling, then spend 10-15 minutes per post adding your personal examples, stories, and opinions before it goes live. Running an SEO report and auto-optimization pass also helps. Posts that go through this quick human review step consistently outperform fully automated content that skips it.
How do I automate social media posting from blog content?
Connect your blog’s RSS feed to a social scheduler like Buffer, Publer, or SocialBee. Set up post templates that pull in the blog title and URL, then enable automatic posting when new articles are detected. For Pinterest specifically, a tool like BlogToPin creates and schedules pins from each new post automatically. This way every article gets promoted across your social channels without daily manual work.
Final Thoughts on How to Automate Your Blog (the Right Way)
When you automate your blog with one of the best autoblogging tools (like our very own RightBlogger), you keep a steady flow of fresh, SEO‑friendly content and social posts going out, even when life gets busy.
The foundational steps of blog automation are simple:
- Set up content planner automations that chooses keyword research-backed topics and scans your YouTube channel for new videos
- Review and AI SEO-optimize each article so it reflects your voice and targets search and AI traffic
- Create social posts that promote your content where your audience spends their time online
Pick one small starting point for your blog automation process today. Connect your site to RightBlogger, create a weekly automation, and review the first post it schedules for you. You can refine and improve your system over time, but every step toward blog automation frees up more space to do what you do best, share helpful ideas with your readers.
Complete Blog Automation in Minutes
Join 48,879+ marketing agencies, pro creators, and marketing teams in using RightBlogger’s powerful blog automation system. You’ll drive more traffic from Google and ChatGPT with our AEO & SEO automated publishing. Plus, you’ll access our library of 80+ standalone tools, online courses, a private community, and more.

Article by
RightBlogger Co-Founder, Andy Feliciotti focuses on web development and shares travel and photography tips on YouTube.


New:Site Agent
Automated SEO Blog Posts That Work
Try RightBlogger for free, we know you'll love it.
- Automated Content
- Blog Posts in One Click
- Unlimited Usage


Leave a comment
You must be logged in to comment.
Loading comments...