How to Create an Image Sitemap for SEO in 2026
Most blogs only need one crawlable main image per post in their XML sitemap.


Your blog can publish a high-quality image and still leave Google guessing about its context. That is the frustrating reality of search engine indexing, and it remains more common than most content creators realize.
An image sitemap gives search engines a much cleaner path to the visual content that matters most to your readers. It is especially effective when your files are lazy-loaded, tucked behind complex JavaScript, or buried deep within a massive archive of posts. By implementing an image sitemap, you ensure that search crawlers do not miss these assets, which is more important in 2026 than ever before.
The good news is that the technical setup is simple once you follow the right steps. You do not need to undertake a giant technical project; you just need a clean workflow and a few best practices that keep your image sitemap useful for both users and search engines.
Key Takeaways for Image Sitemap SEO
- Implementing an image sitemap helps Google discover and index your high-quality blog visuals much faster.
- Focus on including one strong, relevant image per post rather than indexing every minor thumbnail on the page.
- Keep your image URLs clean, canonical, and structured in a way that is easy for search engines to crawl.
- Submit the file to Google Search Console to verify it is being processed and update it regularly whenever your blog content changes.
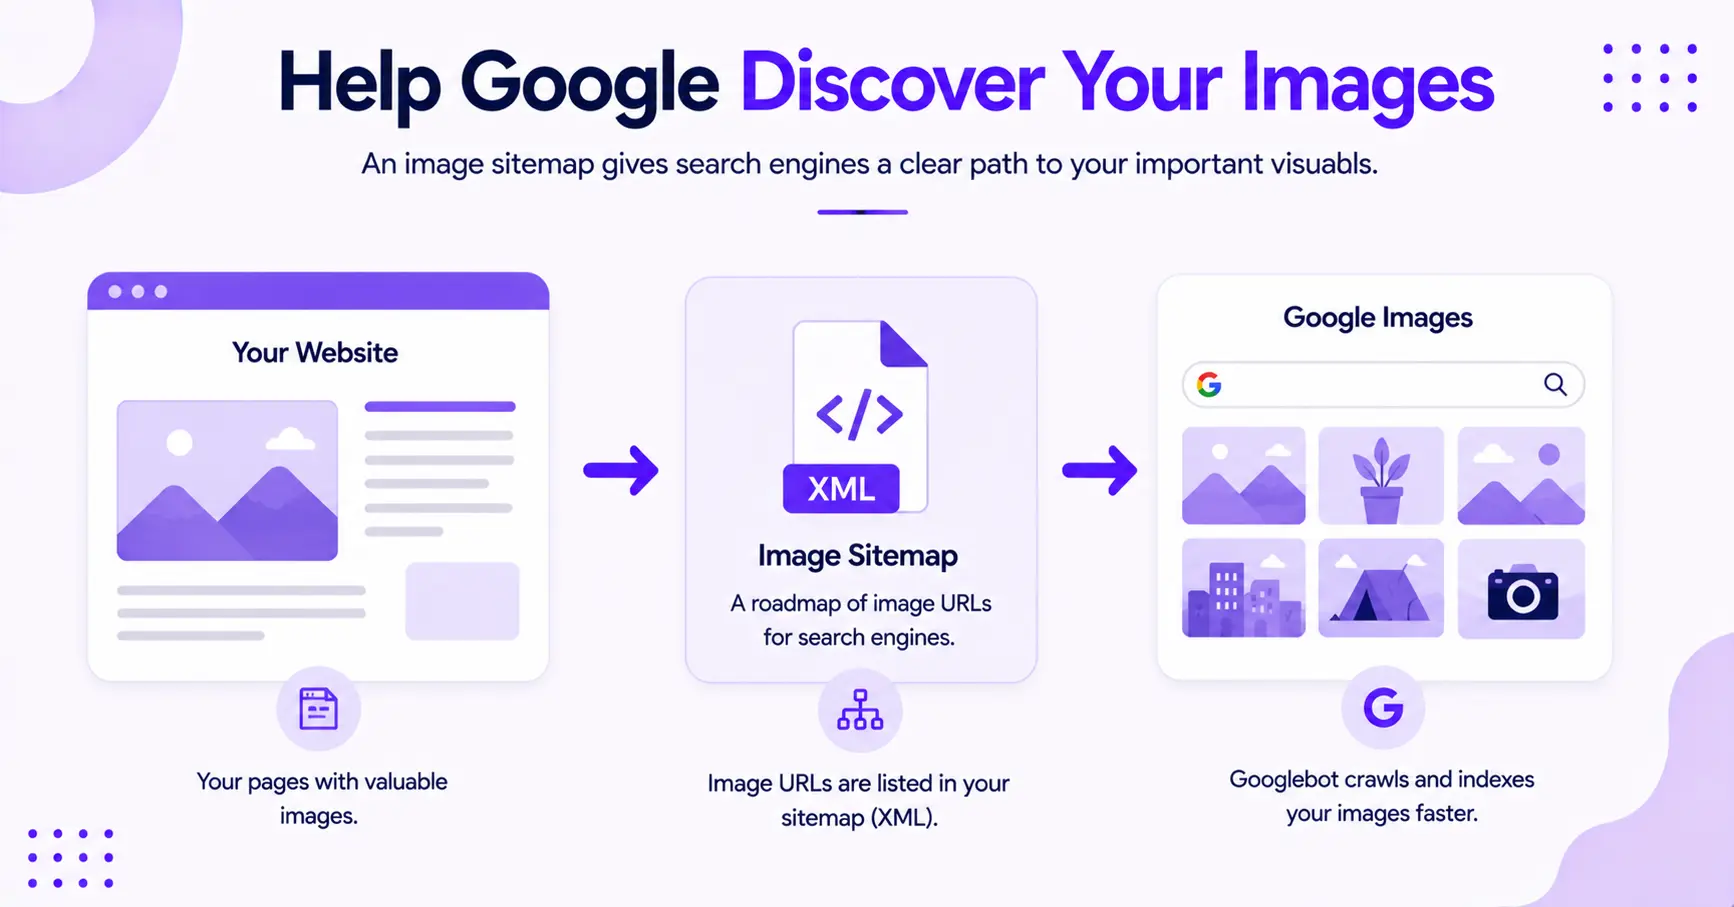
What an Image Sitemap Actually Does
Think of an image sitemap as a detailed roadmap for search engine crawlers. Instead of hoping Google happens to spot every important visual on its own, you provide a clear path to the specific image URL you want indexed.
While a standard XML sitemap covers your pages, this specialized addition ensures that every visual asset is accounted for by the search bot.
This process is particularly helpful when your blog relies on JavaScript or lazy loading, as these elements can sometimes hide images from crawlers. By providing a direct path, you remove the friction that prevents Google from discovering your content.
Google has promoted this concept for years. For the current spec, see Google’s image sitemaps documentation. Skip the older 2010 guidance you will still find floating around, since it references image tags Google has since retired.
If your current sitemap setup is messy, fix that first. A clean technical SEO guide for sitemap configuration will save you time before you add image data on top of it.
The basic setup is straightforward. Your normal XML sitemap lists the page, and the image entry tells Google which visual belongs there.
When Blogs Need an Image Sitemap Most
Not every blog needs a separate image file for every post, and that is an important distinction to make. A small blog with one clean featured image per article may be fine keeping image data within the main sitemap.
However, the need for a dedicated image sitemap becomes vital when your blog relies on high-resolution images for tutorials, travel photography, or complex how-to content. When a site contains significant visual content, search engines may struggle to crawl and index every file correctly, especially if they are part of a complex site architecture.
These pages often feature multiple diagrams or process shots that could be easily overlooked if they load dynamically or late in the page rendering process.
Large blogs face an additional challenge. Once you have hundreds or thousands of URLs, image discovery naturally slows down.
If your site structure is inefficient, a specific sitemap acts as a critical signal to search crawlers, ensuring your media assets are indexed properly.
Ultimately, mastering image SEO is essential for blogs that prioritize visual storytelling or detailed instructional media. If your site is built around topic clusters, your visual strategy should align with that structure as well.
A strategic approach to SEO content planning makes it easier to decide which posts deserve custom diagrams, process shots, or high-quality hero images that support your search performance.
How to Build an Image Sitemap Step by Step
Here is the part that matters. If you follow these steps in order, the setup stays clean and useful.
1. Pick the Right Images for Indexation
Start with the main image for each post. That is usually the featured image, hero visual, or a strong original screenshot.
Skip decorative icons, tiny logos, and repeated thumbnails that do not help searchers.
2. Use Clean File Names Before You Upload
Rename files so they describe the image well. Using descriptive file names is a fundamental part of optimizing your images for search.
For example, how-to-start-a-blog-hero.webp is better than IMG_4817.jpg. Simple names help you stay organized, and they make later audits less painful.
3. Write Clear Alt Text
Alt text should describe what the image shows without stuffing the page with repetitive phrases. Search engines also look for alt tags to understand the context of your media.
If the image is a screenshot of a settings screen, say that. If it is a chart, describe the data clearly. Keep your labeling honest and direct.
4. Make Sure the Image Lives at a Crawlable URL
The file should load without a login wall, a broken redirect, or a blocked path in robots.txt. If Google cannot reach the file, the sitemap entry will not help much.
That part trips up a lot of blogs.
5. Add the Image URL to Your Sitemap
If you already have an XML sitemap, add image entries there. Most WordPress SEO plugins (Yoast, Rank Math) build and update the image sitemap for you automatically, so check whether yours already includes images before hand-rolling one.
The format is simple. Inside each page’s <url> entry, you add an <image:image> block with an <image:loc> tag pointing at the image URL, declaring the image namespace at the top. That <image:loc> is the only tag the sitemap needs: Google retired the old caption, title, license, and geo tags in 2022, so the sitemap now does one job, telling Google where the image lives. You can list up to 1,000 images per page.
<urlset xmlns="http://www.sitemaps.org/schemas/sitemap/0.9"
    xmlns:image="http://www.google.com/schemas/sitemap-image/1.1">
  <url>
    <loc>https://example.com/how-to-start-a-blog/</loc>
    <image:image>
      <image:loc>https://example.com/images/how-to-start-a-blog-hero.webp</image:loc>
    </image:image>
  </url>
</urlset>
If your site is huge, a separate image sitemap file can make sense, but most blogs can keep it inside the main XML sitemap.
6. Submit the Sitemap in Google Search Console
After the file is live, head over to Google Search Console to submit it so the search engine knows where to look. Then give it time to crawl.
Do not panic if you do not see instant results. Sitemap work is more like watering a plant than flipping a switch.
7. Keep It Updated When Posts Change
New post? Add the image. Old hero image replaced? Update the sitemap. Deleted page? Remove the dead reference.
A stale sitemap is worse than no sitemap at all.
A clean image sitemap is not a pile of random entries. It is a short, accurate map that points Google toward your best visuals, nothing more.
Image Sitemap SEO Details That Still Matter in 2026
The small technical details often decide whether your strategy succeeds. While file names, alt text, and crawl access are foundational, your approach to image metadata and technical performance is just as critical.
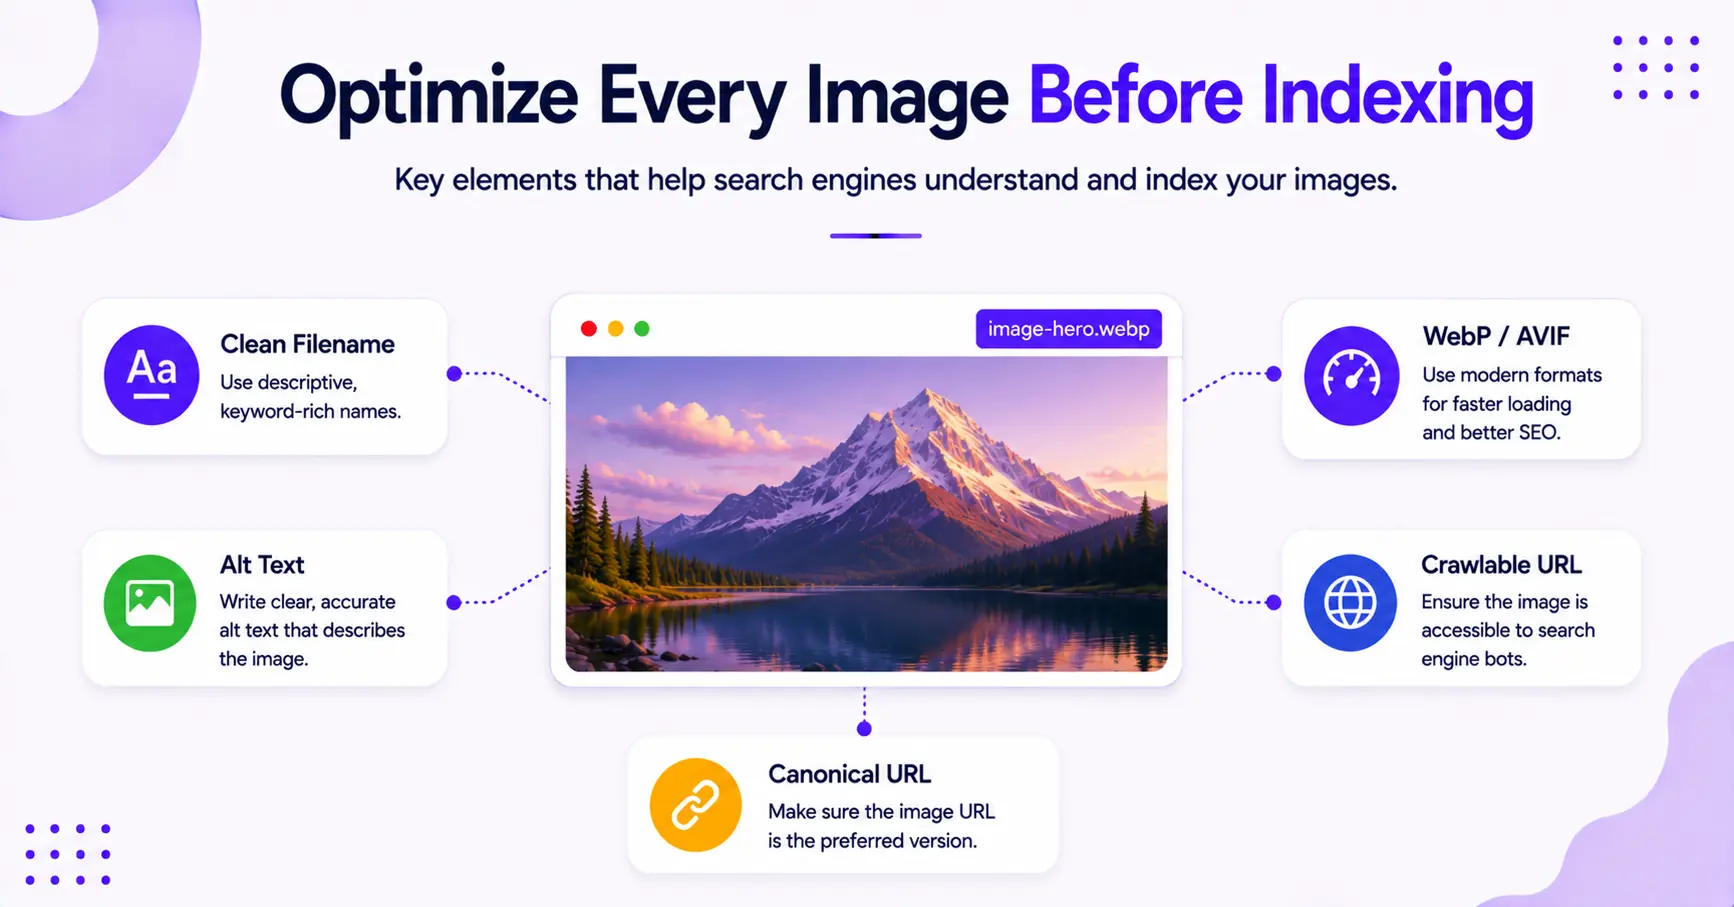
Keep one thing straight: the sitemap itself carries only the image URL, not descriptions. The context Google uses to understand an image comes from the page, through descriptive alt text, a clear filename, and the surrounding copy. That is where the understanding happens, not in the sitemap.
Use the largest relevant version of the image you want indexed. This does not mean uploading bloated files. It means selecting the version that provides the most value to the searcher.
Google indexes all the common formats (JPEG, PNG, WebP, SVG, AVIF, and GIF). WebP is a reliable default, and AVIF compresses even smaller, so use whichever your stack serves cleanly.
Because mobile-first indexing is the standard, load speed is a top priority. You should compress images to maintain high quality without sacrificing performance, and consider using a content delivery network to serve these files efficiently.
If Google can’t fetch the image URL, the entry in your image sitemap is just a note in a notebook.
Keep an eye on these technical points as well:
- Ensure your robots.txt file does not block important image paths from being crawled.
- Avoid redirect chains on image URLs, as these can slow down discovery.
- Use the canonical URL for the image file to avoid duplicate indexing.
- Do not list every tiny icon or variant of the same image.
- Give Google context on the page itself (alt text, filename, captions), since the sitemap only passes the image URL.
- Keep images tied to pages that actually provide value to your readers.
Ultimately, image sitemap SEO works best when the page itself is solid. If the post is thin, confusing, or off-topic, the sitemap will not save it.
A well-optimized image can help with discovery, but it cannot fix weak or irrelevant content.
How to Check Whether It Is Working
Once the new image sitemap is live, your job is to watch for signs that search engine crawlers are reading it. Google Search Console is the primary tool to check your status.
Look at the sitemap status first. If Google accepts the file, that is a positive indicator.
Then, inspect a live page and confirm that the image is visible in the rendered HTML. If the image only appears in a way that Google cannot access, you have a problem occurring upstream.
You should also monitor your image search results over time. Do not expect a sudden spike in traffic overnight.
Image discovery often builds slowly, especially on newer blogs or sites with low crawl frequency. As you track your progress, keep a close eye on your overall performance in Google Image Search to see how your visual assets are ranking.
A simple review cycle helps here:
- Check that the sitemap was submitted successfully in Google Search Console.
- Confirm the image URLs return a 200 status.
- Make sure the images appear clearly on the rendered page.
- Watch your performance in Google Image Search to identify trends.
- Update the sitemap whenever you publish new posts or modify existing images.
If the sitemap is accepted but you do not see improvements in your visibility, the issue is usually not the sitemap itself. It is often a matter of crawl access, weak image placement, or a page that does not provide enough value to warrant indexing.
Common Mistakes That Wreck Image Sitemap SEO
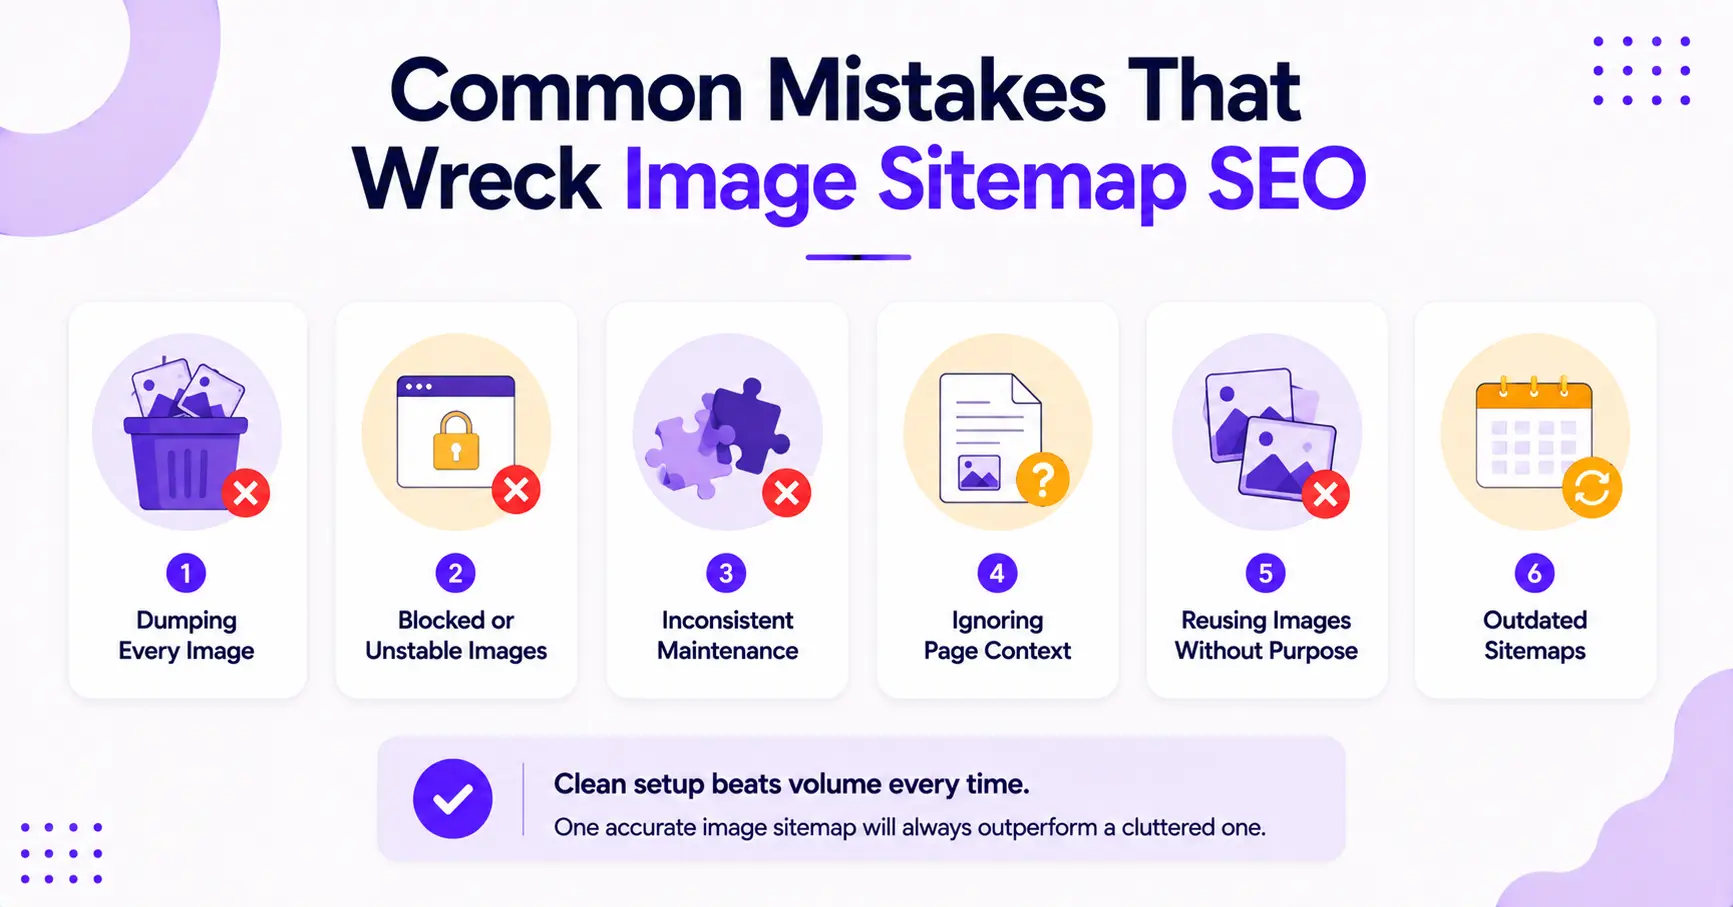
The biggest mistake is dumping in every image you can find. More entries do not mean better results; instead, they often create unnecessary noise.
If you are struggling with indexing issues, it is often because your sitemap is cluttered with irrelevant media that confuses search engines.
Another common miss is listing images that are blocked or unstable. If your CMS changes file paths frequently, Google has to keep chasing moving targets, which delays your indexing progress.
While using a separate image sitemap is a strategic choice for many blogs, maintaining consistency is the only way to ensure those files are actually discovered.
Some blogs also forget the importance of page context. An image sitemap should point to visuals that belong to a specific post.
If the same file is reused everywhere without a clear fit, your signal becomes muddy, which can lead to further indexing issues.
Watch for these traps:
- Low-quality thumbnails instead of high-resolution main images
- Broken or redirected file URLs
- Duplicate images across many posts without a clear reason
- Improper lazy loading that prevents crawlers from ever discovering the image
- Sitemaps that are outdated or only refreshed once a year
A clean setup beats volume every time. One accurate image entry is always better than ten sloppy ones.
FAQs About Image Sitemap for SEO Blogs
A few questions that come up often:
Do I Need a Separate Image Sitemap?
No, most blogs do not need a separate image sitemap. Most blogs can simply include image data within the standard XML sitemap they already use for their posts.
You do not typically need a standalone image sitemap unless your site is exceptionally large or your image library requires a highly specific organizational structure.
How Many Images Should I Add Per Post?
You should start with the main featured image for the page. Beyond that, only include images that are central to your content, such as diagrams, screenshots, or instructional photos.
When adding them, the sitemap entry only needs the image location (the <image:loc> tag). The context that helps Google understand each image comes from its alt text and the surrounding page, not the sitemap.
Does Alt Text Still Matter If I Use an Image Sitemap?
Yes, alt text still matters if you use an image sitemap. While an image sitemap helps Google discover your media files, alt text provides the necessary context to explain what the image depicts.
Both elements work in tandem to improve your overall SEO performance and accessibility.
Will an Image Sitemap Improve Rankings Right Away?
No, an image sitemap will not improve rankings right away. While this technical SEO step helps search engines crawl and understand your visual content more efficiently, actual search performance still depends on page quality, image relevance, and how well your content aligns with user intent.
For additional visibility, consider implementing structured data, which serves as a complementary tool to help search engines interpret your visual assets.
What If My Blog Uses Lazy Loading?
Lazy loading can still work, but you should test your implementation carefully. Google needs to be able to access the actual image URL and render the file correctly.
The real fix is making sure the image URL appears in the page’s rendered HTML so Googlebot can reach it. The sitemap helps Google discover those images, but it works best alongside a crawlable URL, not as a substitute for one.
Final Thoughts on Image Sitemap for SEO
A good image sitemap is boring in the best way. It gives Google a clean path, says what matters, and stays out of the way.
That is the real win with image sitemap SEO. You are not trying to trick search engines. Instead, you are making your best images easy to find, easy to crawl, and easy to connect to the right post. By using an image sitemap, you ensure consistent indexing for your visual content, which provides the foundation for long-term growth.
If your file names are clean, your alt text is honest, and your sitemap stays current, you are already ahead of most blogs. That quiet setup does more than people think, especially when your strategy leads to higher visibility in Google Image Search.

Article by
RightBlogger Co-Founder, Andy Feliciotti builds websites and loves photography, making him a great guide to image SEO.


New:Site Agent
Automated SEO Blog Posts That Work
Try RightBlogger for free, we know you'll love it.
- Automated Content
- Blog Posts in One Click
- Unlimited Usage


Leave a comment
You must be logged in to comment.
Loading comments...