Best SEO Chrome Extensions for Bloggers Who Want Faster Wins
Detailed, RightBlogger, and Check My Links handle 80% of weekly SEO checks.


If you blog for search traffic, you already know the feeling: you’re writing, you’re researching, you’re editing, and then you lose 30 minutes to “quick” SEO checks. It’s like stopping mid-recipe to run to the store for one ingredient.
That’s where SEO Chrome extensions shine. They give you fast, in-the-moment insight while you browse Google, scan competitor posts, or proofread your own draft in WordPress. You get answers in seconds, not a full audit report.
One warning up front: extensions are great for quick checks (on-page, SERP overlays, broken links, redirects). They’re not a replacement for tools like Google Search Console, your analytics, or a full crawler. Think of them as your pocket flashlight, not your whole tool shed.
Below are 10 options, ranked, with what each is best for, plus a simple guide to picking a small stack and using it safely.
In a hurry? The 3-extension starter stack
If you only install three of these today, install Detailed (free on-page checks), RightBlogger (AI writing and SEO overviews while you edit), and Check My Links (broken-link scanner for refresh runs). Those three cover ~80% of what a working blogger actually needs from an extension. Everything else on the list is for specific edge cases. Add more only when you can name the friction it removes.
1. Detailed SEO Extension (best for fast on-page checks on any page)

Free. If you want one extension that instantly tells you what’s happening on a page, Detailed is hard to beat. It’s built for quick scanning, so you can stop guessing and start fixing.
In a few clicks, you can check things you’d normally hunt for in page source or dev tools: the title tag and meta description (including length issues), heading structure (H1, H2, H3), canonical URL, and common indexing hints. You can also spot robots-related clues (like meta robots directives), see whether schema appears to be present, and review internal and external links without manual scrolling. It’s also a fast way to confirm author schema is firing the way you intended.
It’s especially useful right before you publish. You can open your draft, run the check, and catch the boring mistakes that quietly hurt rankings, like missing H1s, multiple H1s, a canonical pointing somewhere odd, or a meta description that’s so long it gets chopped off.
You can also use it for competitor “why are they ranking?” checks. Detailed has been widely adopted, and recent public data shows a large user base and very high ratings (at the time of writing, it’s reported around 500,000+ users and roughly a 4.9 rating). That popularity matters because it usually means the extension is actively maintained.
Here’s a mini workflow you can reuse anytime:
- Search your main keyword in Google.
- Open the top 3 results in new tabs.
- On each page, use Detailed to compare titles, H1s, and any visible schema signals.
- Notice patterns (how-to format, list format, freshness cues, FAQ sections).
- Adjust your draft’s title, headings, and snippet text to match intent, not to copy wording.
2. RightBlogger Chrome Extension (best for turning ideas into publish-ready SEO content faster)
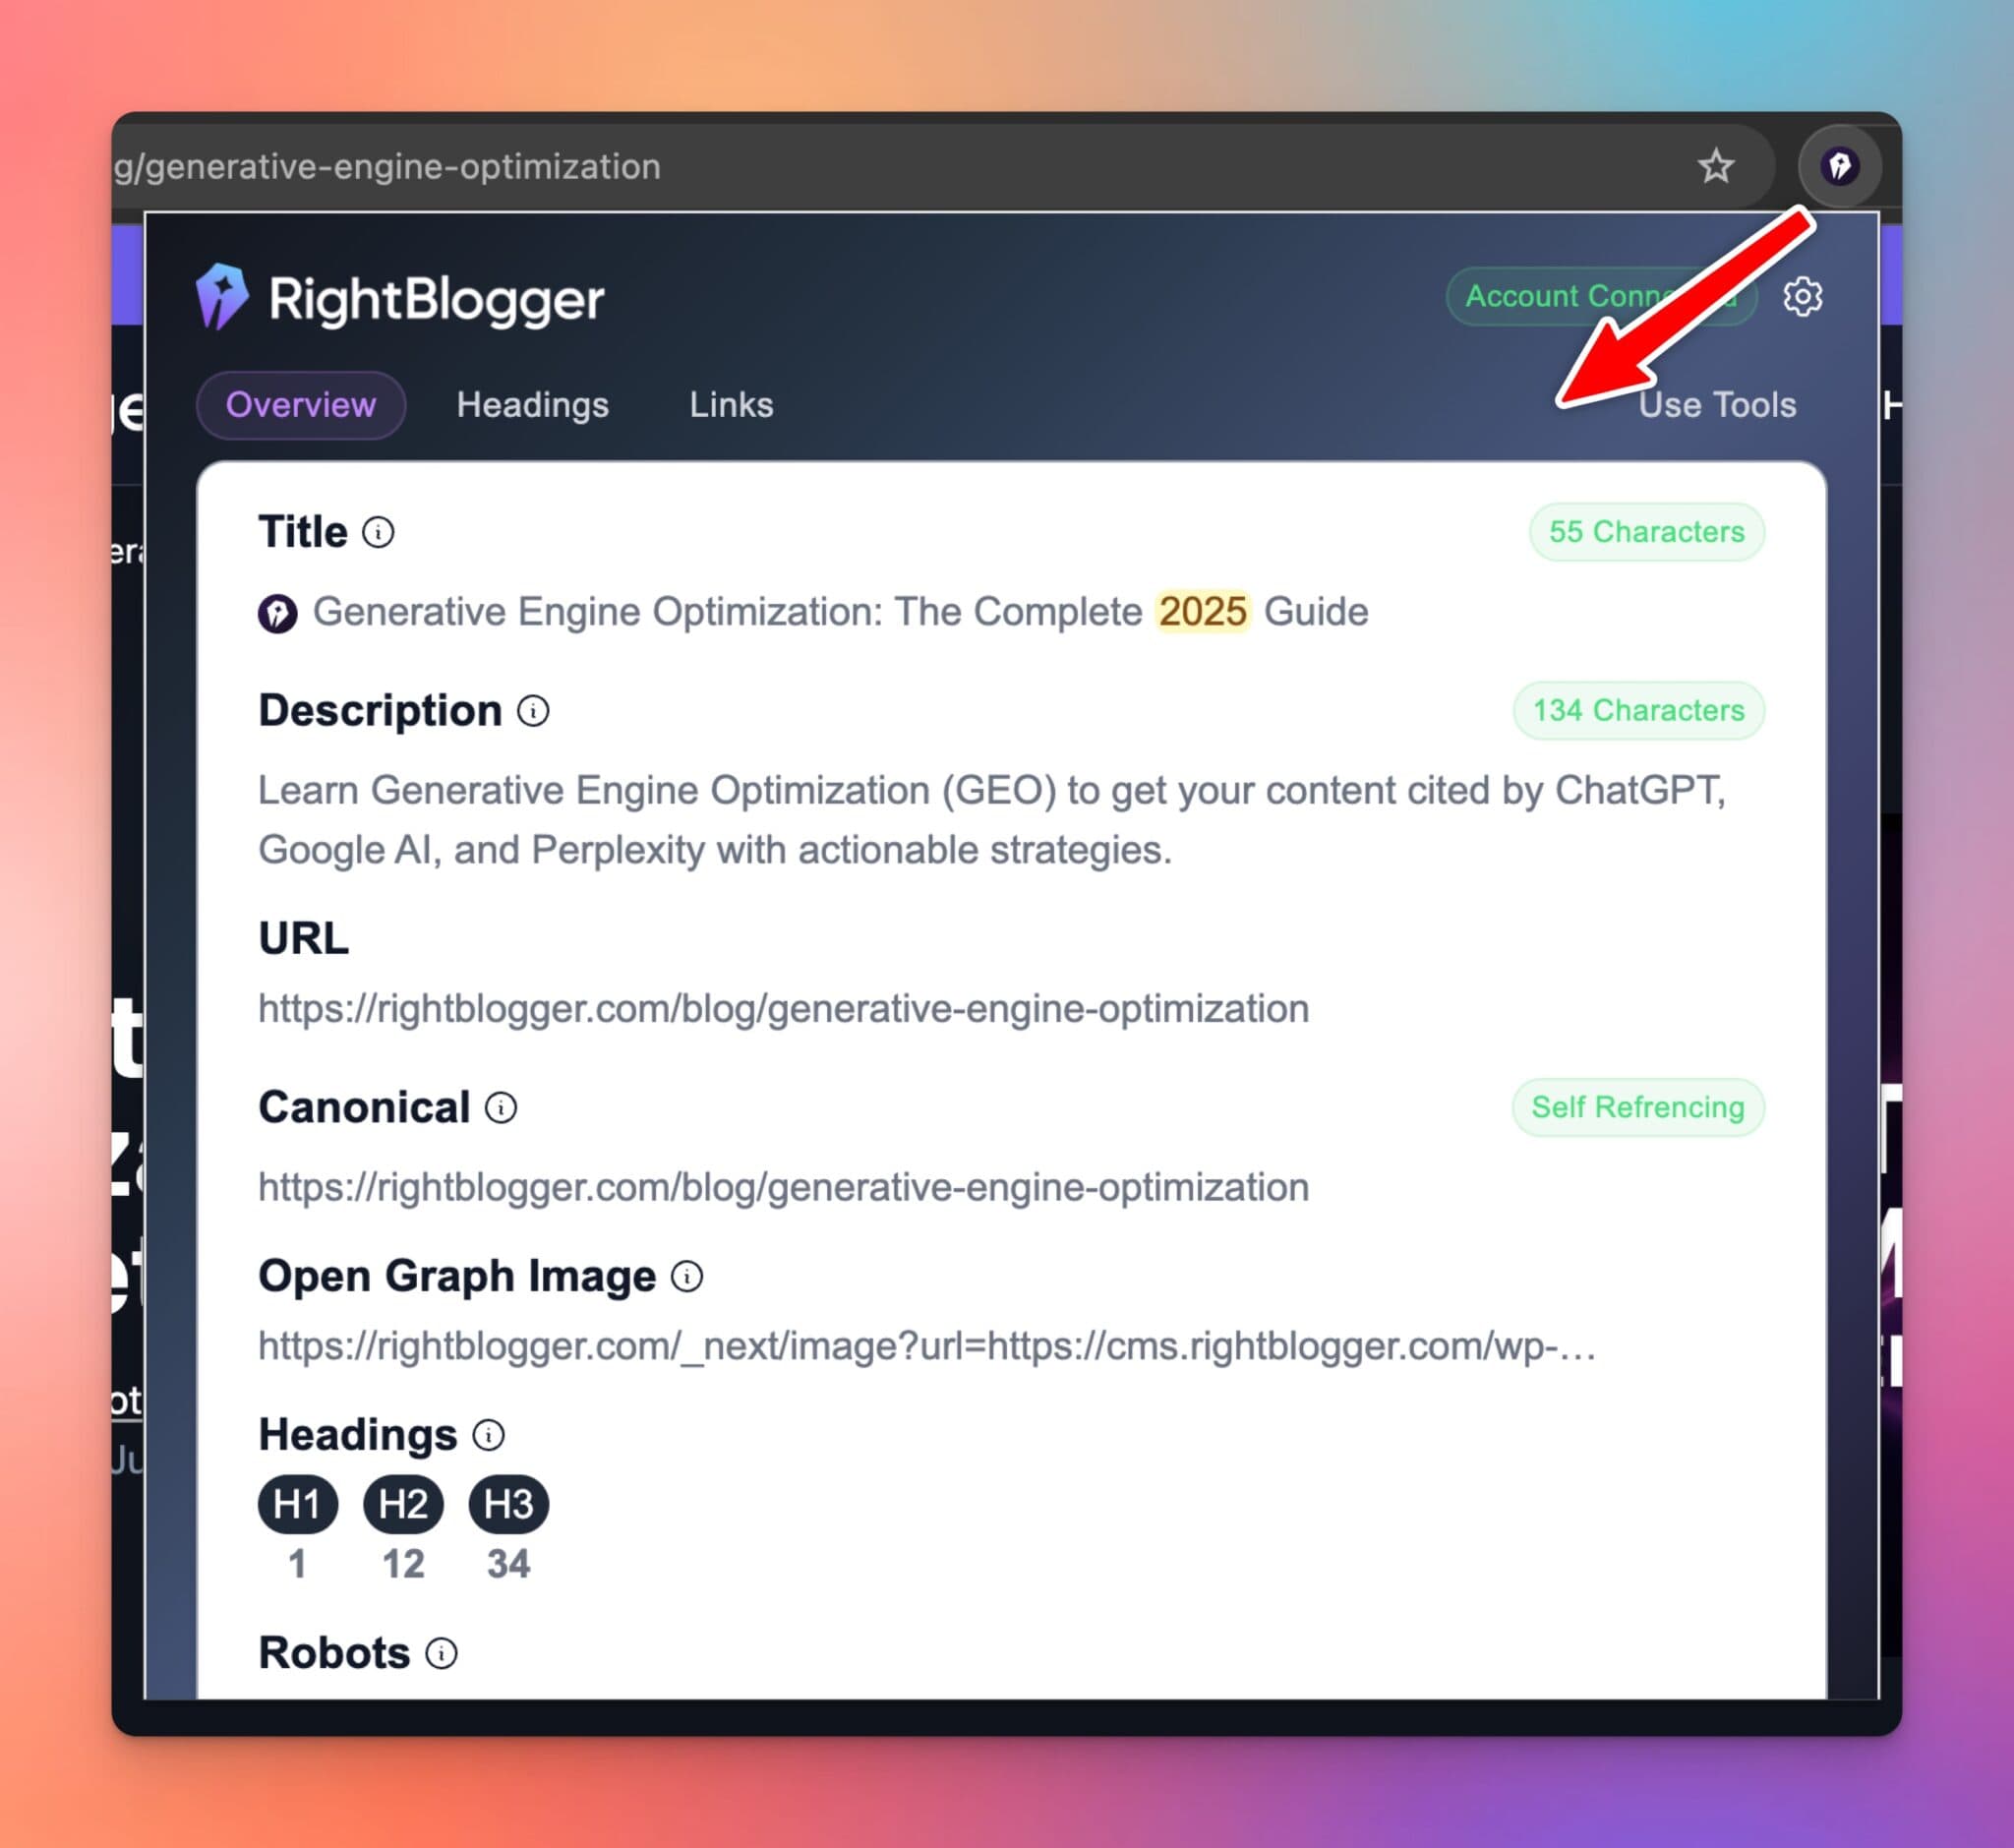
Free with a RightBlogger account. When you’re tired of copying and pasting between tabs, a writing-focused extension can feel like a relief. The RightBlogger Chrome Extension is built to help you write and edit where you already work, so you can go from rough notes to a clean draft without breaking your flow.
It also includes an SEO overview of pages, so you can quickly see the meta title, meta description, Open Graph image, and other essential info in case a page is missing it.
Beyond the SEO overview, it has many AI features: you can tighten paragraphs, rewrite clunky lines, expand thin sections, and keep momentum during research. In blogger terms, it helps you do the hardest part more often, which is starting and finishing.
3. Keyword Surfer (best free keyword ideas directly inside Google search)

Free. Keyword Surfer adds keyword data directly to Google search results, which is exactly where you’re already deciding what to write. You’ll typically see search volume estimates, related keyword suggestions, and extra context that can help you choose a direction fast.
The key word is estimates. For many terms, the numbers won’t match what you see in paid tools. That’s normal. The value is speed: you can spot which ideas likely have demand and which ones are probably too small to prioritize. For a more thorough comparison, see our roundup of free keyword research tools.
A practical blogging tip: use Surfer to pick one main keyword, then pick 2 to 4 close variations you can use as H2 sections and a short FAQ near the end. That keeps your post focused, while still covering the language people actually type.
4. SEOquake (best all-in-one SEO snapshot when researching competitors)

Free. SEOquake is the “Swiss army knife” option. It can add SERP overlays, show on-page audits, highlight internal and external links, and run quick checks like keyword density. If you like having a lot of data in one place, it’s useful.
The downside is the same as the upside: it can feel busy. On some setups it can also slow down browsing, especially if you enable every feature. You’ll get a better experience if you turn off anything you don’t use.
A strong blogger use case: when you’re looking at page-one results, SEOquake can help you spot a weak result. If a ranking page has thin content, messy headings, or weak basic signals, you might have a real chance to beat it with a clearer, more helpful post.
5. Ahrefs SEO Toolbar (best for quick authority and backlink context, if you already use Ahrefs)

Free with limited features, full functionality requires a paid Ahrefs account. If you pay for Ahrefs, their toolbar becomes a fast “sanity check” tool during research. You can glance at authority-style metrics, backlink context, and other competitive signals without opening a full report every time.
Without an Ahrefs account, you’ll still get a limited view, but most of the helpful depth is behind a login. That’s not a bad thing, it just means this extension works best as a companion to the Ahrefs platform.
For blogger workflows, it’s great for two moments: checking how strong the top-ranking sites are before you commit to a keyword, and evaluating link targets when you’re doing outreach.
6. MozBar (best for fast DA/PA checks and simple link signals)

Free, with paid upgrade for advanced metrics. MozBar is a classic for quick comparisons. If you’re scanning the SERP and you want a rough sense of authority, it gives you an easy signal to compare one result to another.
Treat metrics like DA and PA as a weather report, not a law. If you obsess over a single number, you’ll make bad decisions. But if you use it to avoid impossible fights (or to spot a low-authority page ranking well), it’s useful.
Expect a bit of setup. MozBar often works best when you’re signed in and your settings are dialed in.
7. Check My Links (best for broken link checks while editing)

Free. Broken links make a post feel neglected. They also waste a reader’s time, and they can weaken your internal linking structure if you’re pointing to pages that no longer exist.
Check My Links is simple: it scans a page and flags links that work and links that don’t. Bloggers love it during updates because you can run it once and instantly see what needs fixing.
Tip: run it before you refresh and republish an older post. Fixing broken links is one of the fastest “cleanup wins” you can get, and it’s a habit our guide to avoiding common blogging mistakes recommends building into every content audit.
8. Redirect Path (best for spotting redirect chains and indexability traps)

Free. Redirects aren’t always bad, but chains and loops are. Redirect Path shows you what’s happening when you click a URL and where it really ends up.
You don’t need to be a technical SEO to use it. The basics are enough:
200means the page loaded normally.301means a permanent redirect.302means a temporary redirect.404means the page wasn’t found.
This matters when you change slugs, move to HTTPS, update affiliate links, or fix “Page not found” issues after a site redesign. If your internal links go through three redirects before landing, you’ve got easy cleanup work.
9. NoFollow (best for quickly seeing nofollow vs follow links on a page)
Free. NoFollow is a quick visual tool that highlights link attributes so you can spot nofollow versus follow links without guessing.
Bloggers care for a few reasons: sponsored posts, affiliate links, and making sure internal links aren’t accidentally set to nofollow. It’s also handy when you’re evaluating whether a site tends to link out normally or nofollows everything.
It won’t give you deep analysis, but it does one job fast, which is exactly what an extension should do.
10. Wayback Machine (best for SEO research on competitor history)
Free. The Wayback Machine extension doesn’t get listed on most SEO extension lists, but it’s quietly one of the most useful for actual research. It connects directly to the Internet Archive and lets you do three SEO-specific things in one click:
- See what a competitor’s top page looked like a year ago, so you can spot what changed when their traffic moved.
- Recover the content of a 404 page (yours or a competitor’s) instead of guessing what was there.
- Confirm a historical claim before you cite it (date a feature launched, when a competitor first published a topic, and so on).
It’s not a daily-use tool. But the moments when you do need it (especially during a refresh or competitive analysis), it saves an embarrassing amount of time.
How to choose the right SEO extensions for your blog goals
You don’t need 15 extensions. If anything, that turns Chrome into a junk drawer. A better target is 3 to 5 that match how you actually blog.
Start by naming your bottleneck. Are you stuck picking topics? Are you slow at on-page checks? Do you update old posts often? Are you doing outreach?
Also watch for overlap. Many extensions show similar metrics. If two tools do the same thing, keep the one you actually enjoy using. The “best” extension is the one you’ll run every week without groaning.
Match each extension to a real workflow (research, write, publish, refresh)
Here’s a simple mapping you can follow without overthinking it:
- Research: Keyword Surfer, SEOquake, Wayback Machine
- Write: RightBlogger
- Publish QA: RightBlogger, Detailed
- Refresh old posts: Check My Links, Wayback Machine
- Technical fixes: Redirect Path
- Link review and outreach checks: NoFollow, MozBar (or Ahrefs if you use it)
If you mostly write new posts, you’ll live in research and publish QA tools. If you mostly update old content, broken links and redirects will pay off faster.
Know the trade-offs: data accuracy, paywalls, and browser speed
Free tools often give estimates, not exact numbers. That’s fine for choosing topics and doing quick checks. Paid accounts give you deeper data, like fuller backlink context or richer competitive metrics.
Browser performance matters more than people admit. Each Chrome extension typically holds 10-50 MB of RAM resident even when you’re not actively using it, and SEO extensions in particular tend to inject scripts on every page you visit. Running ten of them at once can easily eat 300+ MB of memory and add 100-300ms to every page load. If Chrome starts feeling sluggish, audit your extensions and uninstall (or disable) anything you haven’t touched in two weeks.
A clean approach is best: start with free tools, publish for a week, then add a paid tool only when you can clearly name what it will save you.
Will these work in Firefox, Edge, or Brave?
Most of them, yes. Edge and Brave both run Chrome extensions natively (Brave is built on Chromium, and Edge has a built-in “Allow extensions from other stores” toggle). Firefox has its own add-on store, and most major SEO extensions on this list (Detailed, Keyword Surfer, SEOquake, MozBar, Wayback Machine) have Firefox versions too. Always install from the official browser store, not a third-party download site.
Use your extensions like a pro (simple routines that save hours)
Extensions save the most time when you use them the same way every time. If you only open them “when you remember,” you’ll miss the easy wins.
Build two routines: one for publishing, one for research. Keep them short. You’re trying to avoid rabbit holes, not create a new hobby.
A 10-minute pre-publish SEO checklist you can run on every post
- Check title and meta description with RightBlogger Chrome Extension (or use our free SERP Preview tool to see how the snippet will render).
- Scan headings (H1 to H3) with RightBlogger or Detailed and confirm the structure reads like a clean outline.
- Check basic indexability hints with Detailed (canonicals, obvious robots signals).
- Look for broken links with Check My Links and fix 404s before readers find them.
- Add internal links on purpose, pointing readers to your best related posts, not random ones.
- Spot-check images and confirm you’ve added alt text where it helps explain the image.
- Confirm affiliate and sponsored links with NoFollow to catch links that should be marked properly.
Ten minutes here can save you months of “why didn’t this post move?” later.
A quick competitor scan you can do before you write your next post
Start in the SERP. Open the top results, then use Detailed to compare intent signals like titles, headings, and whether they include FAQ-style sections or schema.
Next, gauge difficulty. If you use MozBar or the Ahrefs toolbar, you can quickly see if you’re up against giant sites. If the SERP is full of heavyweights, you may want a longer-tail angle.
Then use Keyword Surfer to pull related terms and choose a small set of variations to cover naturally. If a top competitor’s traffic mysteriously dropped (or jumped), open their post in Wayback Machine to see what changed. Finally, build your outline and draft with RightBlogger so you move from research to writing without stalling.
What no SEO extension can actually do
Quick reality check before you build your stack. SEO extensions are excellent for in-the-moment, in-browser checks. They cannot:
- Track your rankings over time. That’s what Google Search Console (free) or a rank tracker is for.
- Run a full site crawl. That’s what Screaming Frog or Sitebulb is for.
- Monitor whether you’re getting cited by AI Overviews or ChatGPT. See our guide to finding AI Overview keywords in Search Console for the manual approach, or our roundup of paid LLM SEO tools if you want it automated.
- Tell you what content to write. That’s a content brief or an outline tool’s job.
- Generate or write the post for you. That’s where AI writing tools (like RightBlogger’s Article Writer) come in.
Treat extensions like a kitchen scale. Useful and constantly available, but you still need the rest of the kitchen.
Safety and privacy basics before you install any SEO extension
Extensions can be helpful, but they can also see a lot. Many request permission to read and change data on websites you visit. That’s normal for tools that analyze pages, but you should still be careful.
Install fewer tools, from known publishers, and keep your browser tidy. Your SEO workflow shouldn’t come with mystery access to everything you do online.
What permissions to watch for and how to reduce risk
Install from the Chrome Web Store, read recent reviews, and pay attention to what access the extension asks for. If Chrome lets you limit site access (for example, only on specific sites), use that setting.
Keep Chrome updated, remove extensions you don’t use, and avoid giving analytics or Search Console access unless you truly need that connection. If an extension needs deep account access just to show basic page data, skip it.
Conclusion
If you want a simple starter stack that fits most bloggers, install Detailed, RightBlogger, and Check My Links today. Add Keyword Surfer when you’re picking your next topic and Redirect Path if you change URLs often. That covers research, writing, on-page checks, and cleanup without turning Chrome into a junk drawer.
Pick 3 today, use them for one week, and notice what actually saves you time. Then keep the winners and delete the rest. Your best SEO system is the one you’ll repeat, and consistency is where the real traffic gains come from.
Complete Blog Automation in Minutes
Join 48,879+ marketing agencies, pro creators, and marketing teams in using RightBlogger’s powerful blog automation system. You’ll drive more traffic from Google and ChatGPT with our AEO & SEO automated publishing. Plus, you’ll access our library of 80+ standalone tools, online courses, a private community, and more.

Article by
RightBlogger Co-Founder, Andy Feliciotti focuses on web development and shares travel and photography adventures online.


New:Site Agent
Automated SEO Blog Posts That Work
Try RightBlogger for free, we know you'll love it.
- Automated Content
- Blog Posts in One Click
- Unlimited Usage


Leave a comment
You must be logged in to comment.
Loading comments...