RightBlogger Tool Studio: Embeddable AI Tools & Lead Magnets
Build niche AI tools in minutes, then turn their results into email signup opportunities.


Screenshot of RightBlogger Tool Studio
What if you could create your own free tools that live directly on your website… giving you the ability to drive more SEO traffic, grow your email list, engage your audience in unique ways, and serve as your best new lead magnets… all at the same time? Well, do we have something special for you today.
🌟 Introducing RightBlogger Tool Studio: The easiest way for you to create embeddable tools that’ll drive more traffic & generate more leads from your website. Peep our announcement video for everything you need to know:

📺 Want the deeper training? Andy & I recorded a full session on the fundamentals of tool SEO, the strategy that brings us 1 million+ visitors to our websites each month. Watch it right here on YouTube 📺
Embeddable free tools are a huge disruptor for blogs and websites of all kinds. If you want more SEO traffic and more engaged subscribers for your email list, this is a mindblowingly powerful new marketing strategy to add to your arsenal.
Building tools used to be very technically complex. Not no mo. Now, making your own embeddable tools is super easy with the help of RightBlogger Tool Studio. Wanna ask questions or give us feedback? Join our Discord community.
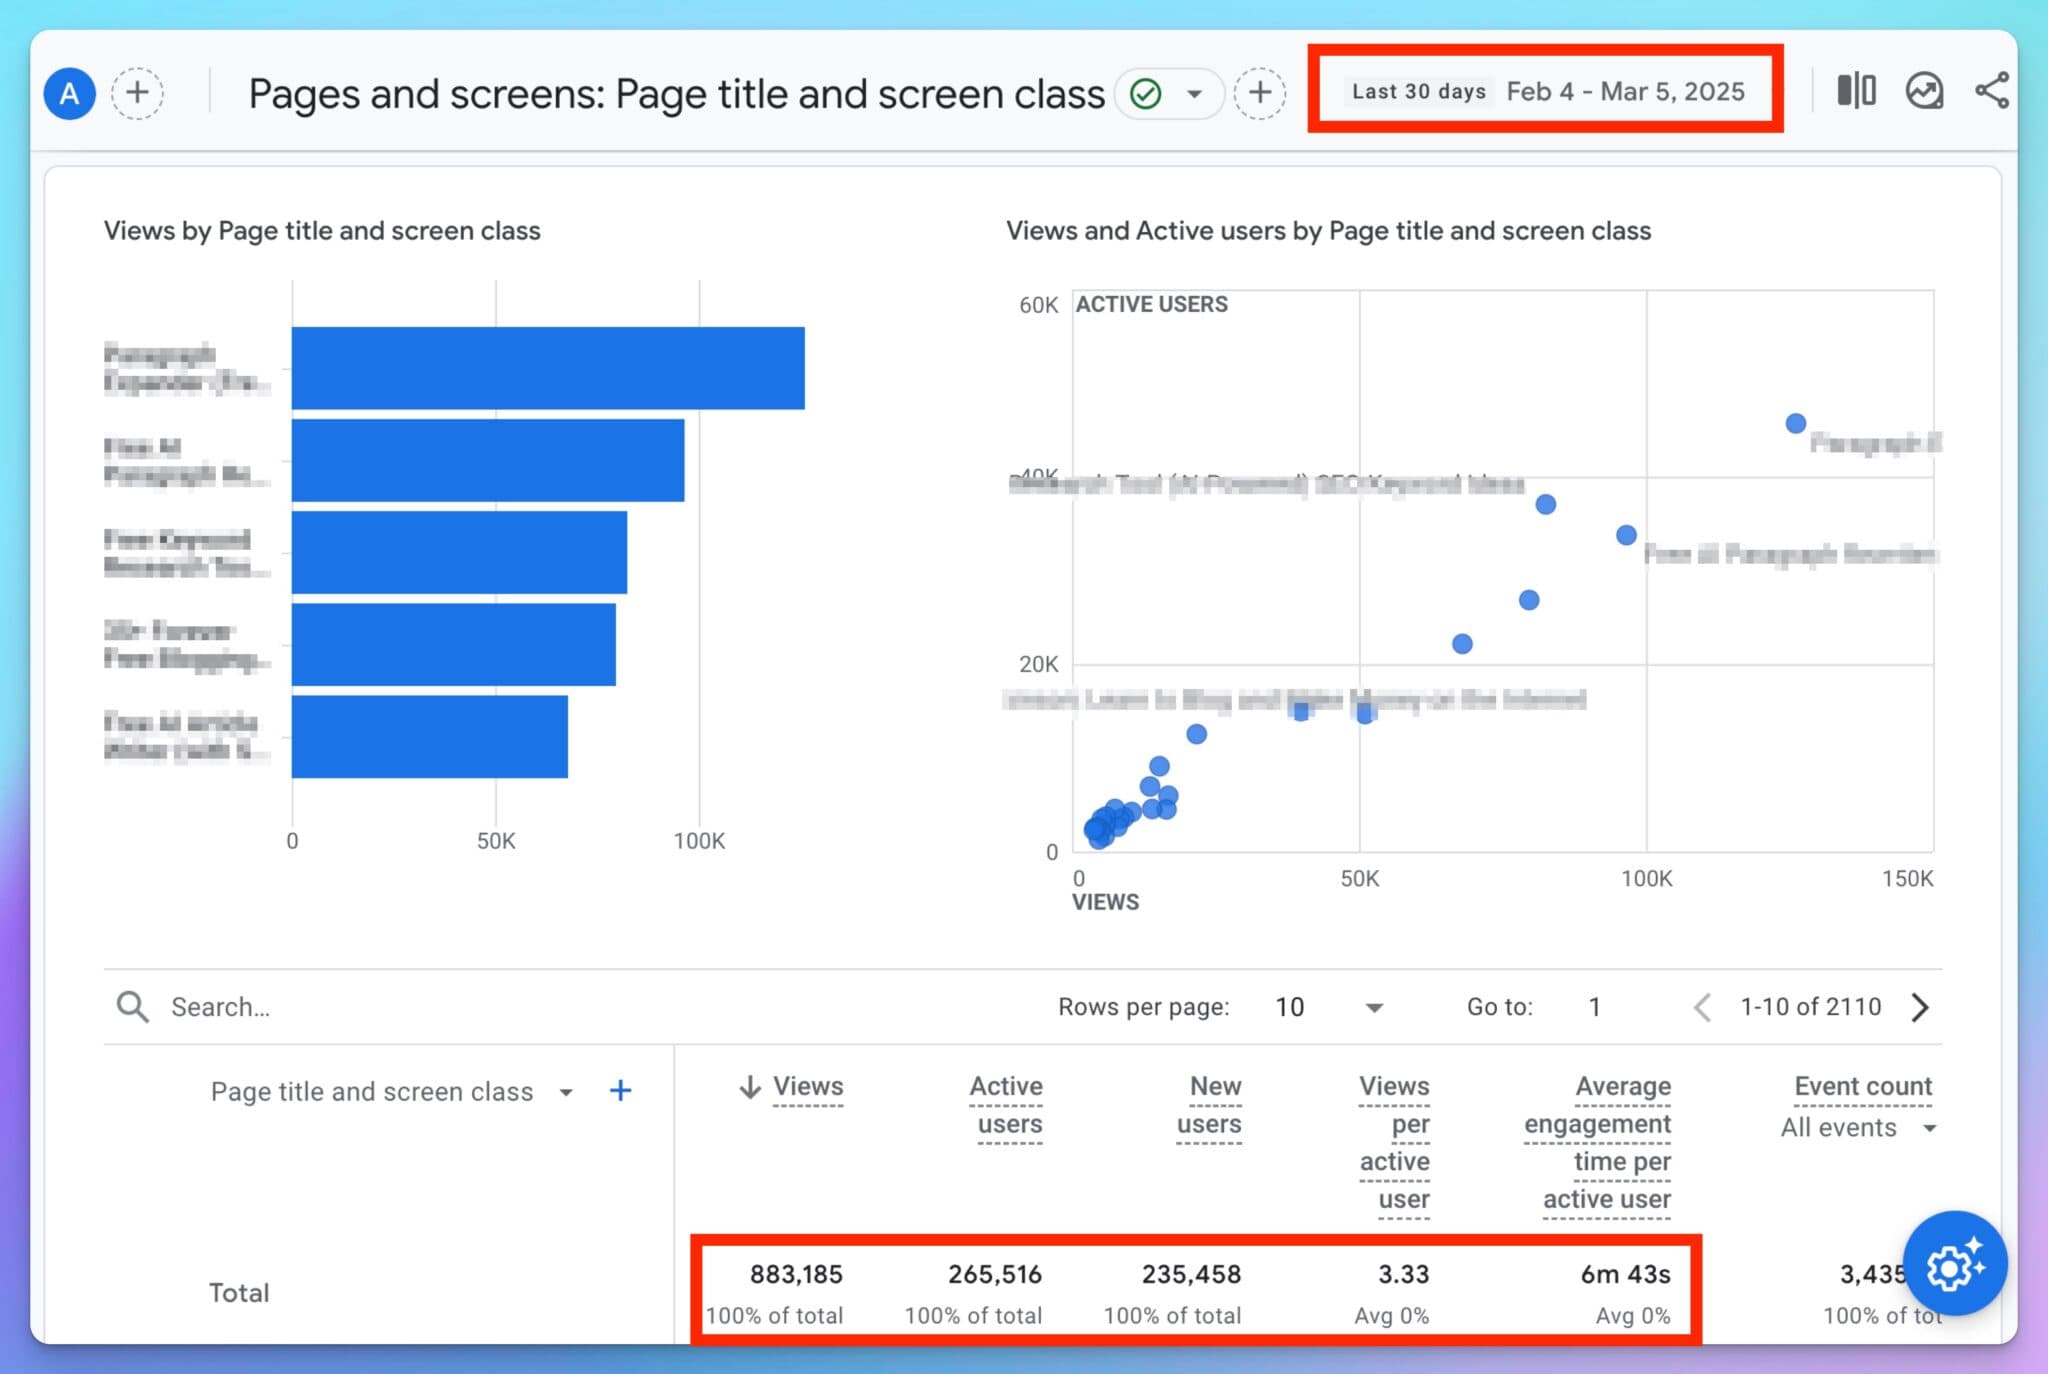
In the last 30 days alone, the free tools on just my blog were visited & used 883,185+ times… resulting in 1000s of new email subscribers and 100s of new customers for my businesses, all while delivering fun, useful experiences for my readers.
With free tools… you win. Your audience wins. The world wins. And beyond just the traffic & email signups, the free tools on my blog have attracted 100s of the best (free) high quality backlinks my blog’s ever received.
Here are the quick highlights of RightBlogger’s Tool Studio:
- What is Tool Studio? An easy way for you to quickly describe any tool you want to make for your website, customize the options, get an embed code, and go live with the free tool on your site in a matter of minutes.
- What can free tools do for my website? This is your way to drive SEO traffic to useful niche tools that educate & entertain your audience, creating opportunities to grow your email list with highly targeted visitors. Any problem your audience has, that can be solved with a free tool is an opportunity for you. The free tools you’ll quickly build inside Tool Studio & embed across your website, have the potential to directly grow your business. They’re also fantastic at attracting high authority backlinks.
- Who can create free tools inside Tool Studio? Tool Studio is included with every paid RightBlogger plan, starting at $59/mo on Solo (or save with annual billing). If it looks fun to you, come take it for a spin, you’ll love it.
- How many free tools can I create? Solo gets you 5 active embeddable tools, Pro bumps that up to 15, and Agency goes to 50. You can peep the details on pricing right here.
One of the best parts about free tools? People spend way more time using them than just reading blog posts or watching videos. Interactive content gives them instant value. Plus, you’ll get more traffic and leads to grow your business.
Wanna ask questions or give us direct feedback? Join our Discord community.
How to Make Embeddable AI Tools with Tool Studio: Step-by-Step Guide
Once you’re on any paid RightBlogger plan, you’ll get the keys to open Tool Studio. Once you’re in, it’ll look like this (minus the tools you see here inside my account):
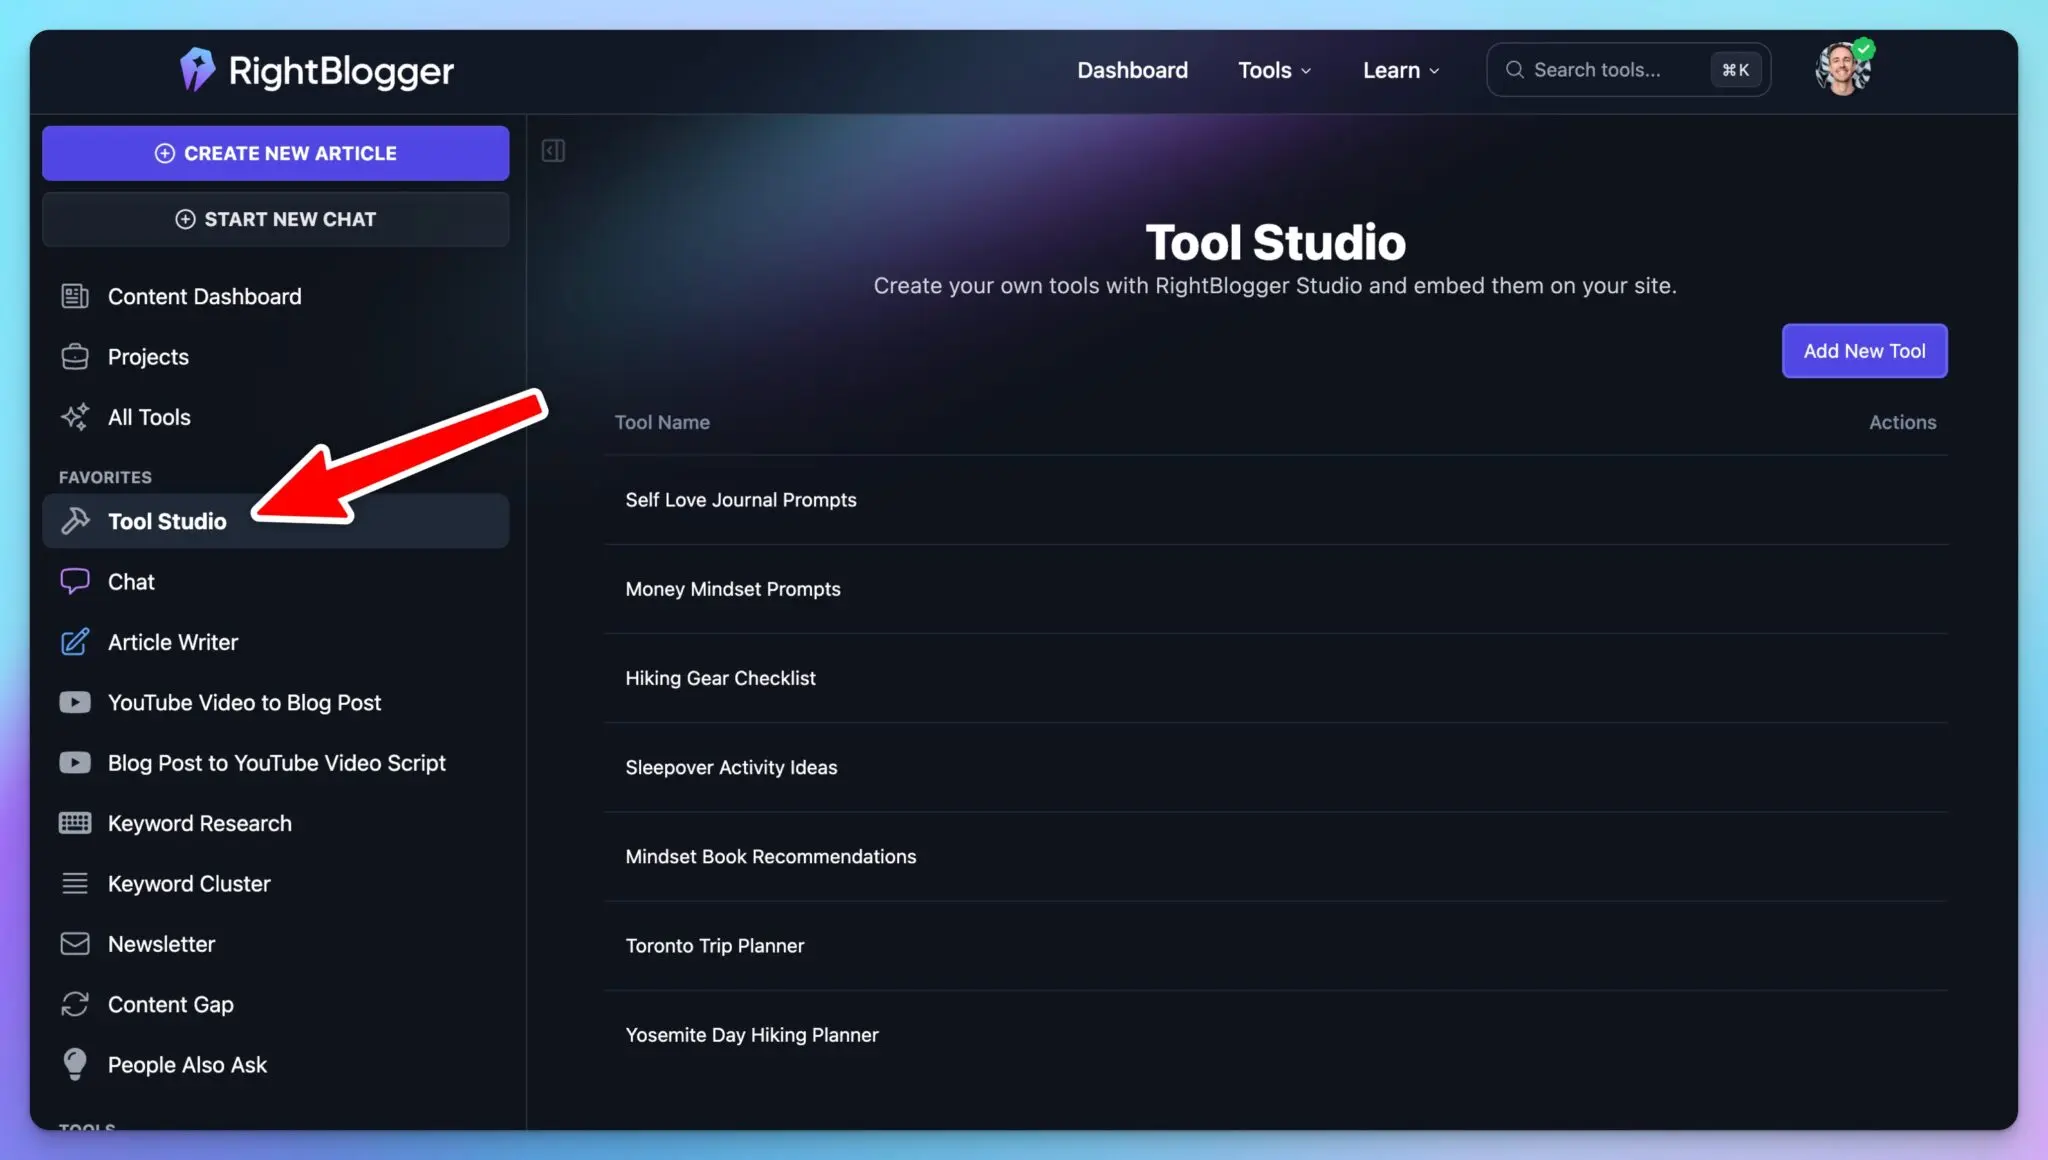
You’ll find Tool Studio in the left-hand tool menu, or you can always hit the search bar at the top of RightBlogger and type in ‘tool studio.’ Now, you’re in.
Step 1: Creating an Embeddable AI Tool
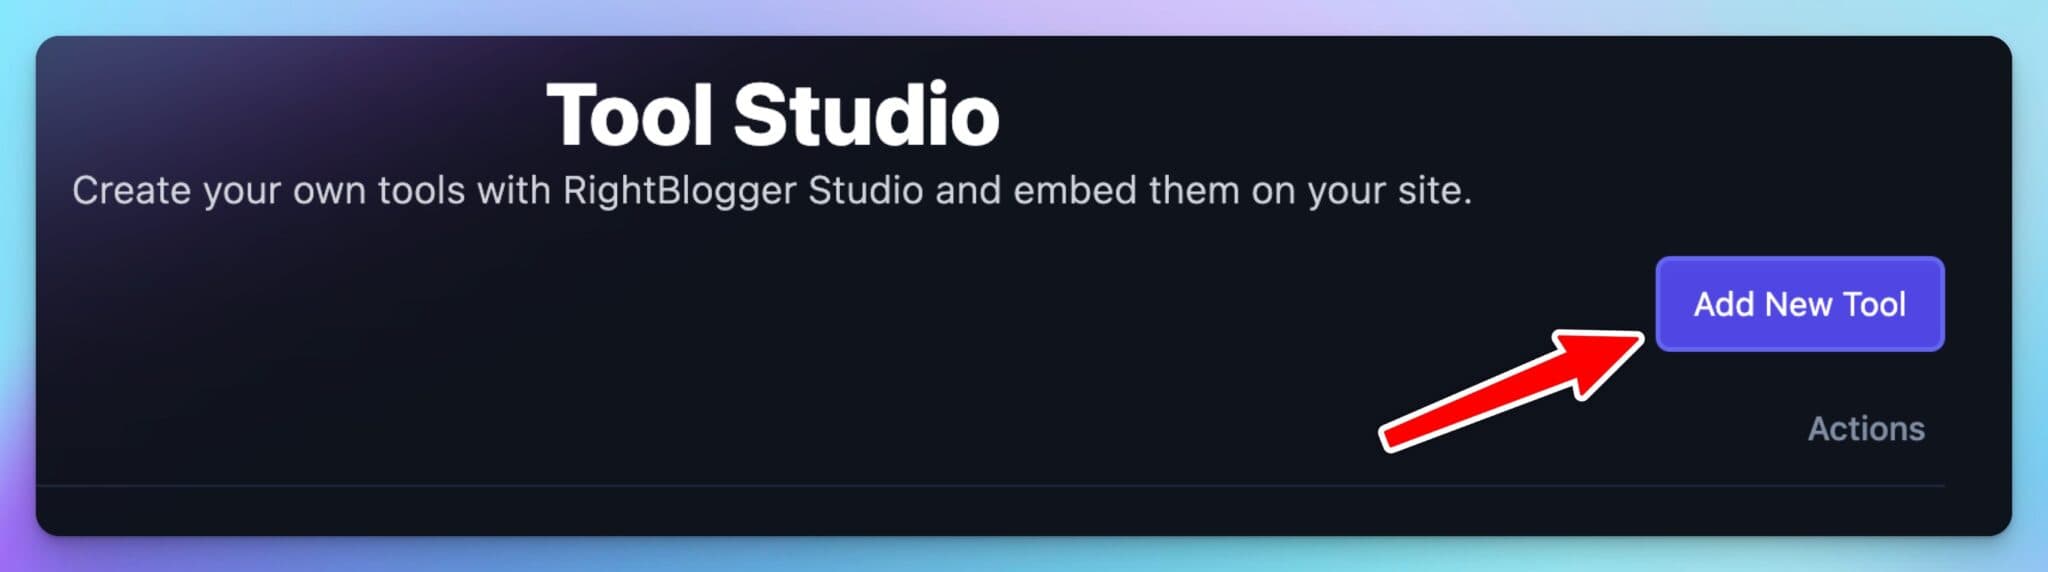
Click the “Add New Tool” button to begin making your first embeddable tool.
Don’t worry… we handle all the complex stuff for you. Next, you’ll wanna describe the tool you envision, with as much detail as possible.
Want an assist coming up with the right tool idea? We got you covered.
Tool Idea Generator: Get Embeddable Tool Ideas
Create custom embeddable tool ideas based on the topics you cover.
Still not sure which tool idea is right to hit the ground running with? Fear not.
You can start the creation process by generating example tool ideas that are related to the topics you’ve already created content about inside RightBlogger by clicking the ‘Generate New Example’ button right here (if you don’t like the first suggestion):
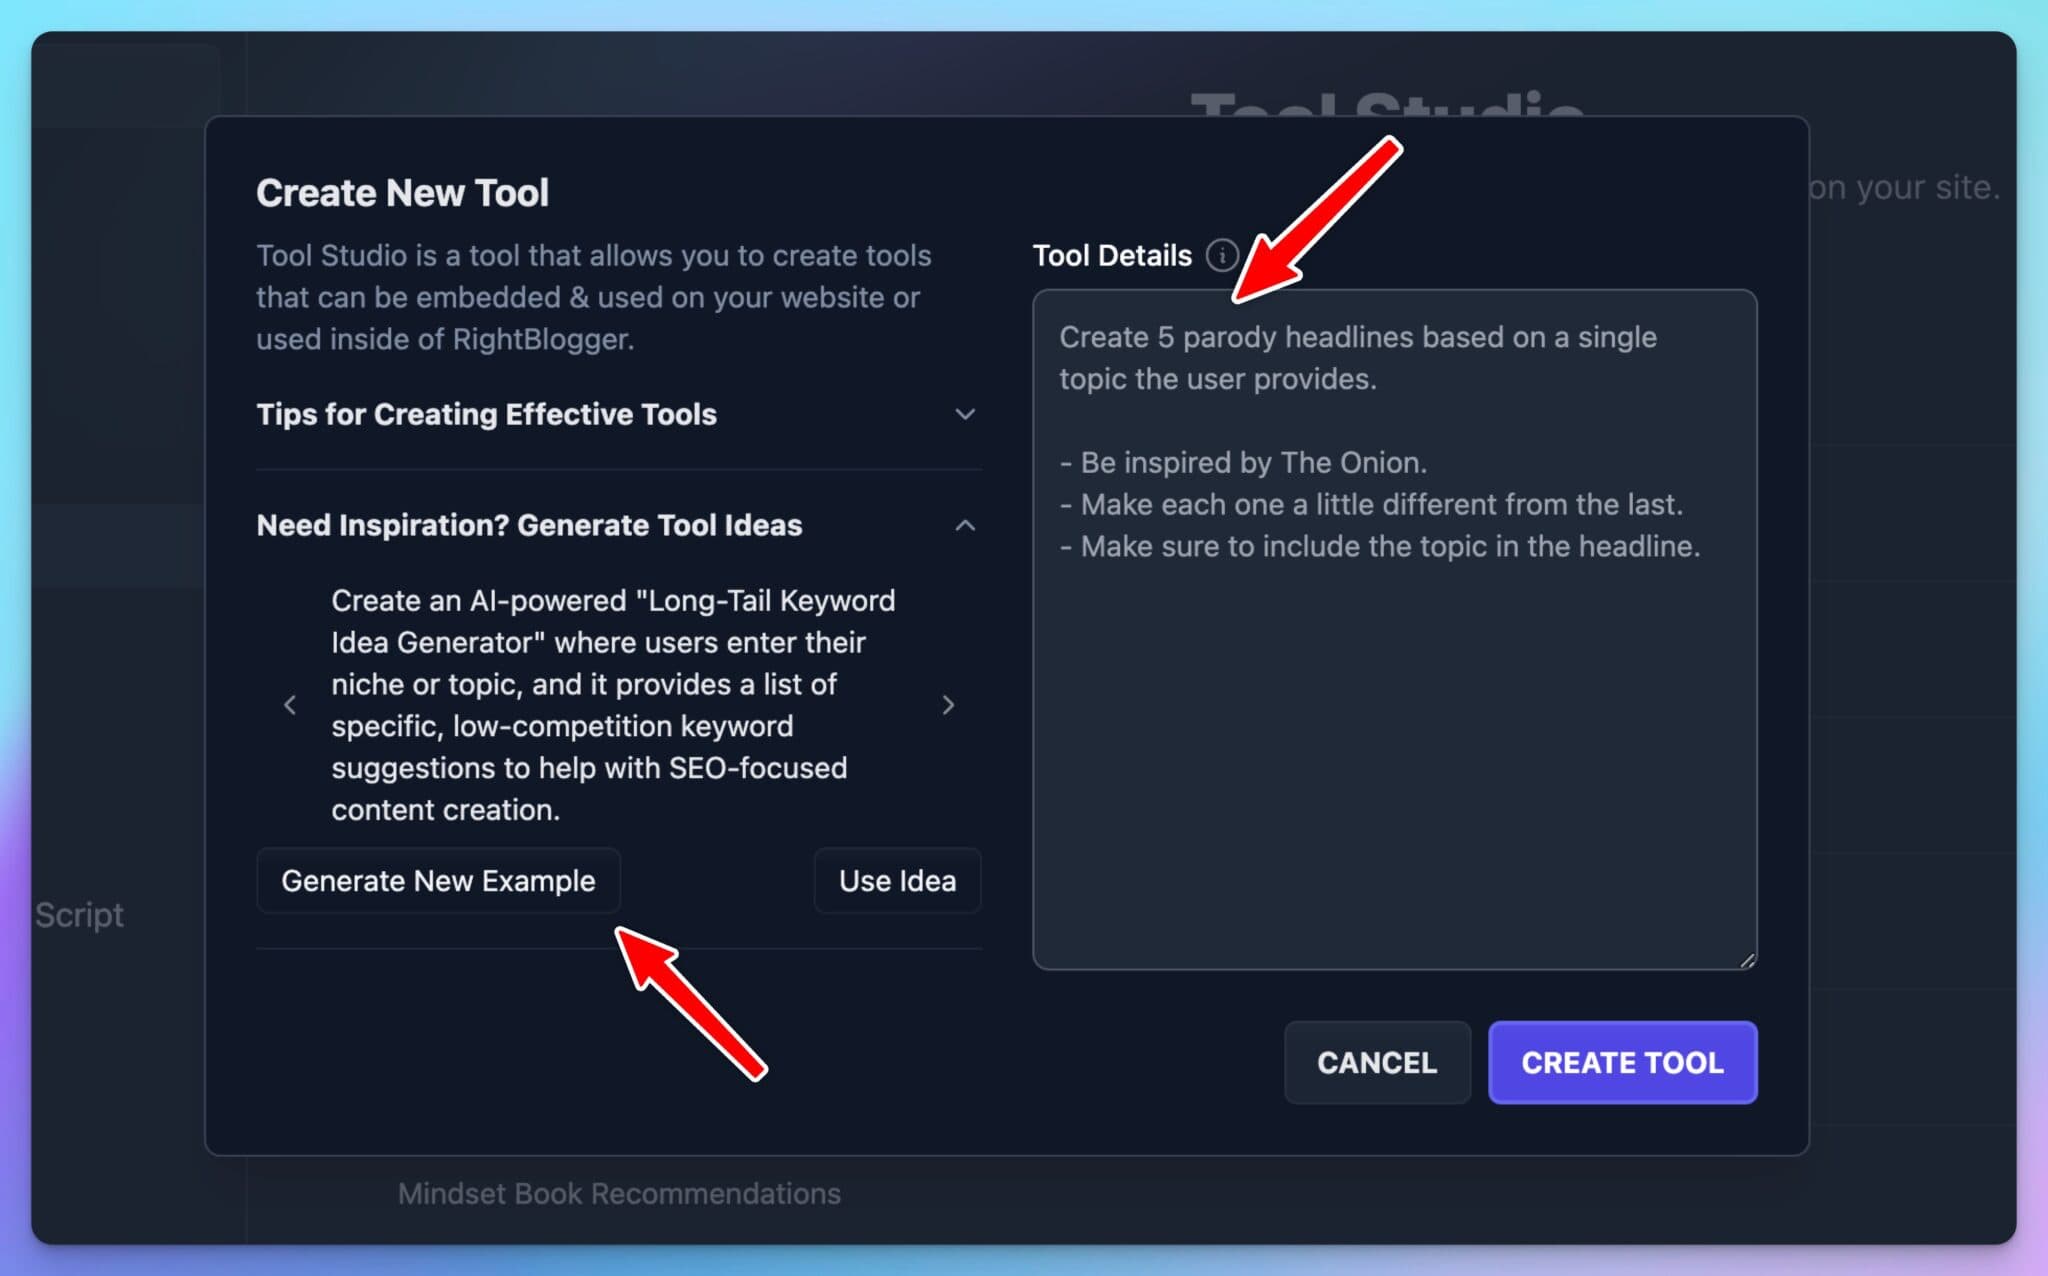
If you like an example tool idea, just click ‘Use Idea’ to pull that tool prompt over to the ‘Tool Details’ area where you’ll be able to make tweaks & customizations to it based on any preferences you have. Or you can start from scratch if you’ve got a vision.
Part of the fun in making your own embeddable tools is, well… having fun with the process, so if your first crack at a tool doesn’t nail your vision, head back to the drawing board with changes based on your first test.
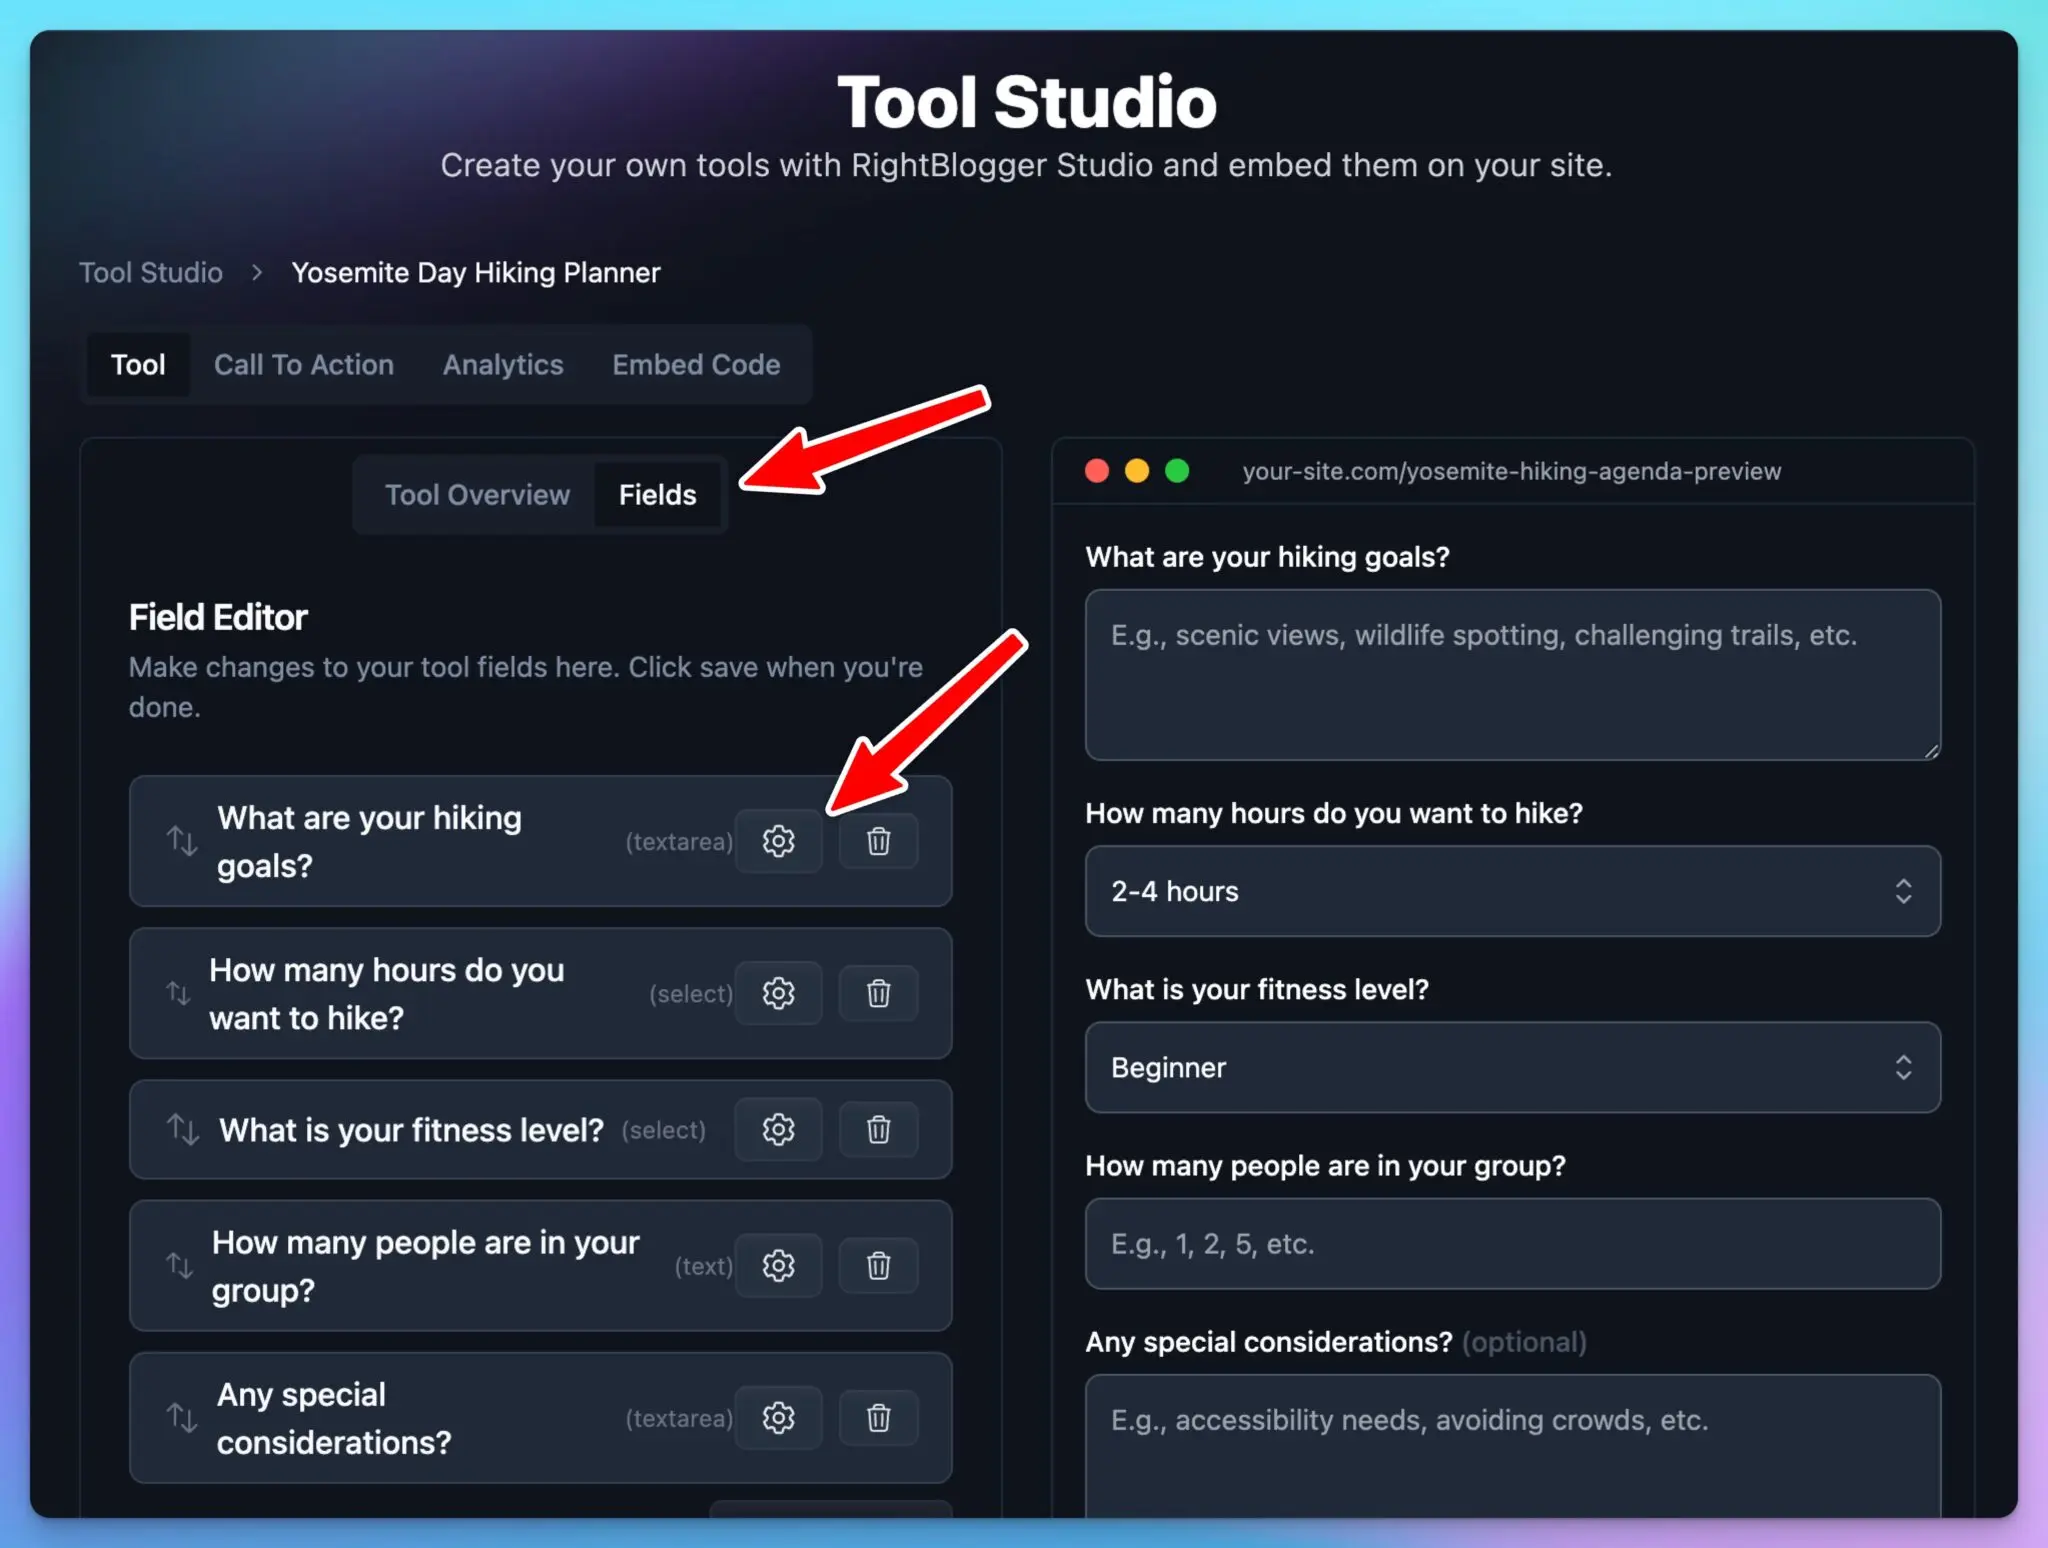
👋 Important Note: If you don’t like a tool you just created, you can make edits to the fields by clicking into the ‘Fields’ menu. Here, you’ll be able to tinker with the detailed settings for each element of your tool, reorder your fields, and fully customize the functionality of your tool.
Here are a few pointers for describing a tool that’ll help nail your vision:
- Details Matter: In plain speak, tell Tool Studio exactly what you want your tool to do. Be as specific as possible, aiming for at least around 2-3 sentences explaining the vision you have.
- Input and Output: On the input front, what information will the user need to provide in order for the tool to work with? Think about which pieces of information are going to be relevant for your reader to share, in order to get a valuable output on the other side. With the output, what kinds of results do you want the tool to generate for your reader? Will it be in the format of a list of ideas, a schedule, a table of results with specified columns?
- Additional Instructions: Any other specific instructions that’ll be useful for the AI to work with, in hopes of nailing your tool on the first pass? When possible, default to giving Tool Studio more detail, rather than less.
The more info you give Tool Studio, the better your tool will turn out.
Remember, at the beginning of the creation process, Tool Studio will provide example tool ideas based on your account’s usage inside RightBlogger. And if you’re feelin stuck, reach out to us for an assist to contact@rightblogger.com or join our Discord community.
Step 2: Customizing, Embedding & Using Your AI-Powered Tool
Once you’ve created your first tool, this is where the magic really happens.
Near the top, you’ll see a menu of tabs that includes the Tool Details, Call to Action, Analytics, and Embed Code.
The Tool Details Tab
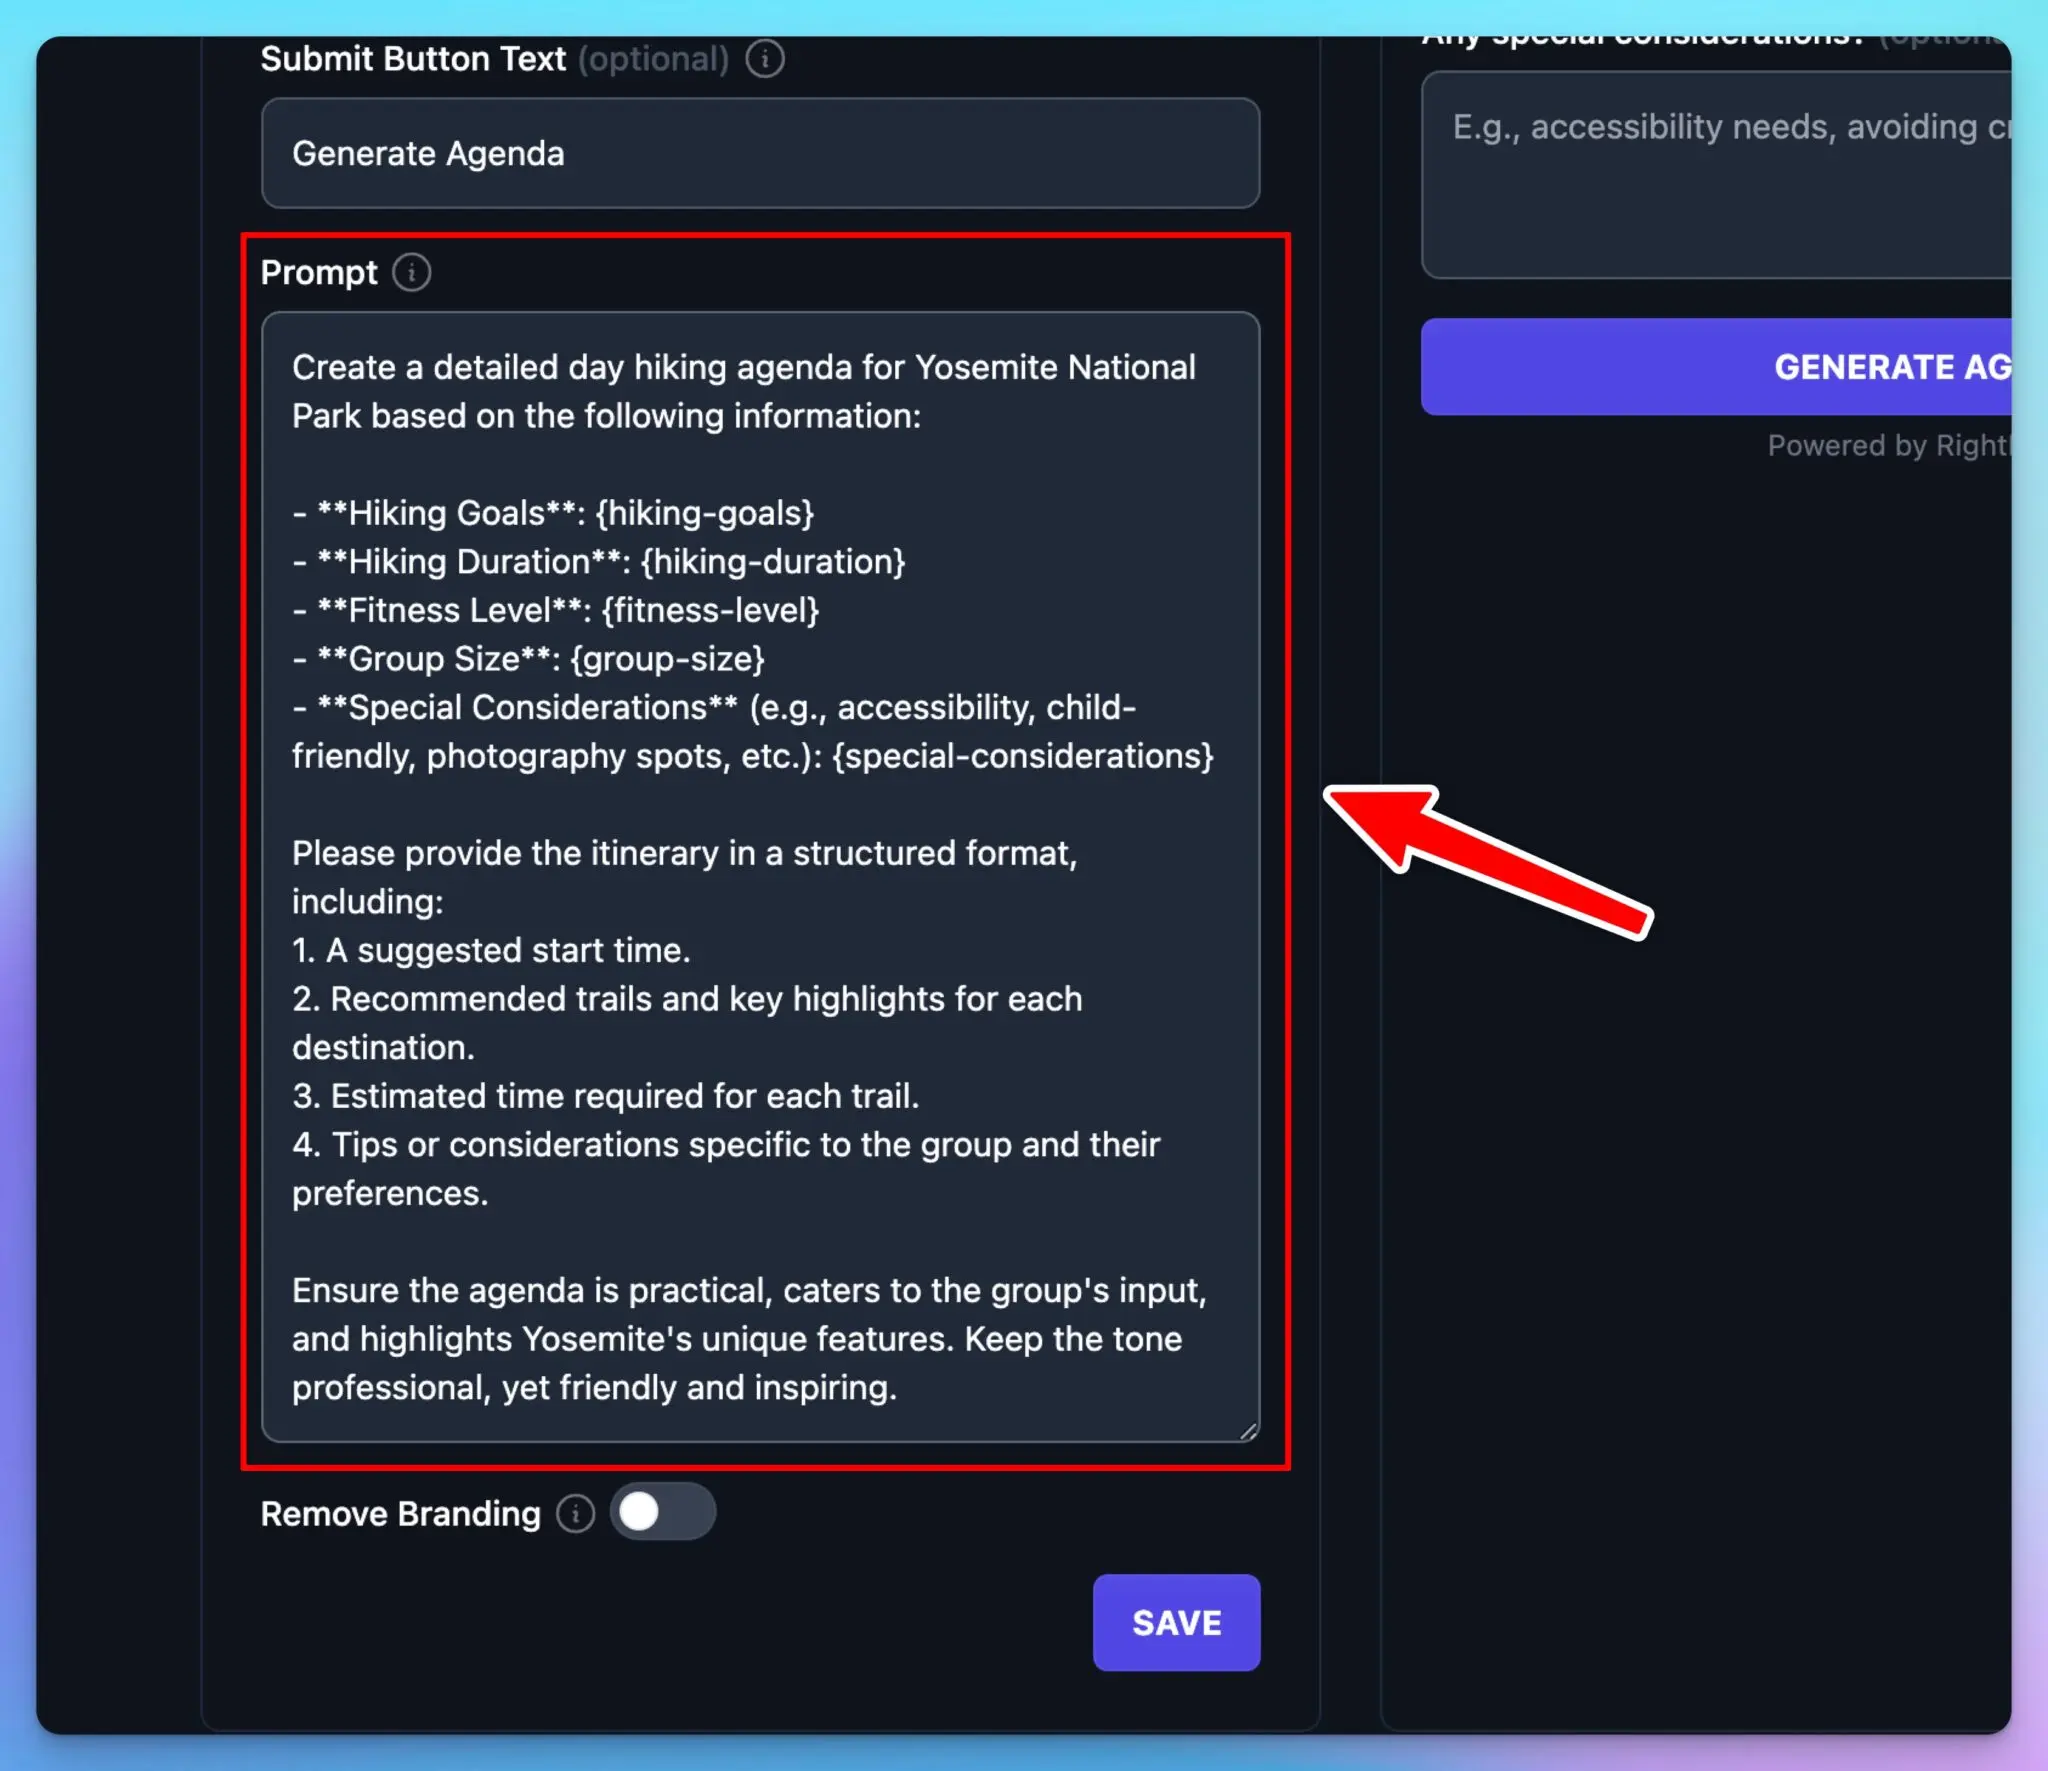
The Tool Details tab gives you control over the look, feel, functionality, and behind-the-scenes details (including the editable AI prompt your tool will work with when combining user inputs, to create personalized outputs for them).
From the details page, you’ll also be able to see a full preview of your tool on the right hand side, a functional version of exactly what your tool will look like, for you to test inside of RightBlogger.
The Call to Action Tab

The Call to Action tab gives you a few options for turning your free tool into a lead magnet. The call-to-action itself will be displayed just above the field where your outputs are delivered, giving your audience the opportunity to join your email list, or click on a custom button you can link to anywhere you’d like your audience to go.
Here’s what the optional email signup call-to-action looks like when displayed on a live tool:

🤓 Quick note on where your leads go: Every signup lands in a table inside the Call to Action tab. From there you can copy a single address or export the whole list as a CSV and import it into Kit, Mailchimp, beehiiv, or whatever you run your list on.
🔒 Turn any tool into a true lead magnet: Over in the Tool Details tab, flip on Require CTA to View Results. Your tool still runs for everyone, but the results stay blurred until the visitor enters their email. That single toggle is the difference between a fun toy and an email list that actually grows. Use it where the output is genuinely worth the trade, and leave it off where a blurred result would just annoy people.
The Analytics Tab
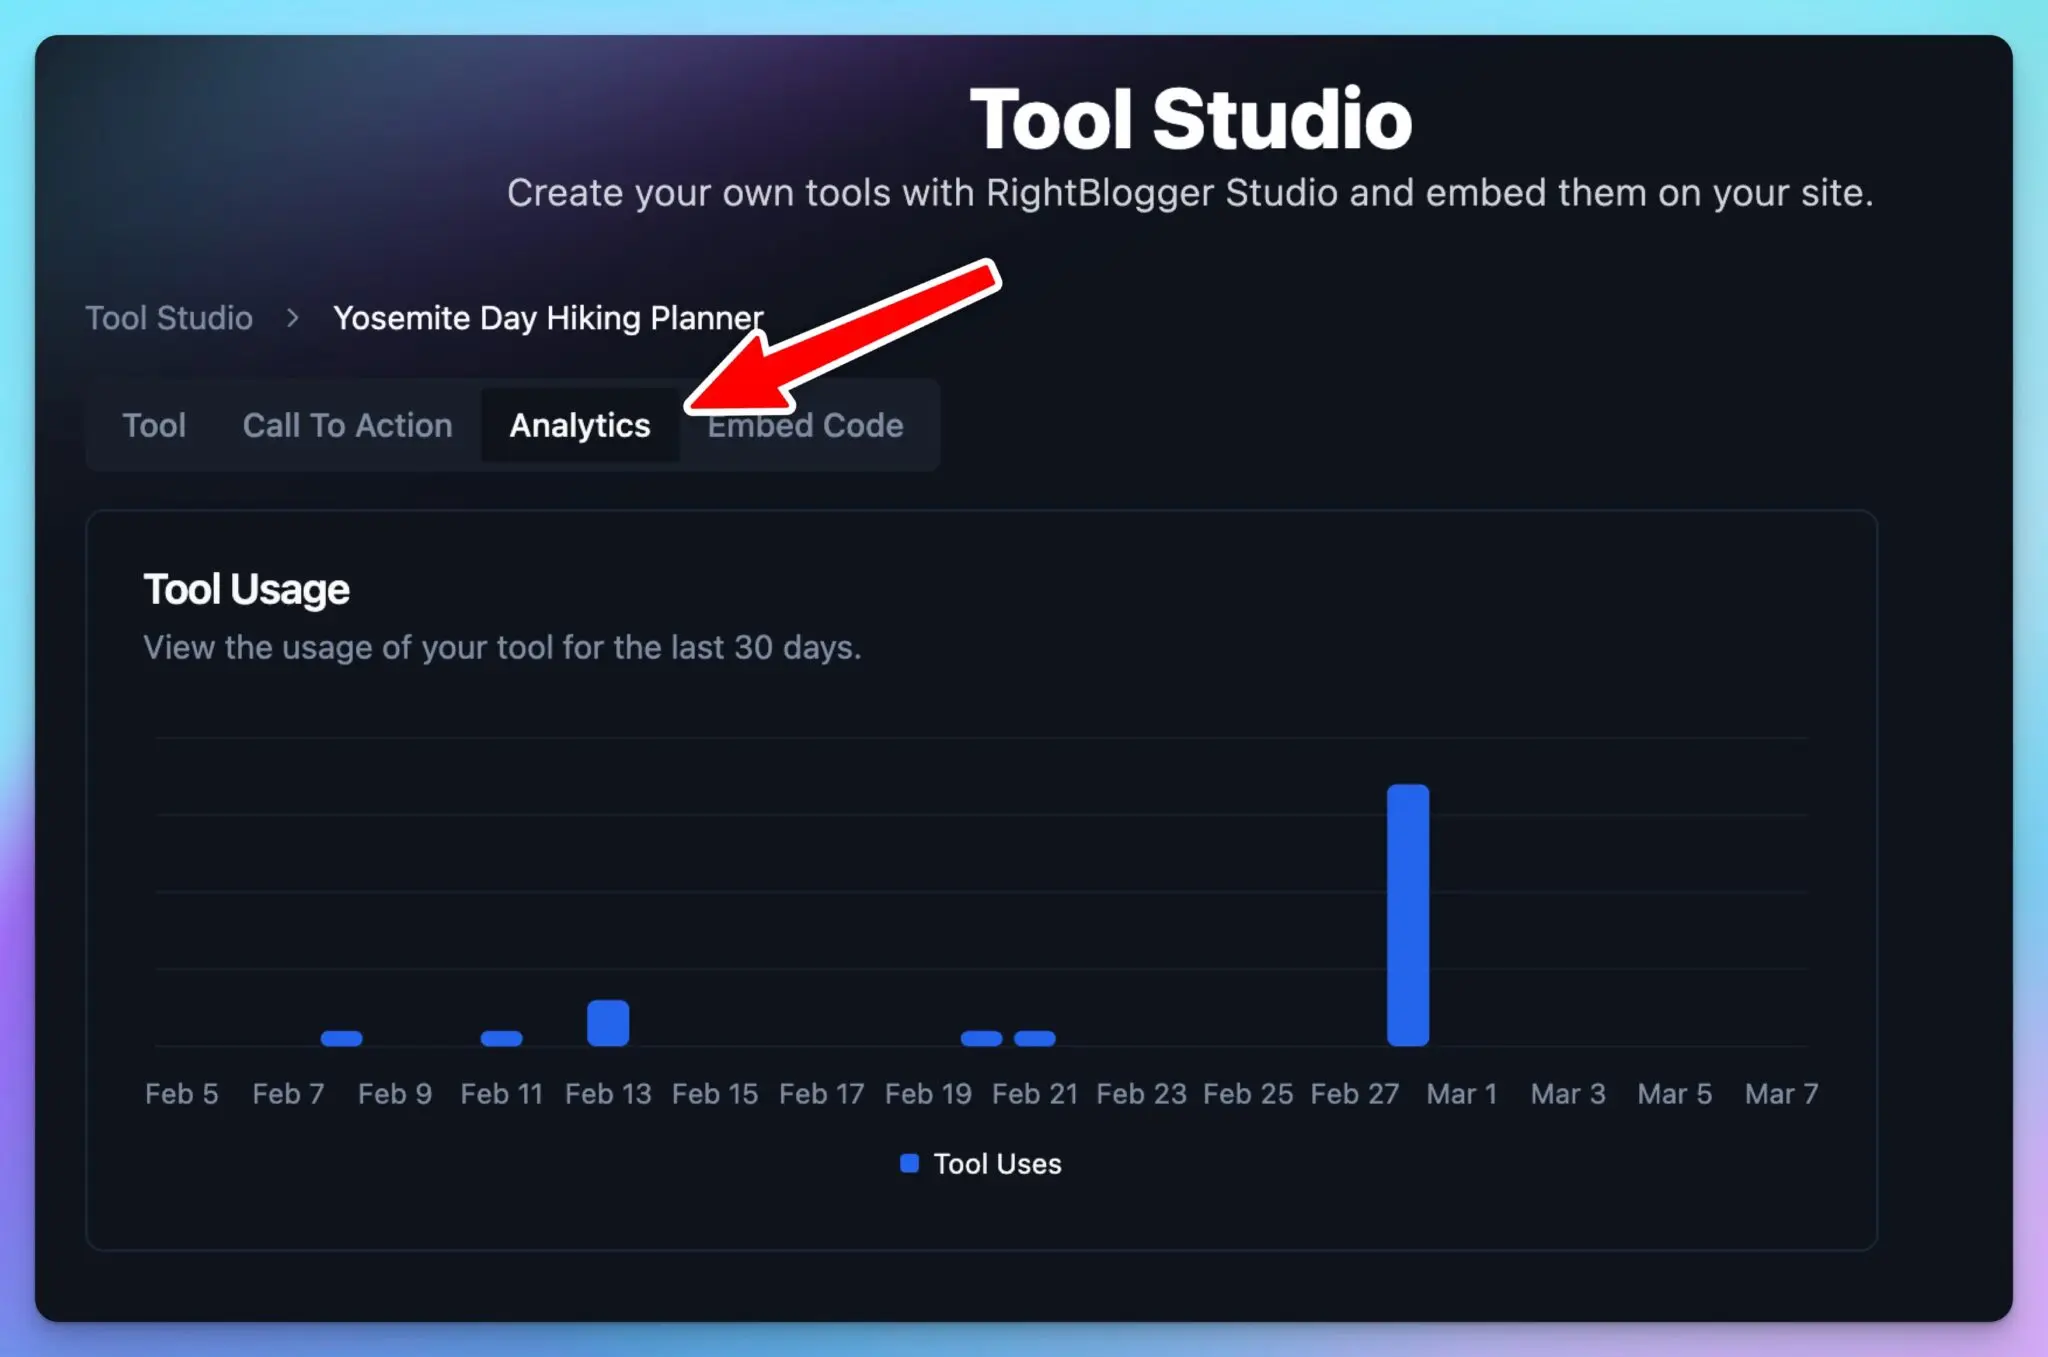
The Analytics tab displays a live-updated dashboard showing the usage statistics for each of your tools, allowing you to see how much your tools are being used. Wanna see more data here? Drop us a message in our Discord group.
The Embed Code Tab
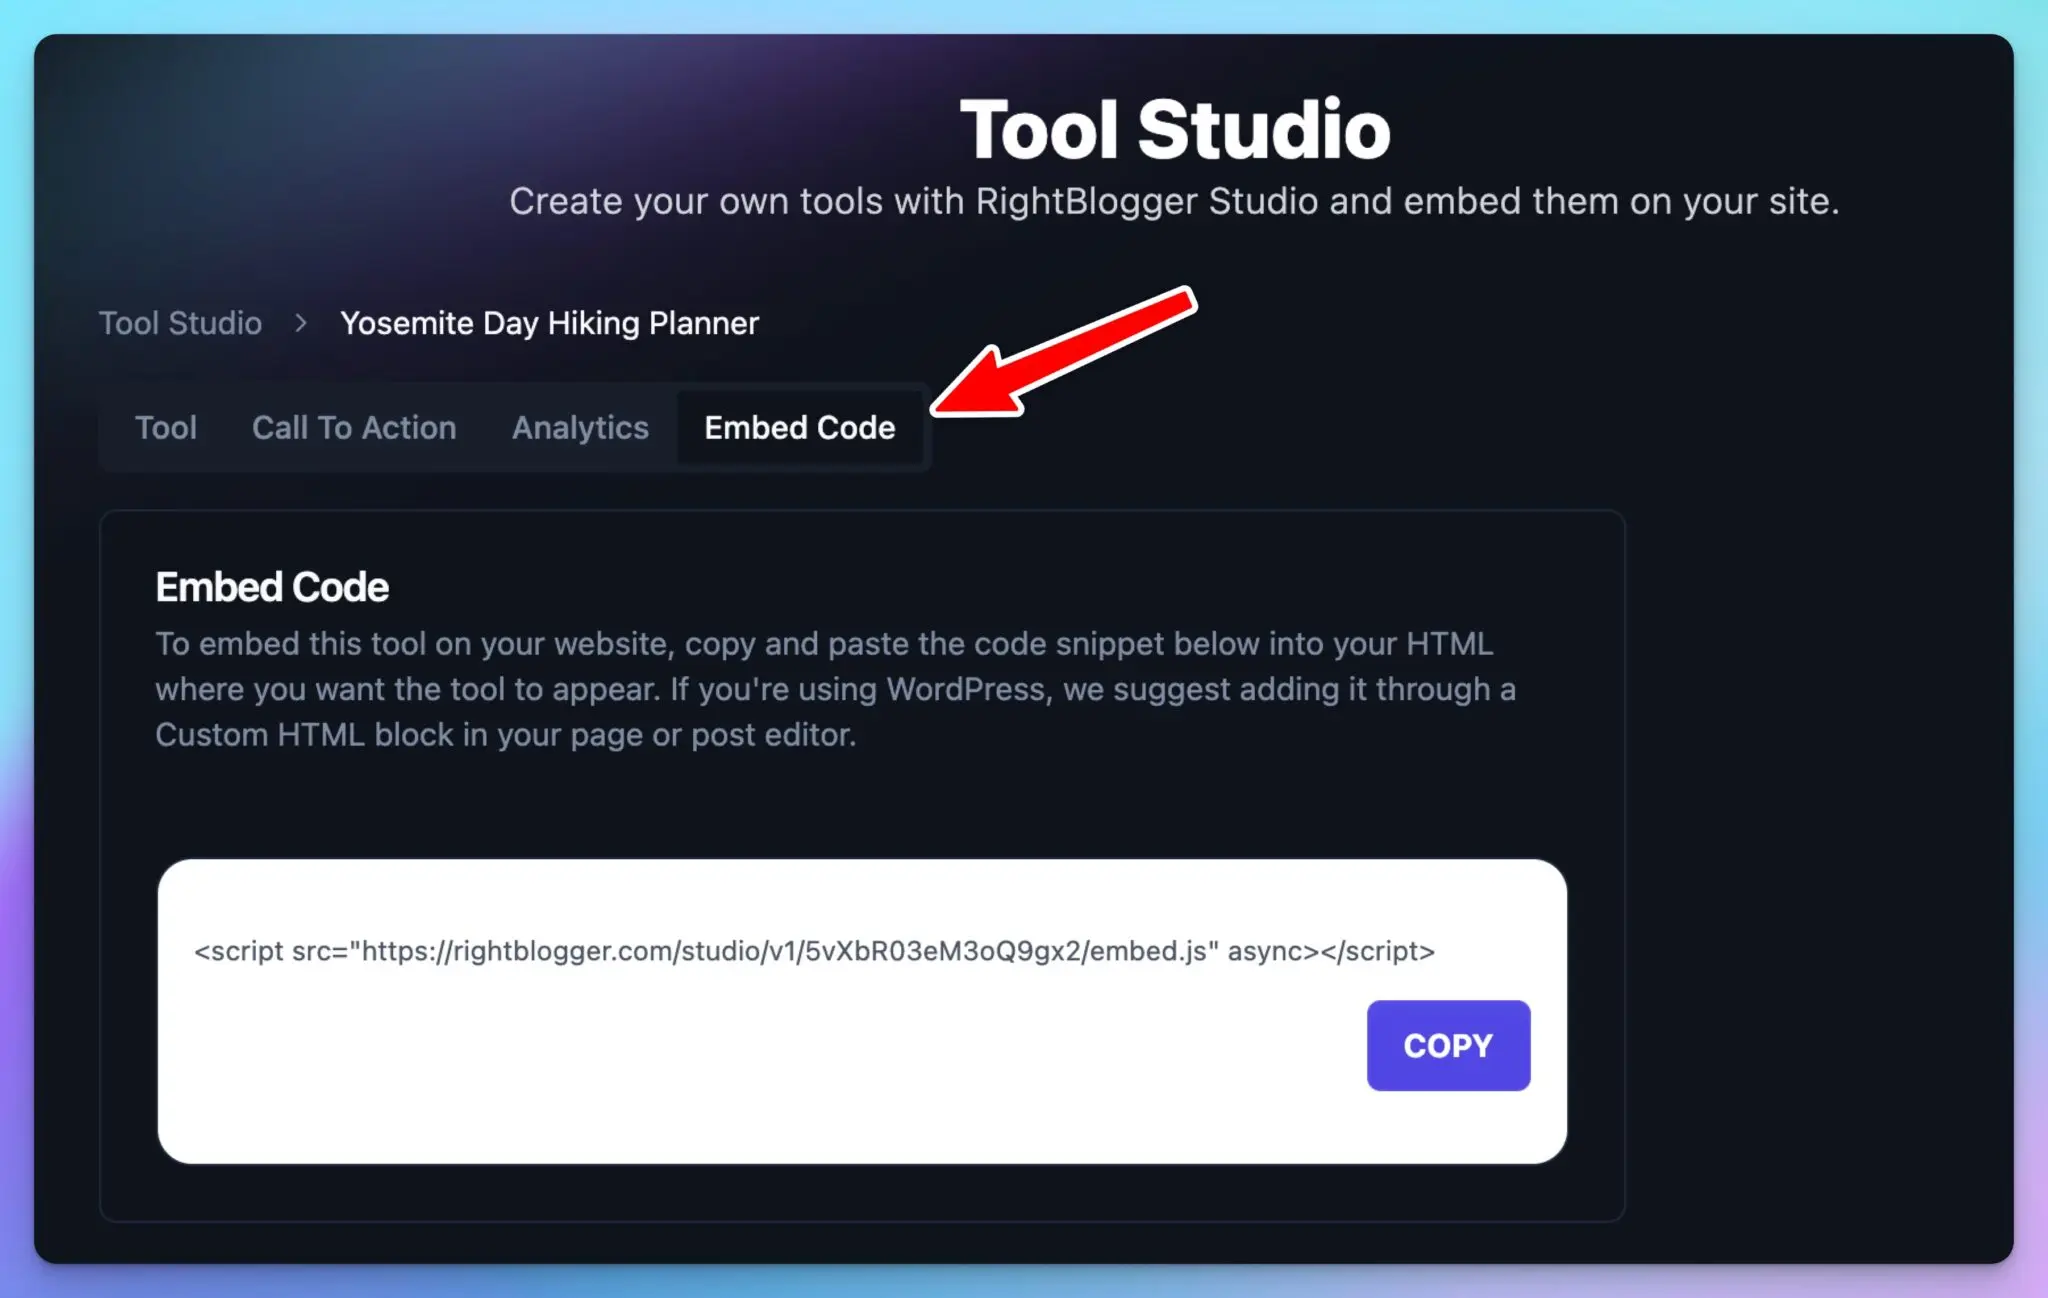
The Embed Code tab is where you’ll grab the copy & paste code snippet that’ll make your embeddable tool display on your website. Here are the quick steps to getting your tool properly embedded:
- Copy the snippet of code to your clipboard
- Paste the code into your desired location on your website. I like to embed tools both (1) inside relevant blog posts at useful locations for my readers and (2) on their own dedicated landing pages where they have the most SEO opportunity (to rank in Google searches related to the tool)
💻 Tech Tip: If you’re using WordPress to embed your tool, it’s super easy. You’ll add a ‘Custom HTML‘ block and paste your code in there, just like so:
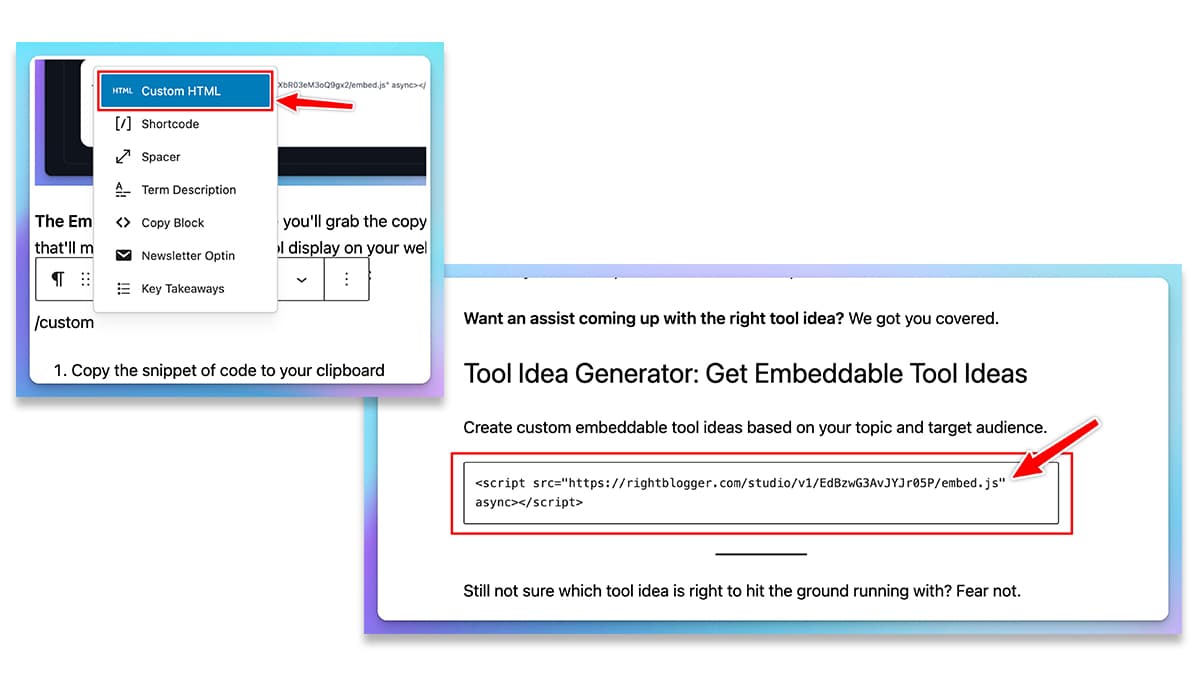
Whenever you publish or update the post/page, your tool will now appear on the front end, where your audience can immediately interact with it.
🔌 Even easier on WordPress: If you’ve got our free WordPress plugin installed, skip the code entirely. Add the RightBlogger Tool block, pick your tool from the dropdown, and you’re done.
It’s that easy! If you’ve got questions or wanna chat with us about using Tool Studio, come join our Discord group (or drop us an email to contact@rightblogger.com).
Fine-Tuning the Prompt & Settings on Your RightBlogger Tools
As with any an AI tool, the more detailed you are in your instructions, the closer it’ll come to hitting the mark for both you and your tool’s users.
Here are a few more detailed tips & instructions for really dialing in your embeddable AI tools:
- Title and Description Options: Customize the title and description of your tool to match the intent of how this tool will help your audience. For the title, you’ll likely want to SEO-optimize it for a specific keyword phrase, to increase your chances of ranking your tool page in Google search results (i.e. tool SEO).
- Submit Button Text: Here, you can change the text that’ll display on the submit button. “Generate” is a good generic call-to-action button that’ll work in a lot of use cases. Going with something more specific to your particular tool, like “Get Ideas,” “Find Solutions,” “Create Plan,” or “Generate Fart Jokes” tend to be much more effective at creating a memorable experience for your users.
- The AI Prompt: These are the instructions for how your tool will function, when used by someone on your website. Tool Studio generates a prompt based on your description, but you can customize it any way you’d like. If your prompt contains variables, you can use those to create dynamic prompt instructions. You can also add, remove, and reorder the tool’s input fields any time from the Fields menu.
- Saving Your Changes: Remember that changes are published instantly to your tool, so double-check before you hit “Save,” as it’ll immediately impact an actively embedded tool.
🧪 SEO Tip: Turn off the heading option within your RightBlogger tool (this is off by default) and instead, use headings inside your CMS like WordPress. I recommend an H2 (Header 2) as the title tag for the name of the tool. Check out the example of our ‘Tool Idea Generator’ earlier on in this post. Displaying the header in your CMS helps Google crawl & understand the title of your tool, whereas the embedded version from RightBlogger may not get picked up.
3 Tool Studio Embeddable AI Tool Examples + Free Tool Idea Generator
If you’re still figuring out how embeddable AI tools might translate over to your niche & the content topics you cover start by using our Tool Idea Generator right here to spark some inspiration:
Now, here are a few examples to spark of embeddable tools that’ll help spark your creativity:
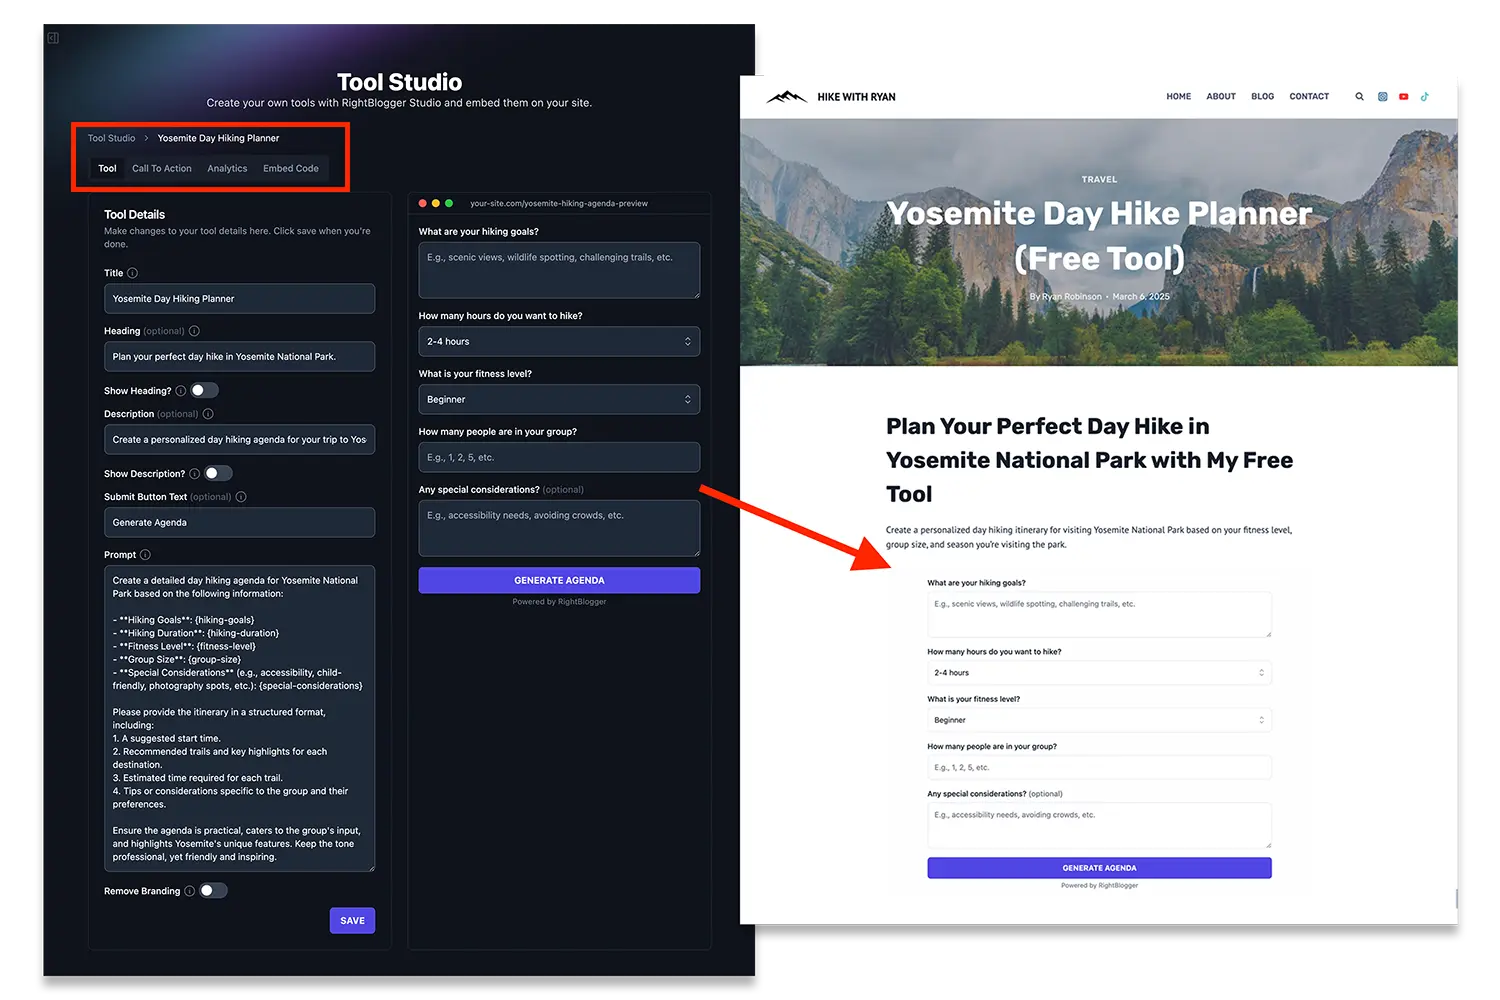
Tool Example #1: Day Hike Planner
Over on my hiking blog, I have a lot of content about my adventures in my favorite national parks here in California (my home state). So naturally, a series of interactive hike planner tools for my favorite national parks, came to mind as both an SEO traffic opportunity and a way to bring something unique to my niche:
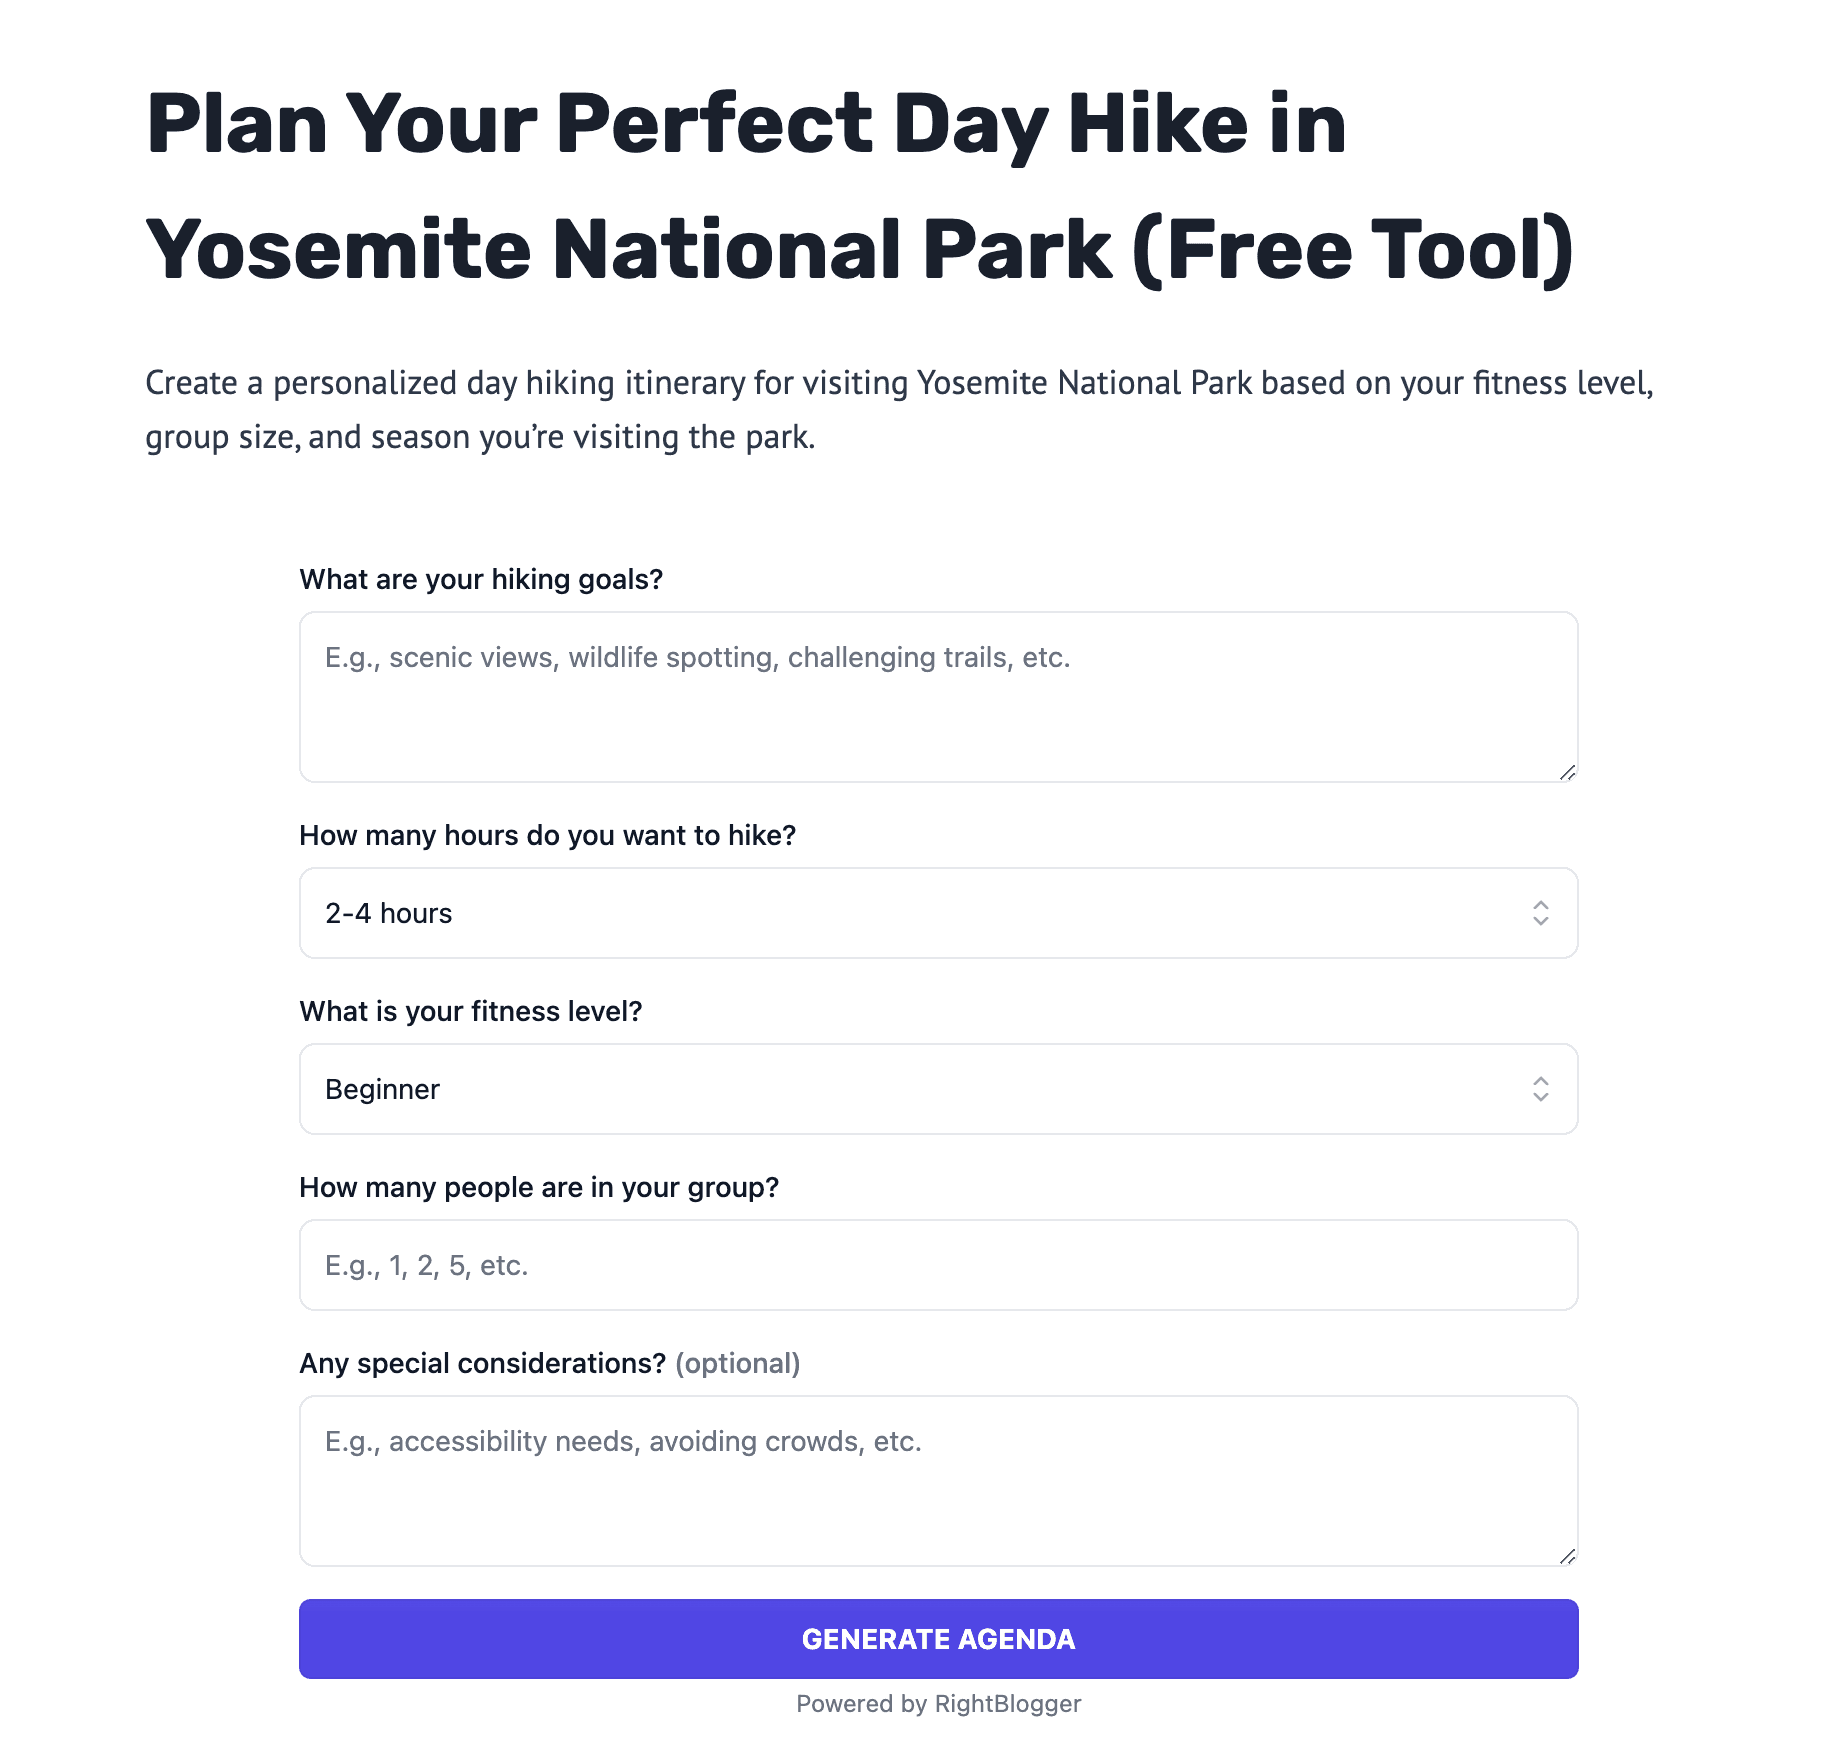
In just a couple of minutes, I built this tool using Tool Studio and got it embedded inside a page of my hiking blog, where I’ll soon add some explainer content, teaching my audience how to use the tool & get the most out of it.
Pro Tip: A winning recipe for scoring SEO traffic to your tool pages, is to turn them into a true landing page (like all the examples here on my blog), complete with a ‘how to use’ section, education around the broader topic, FAQs, a video walkthrough, and other SEO-rich sections that add value for both readers & search engines alike.
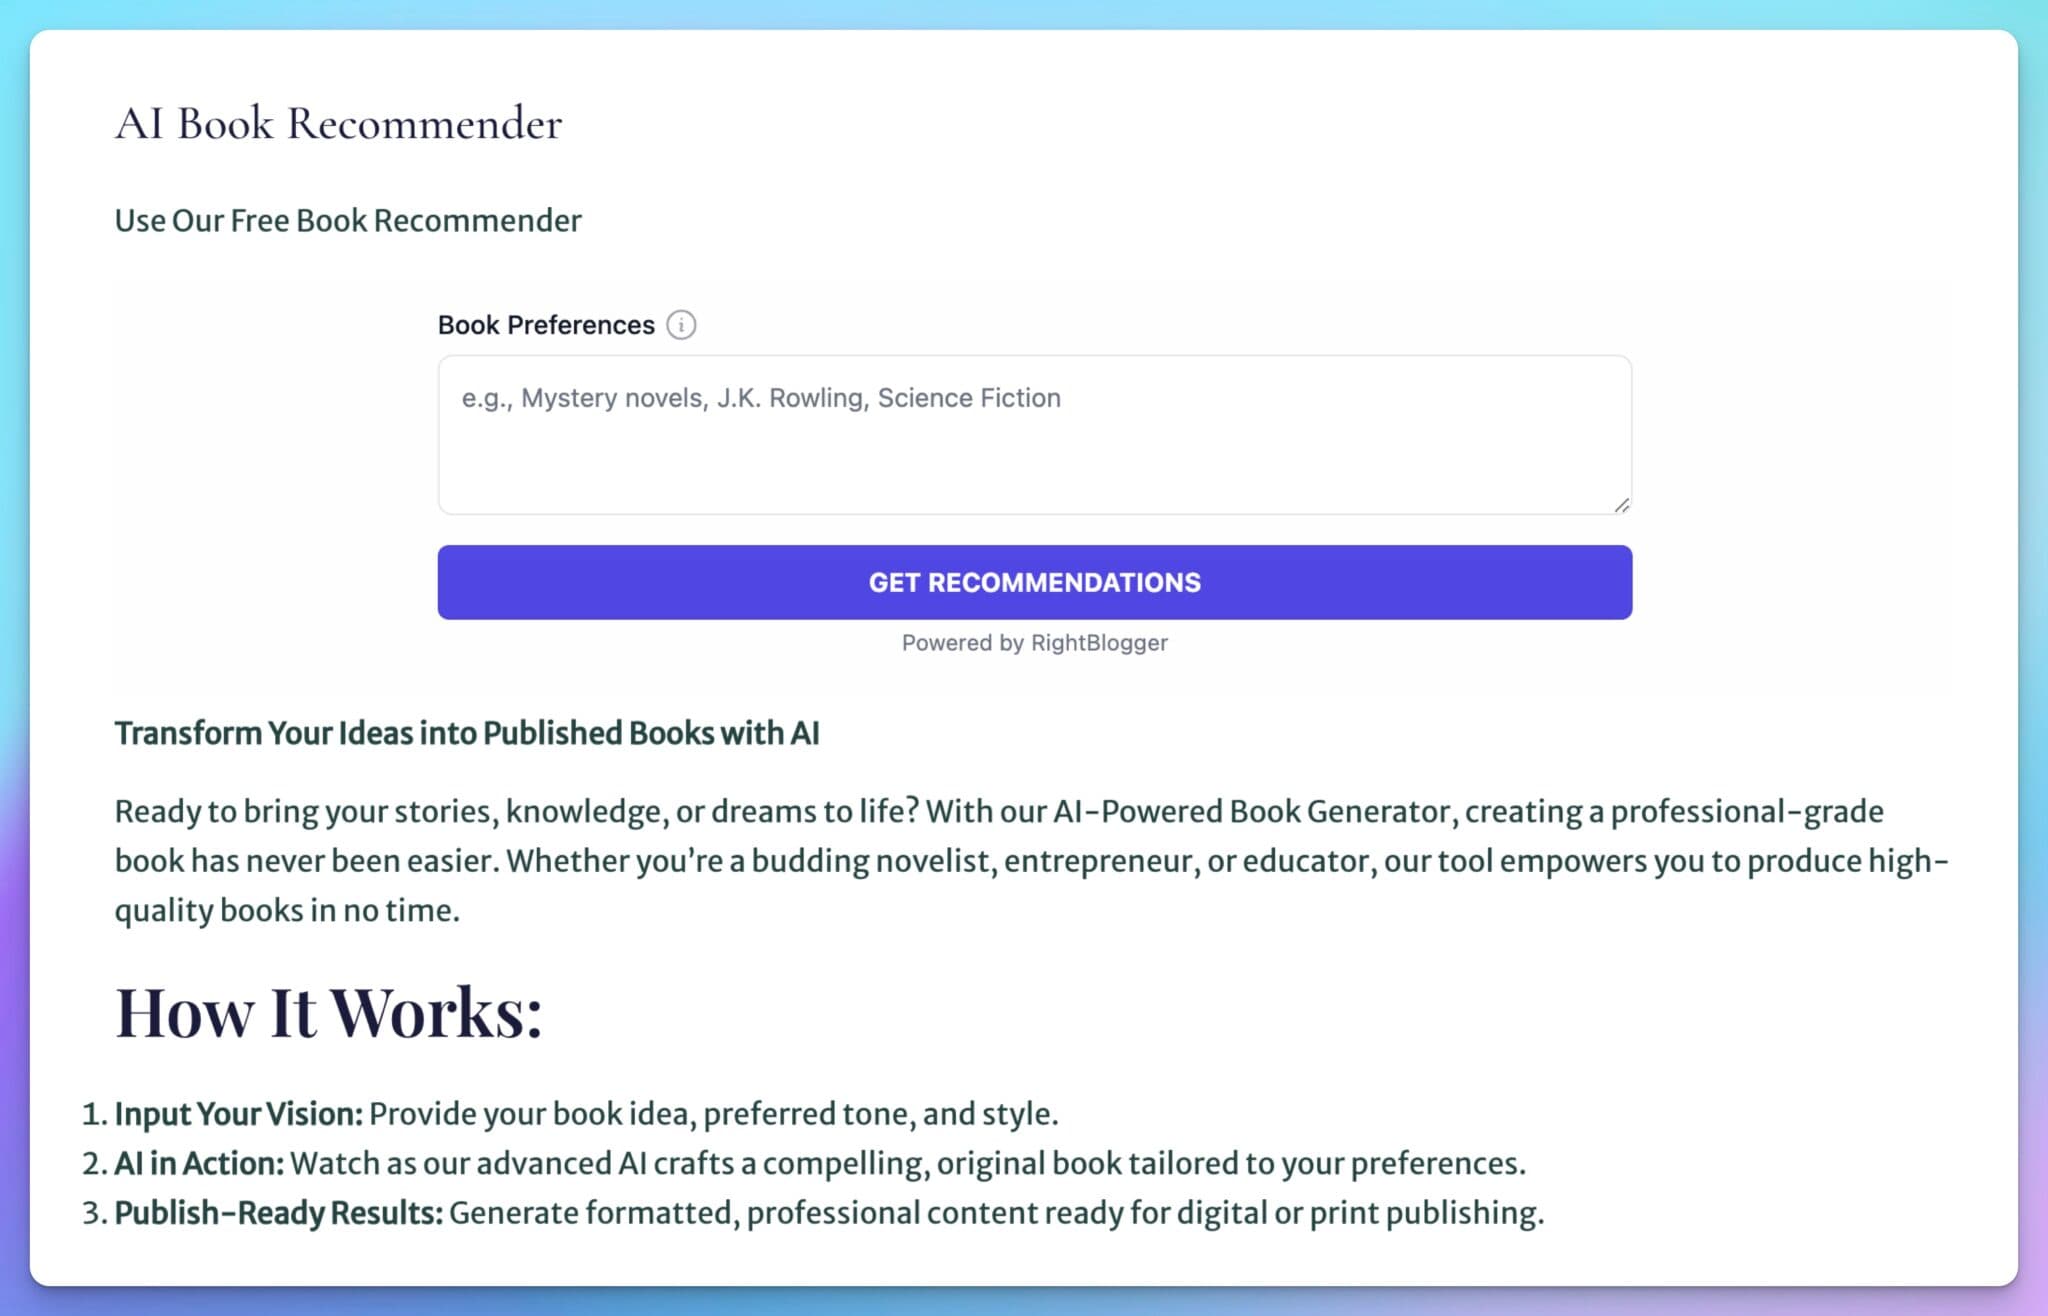
Tool Example #2: AI Book Recommender
RightBlogger customer, Chad McIntyre, recently launched The Literary Compass, to help fellow readers discover expert book reviews, read author spotlights, and receive the timeless literary insights he’s gleaned from his readings.
Chad’s first tool, an AI Book Recommender, generates new book recommendations for your reading list, based on your favorite authors & types of books you like reading, a really cool value add to his website & a new SEO traffic opportunity, too:
One way Chad could really expand this strategy (to drive more SEO traffic in the months to come), is by publishing a wide range of niche-specific book recommendation tools on his site, covering topics like:
- Science Fiction Book Recommender
- Children’s Book Recommender
- Mystery Novel Recommender
- Self-Help Book Recommender
- and so on…
As you can see, the possibilities are pretty endless with free tools. If it solves a pain point your audience has, then you’ve got a good potential tool idea to test out.
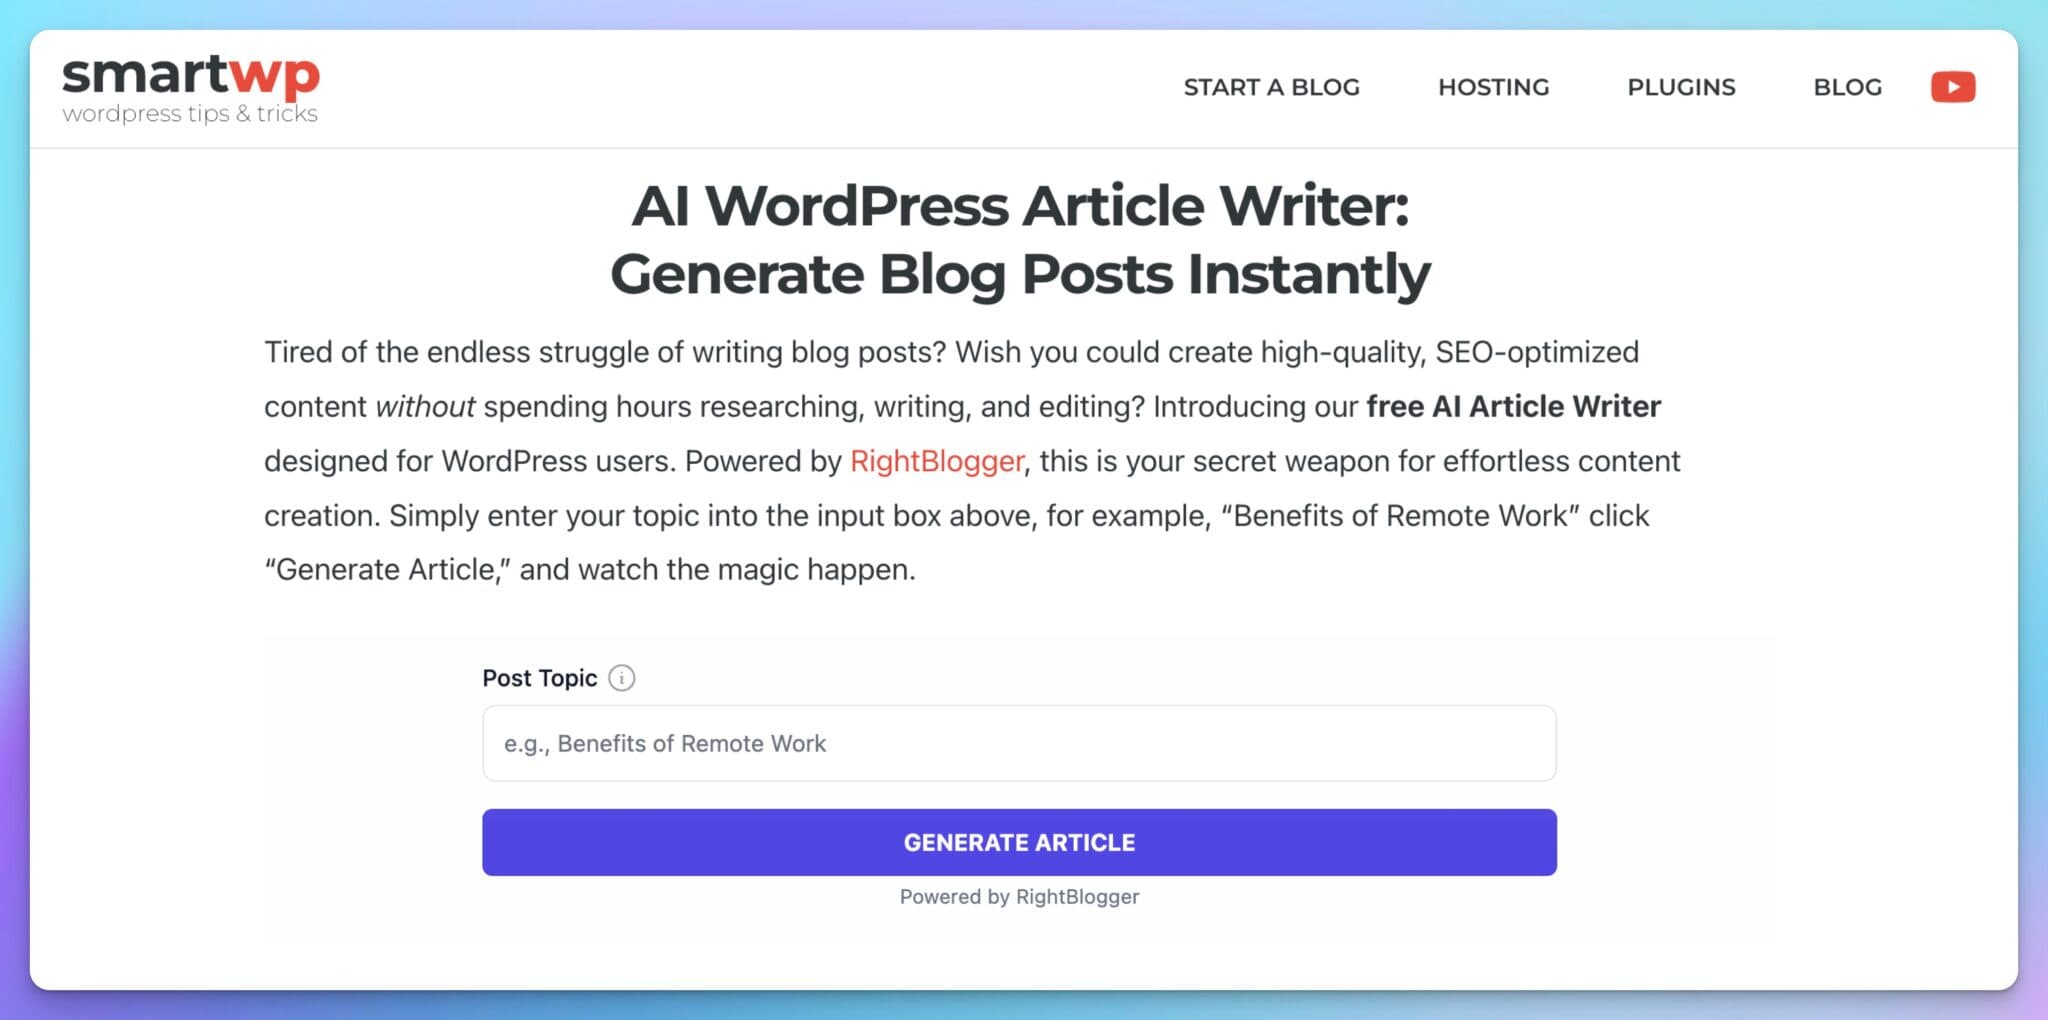
Tool Example #3: AI Article Writer for WordPress
For several years, Andy & I have been running the SmartWP blog together, where we (mostly Andy tbh) teach everything we’ve learned about building & scaling WordPress websites. Free tools related to WordPress are a no-brainer for us over there, here’s our first one:
We’re slowly working on a stable of embeddable AI tools that’ll be helpful & relevant to anyone with a WordPress website, which will continue to build out our reputation in the space, while driving more SEO traffic along the way.
Tool Studio Plans: Features & Pricing
Tool Studio is bundled into every paid RightBlogger plan, so there’s no separate add-on to buy. What changes from plan to plan is how many tools you can keep live at once, and hitting that ceiling is a good problem to have. It means your tools are working, driving SEO traffic and adding subscribers to your email list.
Here’s how the tool limits break down:
- Solo ($59/mo): Full RightBlogger access on 1 site, with up to 5 custom AI tools live at the same time.
- Pro ($89/mo): 3 sites and up to 15 active tools. This is where most people land.
- Agency ($299/mo): 10 sites and up to 50 active tools, enough to generate serious traffic & leads on autopilot. This is the scale I operate the free tools on my blog at, which get nearly 1 million monthly uses… bringing me 500,000+ monthly readers and thousands of new subscribers to my email list each month.
Every paid plan also lets you remove the “Powered by RightBlogger” branding under your embed and restyle the tool (colors, buttons, layout, background) to match your site. That used to be an upsell. It isn’t anymore.
My 2 cents: start on Solo, get some quick wins with your first few tools, and prove that embeddable tools will support the growth of your business before you scale up. The bigger plans will still be there when your tools have earned them.
💪 A Major Exception: If you already have a decently established website in your niche, let’s say you’re getting in the neighborhood of ~5,000 monthly visitors or more, then folding in a scaled up approach to free tools as a part of your SEO traffic & lead generation strategy, is close to a no-brainer. Hit me up in Discord with your site and I’ll give you a no-BS recommendation on how to get this strategy working for you.
If you’ve got questions or wanna chat with us about Tool Studio, come join our Discord group (or drop us an email to contact@rightblogger.com).
Wanna Learn More About RightBlogger Tool Studio?
Take Tool Studio for a spin with your RightBlogger account today.
Experience is the best teacher, dive in and play with creating your own embeddable AI tools. You’re gonna love it.
Wanna chat with us about Tool Studio? Come join our Discord community. We’d love to show you how it works, give you some embeddable tool ideas, answer your questions, and help you get the most out of this powerful new feature.
To recap, here are just a few of the biggest benefits you stand to gain by deploying embeddable free tools in your marketing mix:
- Drive More SEO Traffic: Do keyword research to identify a series of small-to-medium size problems that the people in your target audience have, and design free tools that solve different components of these challenges. Nail your approach to tool SEO and you can win massive amounts of traffic from search engines like Google.
- Create High-Converting Lead Magnets: Interactive tools are a lot more fun (and memorable) than blog posts or videos alone. Build stronger relationships with your audience & convert them into subscribers for your email newsletter with ease.
- Get High Quality Backlinks (Easier): Whether you’re actively building links to your website or you wanna create some great passive link building opportunities, free tools are far more likely than other content formats, to earn a link from other websites in your niche.
You can now build custom AI-powered embeddable tools that solve real problems and provide instant value to your peeps.
Come grow your audience faster with Tool Studio, today. We can’t wait to see what you make!

Article by
RightBlogger Co-Founder, Ryan Robinson teaches 500,000 monthly readers how to grow online and calls himself a recovering side project addict.


Automated SEO Blog Posts That Work
Try RightBlogger for free, we know you'll love it.


Leave a comment
You must be logged in to comment.
Loading comments...