How to Submit URL to Google Index with Google Search Console
Request indexing for new or updated pages, then troubleshoot crawl and quality issues.


Having your website indexed by Google is essential for visibility and attracting organic traffic. One effective method to ensure your website’s presence on Google is by submitting a URL to the Google index using Google Search Console. In this post, we will guide you through the process step-by-step, ensuring that your website gets crawled and indexed efficiently.

Google Search Console is a powerful tool that enables website owners to monitor their site’s performance, identify issues, and interact with Google.
By submitting your URLs to the Google index, you can prompt Google’s bots to crawl and index your pages, making them visible in search results. This process is crucial for gaining visibility and driving organic traffic to your website.
You do not have to submit every page, though. Google discovers most new content on its own through your sitemap and internal links, so manual submission is optional. It mainly helps you get a brand-new or freshly updated page crawled sooner, which is exactly when it is worth doing. Getting indexed also matters for AI search in 2026, since a page has to be in Google’s index before it can show up in an AI Overview or be cited by an AI assistant.
Before getting started, you will need to add your site to Google Search Console.
Submitting Individual URLs
To submit a specific URL for indexing, follow these steps:
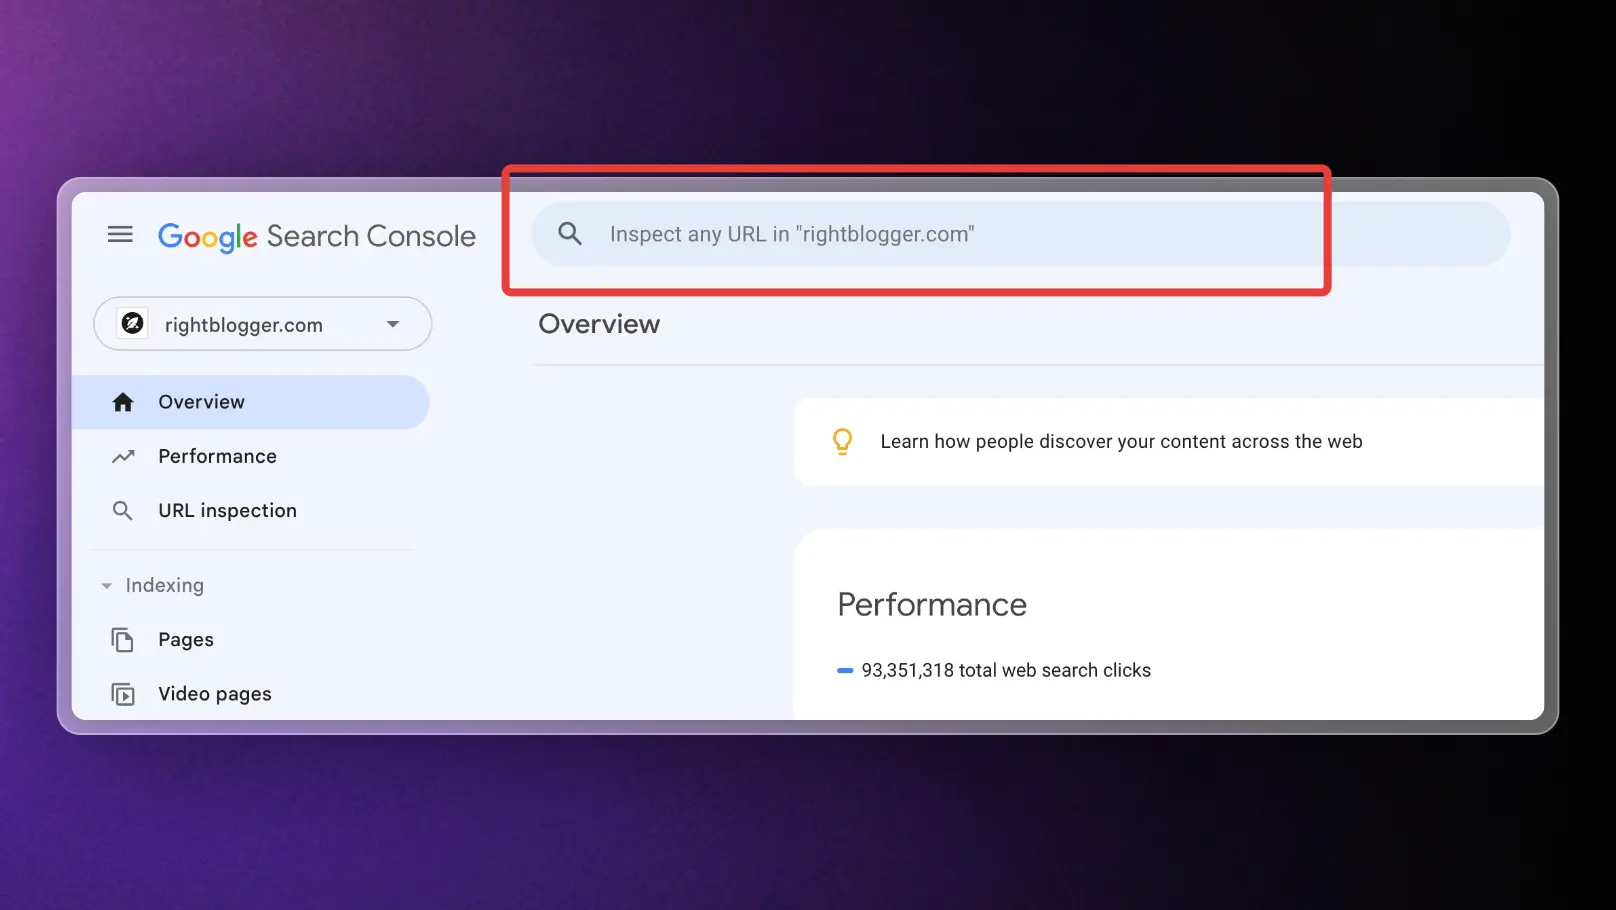
- Sign in to Google Search Console: Visit the Google Search Console website and sign in with your Google account.
- Select your website: If you have multiple sites in your account, choose the one you want to submit a URL for. This is done at the top left of the sidebar.
- Enter the URL: Type or paste the URL into the inspection bar at the top of Google Search Console and press Enter.
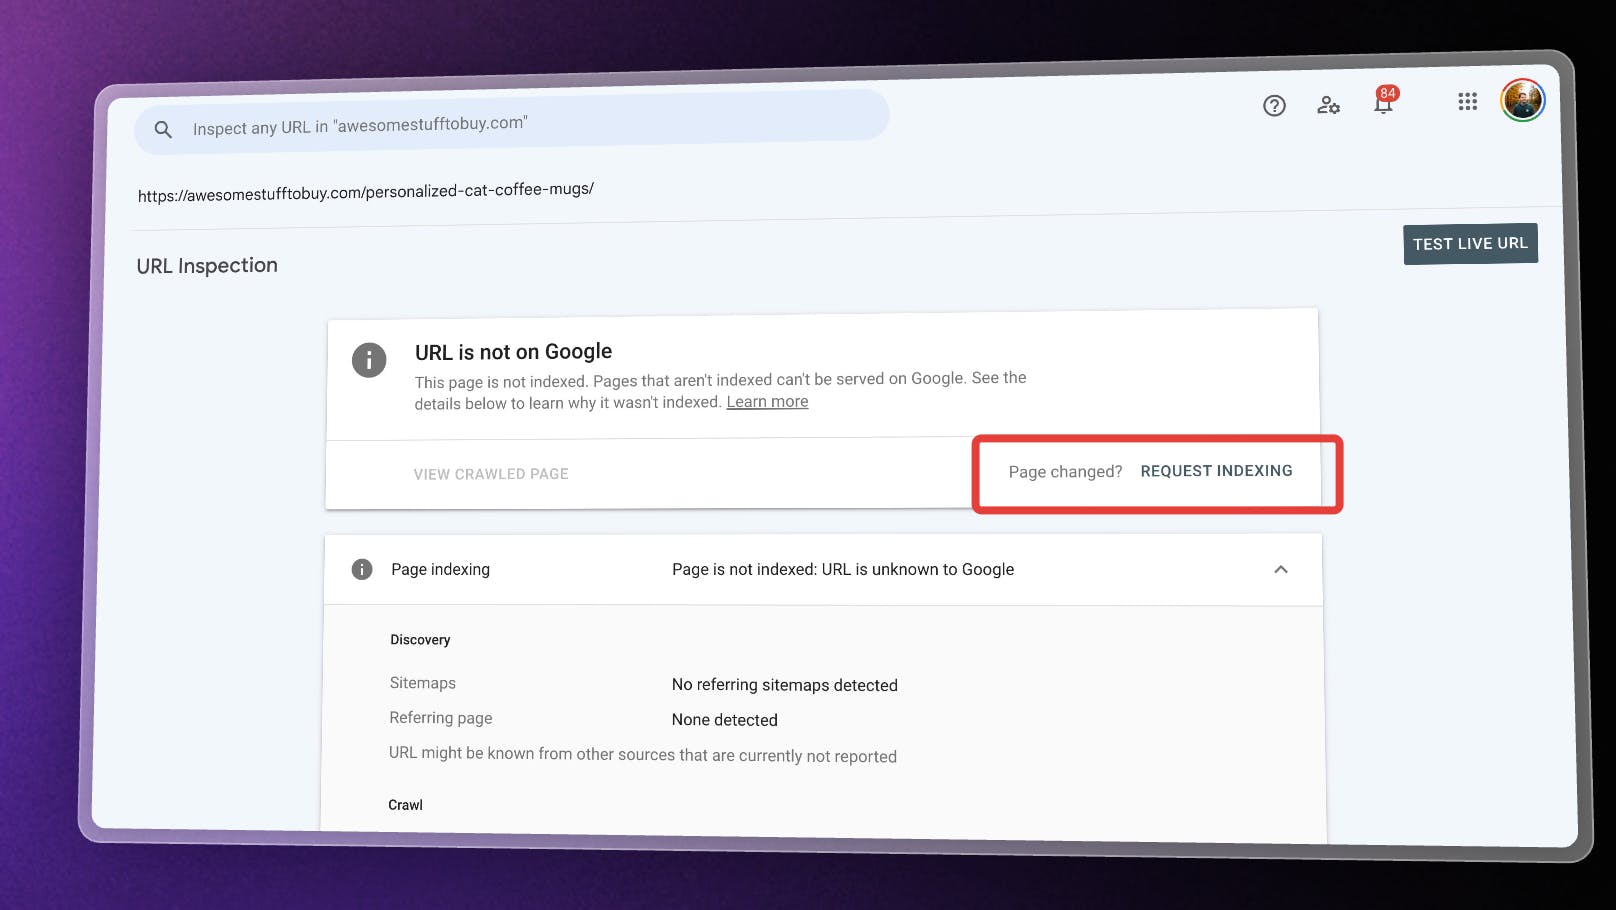
- Inspect the URL: Google Search Console fetches the URL and shows its current indexing status.
- Request indexing: If the page is not indexed, you will see a message saying it is not on Google. Click Request Indexing to add it to the crawl queue.
Please note that Google has a quota for submitting individual URLs, and submitting the same URL multiple times won’t expedite the crawling process. Be patient and monitor the progress using either the Page indexing report or the URL Inspection tool.
While you’re working within the Search Console interface, it’s helpful to understand the fundamental ways users actually reach these pages. Whether a visitor decides to search Google or type a URL directly into their browser’s address bar can significantly impact your traffic data. Understanding this distinction helps you better visualize the journey a user takes before landing on the pages you are working so hard to index.
Submitting a Sitemap
If you have a large number of URLs to submit or want to ensure that Google discovers all the pages on your website efficiently, submitting a sitemap is recommended.
To submit a sitemap:
- Create a sitemap: Before submitting a sitemap, you need to create one. A sitemap is an XML file that lists all the URLs on your website. WordPress will do this automatically and can be found via the example.com/wp-sitemap.xml URL.
- Verify your website: If you haven’t already done so, verify your website ownership in Google Search Console.
- Access the Sitemaps report: In the left-hand sidebar of Google Search Console, click “Sitemaps” under the “Indexing” section.
- Add your sitemap: Paste your sitemap URL (for example,
wp-sitemap.xml, orsitemap_index.xmlif you use Yoast or Rank Math) into the “Add a new sitemap” field. - Submit the sitemap: After adding your sitemap, click on the “Submit” button to inform Google about its existence.
- Monitor sitemap indexing: Google Search Console will now process your sitemap and provide valuable information about the indexed URLs.
Submitting a sitemap is especially useful when you’ve just launched your website or made significant updates to its structure. Additionally, sitemaps can include metadata about alternate language versions, video, image, or news-specific pages, enhancing the overall indexing process.
How Long Does Google Take to Index a Page?
After you submit a URL to Google through Search Console, indexing does not happen instantly.
In many cases, Google will crawl a page within a few hours or days, but it can sometimes take longer depending on several factors:
- The authority of your website
- How often Google crawls your site
- Whether the page is linked internally
- The overall quality of the content
Submitting a URL through the Request Indexing feature simply asks Google to crawl the page sooner. It does not guarantee immediate indexing.
You can check the progress anytime by using the URL Inspection tool inside Google Search Console.
Why Your Page Might Not Get Indexed
Even after submitting a URL, Google may decide not to index the page.
Some common reasons include:
- The page is blocked by
robots.txt - The page includes a
noindexmeta tag - The content is considered low value or duplicate
- Google has not discovered enough internal links to the page
- The site is very new and has low crawl activity
If a page is not indexed after several days, open the Page indexing report in Google Search Console. It groups your URLs by status and explains exactly why each one was skipped. The two you will run into most are “crawled – currently not indexed” (Google visited the page but judged it not worth indexing, usually a quality or duplication call) and “discovered – currently not indexed” (Google knows the URL exists but has not crawled it yet). Our guide on fixing crawled – currently not indexed breaks down the nine causes and how to clear each one.
Tips to Help Google Index Your Pages Faster
Submitting a URL through Search Console helps, but there are additional steps that can encourage faster indexing.
Some practical strategies include:
- Add internal links pointing to the new page
- Share the page on social media
- Include the page in your XML sitemap
- Update older blog posts with links to the new content
- Ensure your site loads quickly and has no crawl errors
These signals help Google discover the page more easily and understand that it is worth indexing.
You may also run into advice to use IndexNow or the Google Indexing API for instant submission. Be careful with both. Google does not support IndexNow (only Bing, Yandex, and Naver do), and Google’s official Indexing API is limited to job posting and live video pages, not regular blog posts. For a blog, Search Console plus a clean sitemap is the right tool. If you also want faster pickup on Bing and other engines, our IndexNow guide covers the setup.
Frequently Asked Questions
Do I need to submit every page to Google?
No. Google will usually discover new pages automatically through internal links and sitemaps. Manual submission is mainly useful for new or updated pages.
How many URLs can I request indexing for?
Google limits the number of manual indexing requests per day. The exact limit is not publicly documented, but most sites can request indexing for a small number of URLs daily.
Does requesting indexing improve rankings?
No. Submitting a page for indexing only helps Google discover and crawl the page sooner. Rankings depend on content quality, backlinks, and overall SEO.
How do I check if my page is indexed?
Search site:yourdomain.com/your-page in Google, or paste the URL into the URL Inspection tool. If the tool says “URL is on Google,” the page is indexed. If your site: search returns nothing, it is not.
What is the fastest way to get a page indexed?
Make sure the page is genuinely useful and linked from other indexed pages, then request indexing in the URL Inspection tool and keep it in your sitemap. There is no guaranteed instant method, and it is best to avoid third-party “instant indexing” services that promise to force Google to index your URLs, since most violate Google’s guidelines.
Conclusion
Submitting a URL to the Google index with Google Search Console is a crucial step in ensuring your website’s visibility and organic traffic. By following the steps outlined in this post, you can proactively prompt Google to crawl and index your website’s pages. If you have a WordPress website there are plenty of other tips you can do to improve SEO in WordPress.
Remember to be patient during the indexing process and monitor your site’s progress using the available tools in Google Search Console.
If you’re publishing content regularly, tools like the RightBlogger’s Autoblogging Content Planner can help you organize and publish articles consistently, which increases crawl activity over time.

Article by
RightBlogger Co-Founder, Andy builds websites and shares his travel and photography tips on YouTube and his blog.


New:Site Agent
Automated SEO Blog Posts That Work
Try RightBlogger for free, we know you'll love it.
- Automated Content
- Blog Posts in One Click
- Unlimited Usage


Leave a comment
You must be logged in to comment.
Loading comments...