How to Screen Record on Mac: A Full Step-by-Step Guide
Use Command-Shift-5 for microphone audio; use BlackHole or third-party apps for system sound.


Level up your content creation game by mastering screen recording with audio on your Mac. Record slick demos, how-tos, and more with just a few clicks. QuickTime Player lets you capture video and audio easily for quick recordings. Or use third-party apps for advanced editing features.
In this guide you’ll learn how to screen record on Mac. Add crystal-clear audio and take your content creation skills to new heights. Screen recording with audio made easy. It’s time to produce your best work yet.
Recording Screen with Audio on Mac Using Keyboard Shortcuts
For those looking to screen record video and audio on Mac without extra software, the screenshot toolbar is a straightforward solution. This is by far the easiest way to screen record on Mac. This method is perfect for quick recordings. The screenshot toolbar allows you to record your full screen or just a portion of the screen.

Here’s how to do it:
Step 1: Press “Command + Shift + 5” on your keyboard.
Step 2: The Screenshot toolbar will appear with specific onscreen controls.
Step 3: Choose options in the toolbar, select your Macbook microphone (or an external mic), then hit Record.
Step 4: To stop recording, press “Command + Control + Escape” or “Command + Shift + 5” again and select “Stop Recording“. You can also click the stop button in the top menubar as well.
Your video will show up on your desktop (or where you selected the recording to go to in the options), complete with audio. By default screen recordings are captured as a .MOV file.
Using QuickTime to Record Video and Audio on Mac
QuickTime Player, an Apple product, comes preinstalled on all Macs. You can open QuickTime via your applications folder or use spotlight to quickly open it (by hitting Command + Space) and typing QuickTime.
Here’s a quick guide:
Step 1: Open QuickTime Player from your Applications folder.
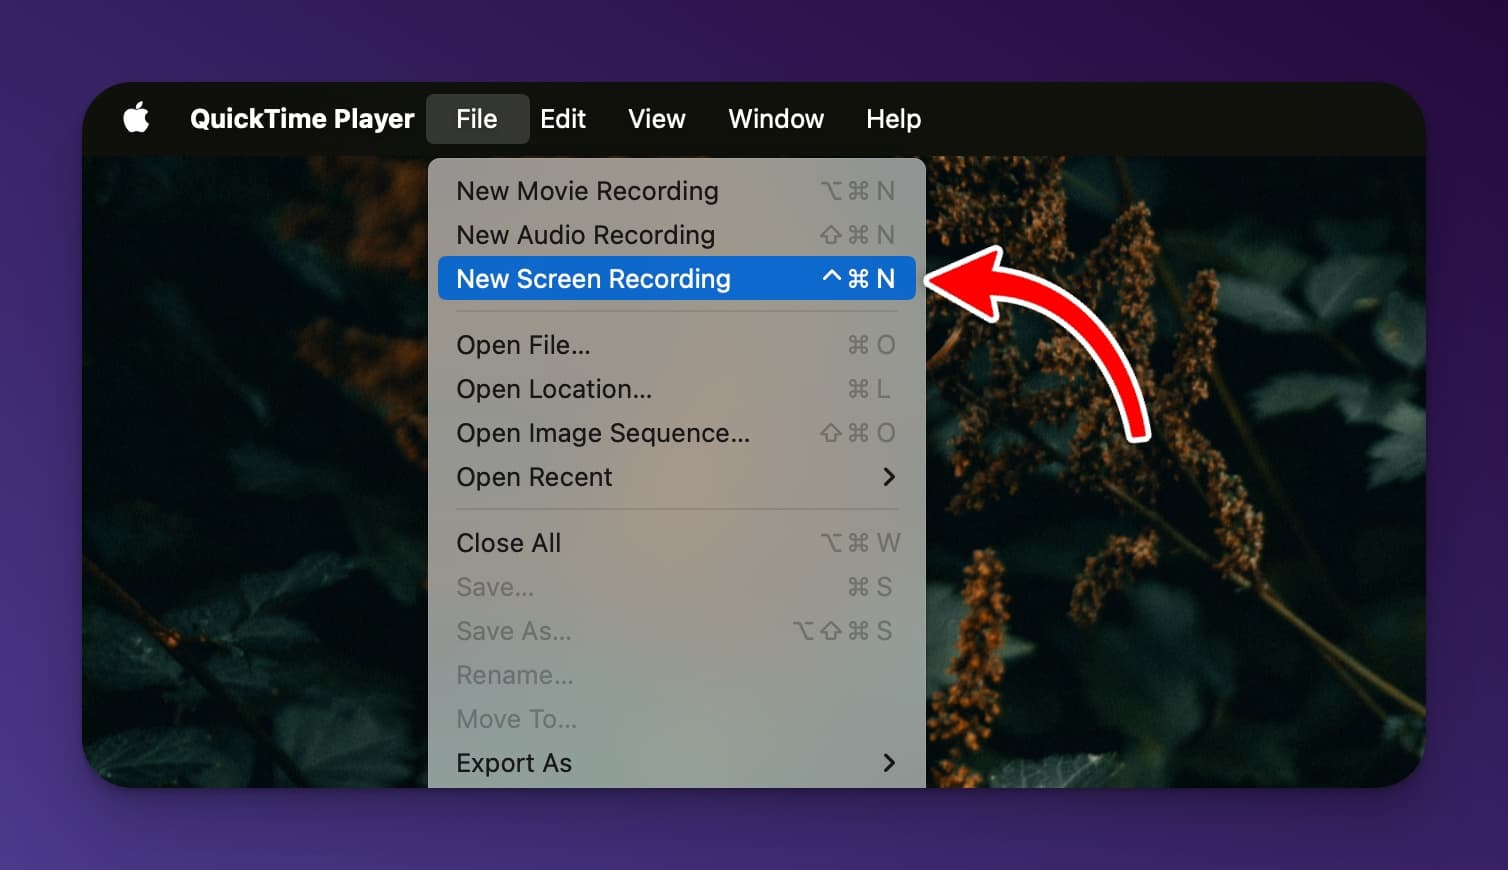
Step 2: Go to “File” and choose “New Screen Recording“.
Step 3: Click the Options button next Record button to pick a microphone.
Step 4: Hit the “Record” button. You can record the entire screen or drag to select a specific area.
Step 5: Record your content, including any audio.
Step 6: Press Stop Recording or “Command-Control-Esc” to finish.
Step 7: QuickTime Player will show your recording. Check the sound quality before saving. Saving the file can be done by clicking “File” then “Save…”.
Which Screen Recorder Is Best for Mac with Audio?
When choosing a screen recording app or software for Mac, consider what suits your needs best. Here are two great options:
QuickTime Player
QuickTime Player remains a preferred choice for many Mac users. It allows for basic video editing, such as trimming and rearranging clips. It’s a simple solution for quick screen recordings with audio.
The Catch: Recording Internal System Audio on a Mac
If you’ve ever tried using the built-in Mac tools to record a Zoom meeting, a YouTube clip, or a webinar, you’ve probably run into a frustrating roadblock: the video looks great, but there’s no sound.
By default, Apple’s security settings prevent native tools from capturing internal system audio. When you click the “Options” menu in the Screenshot Toolbar or QuickTime, you can select your microphone to record your own voice, but you can’t capture the audio actually playing on your computer.
Depending on your budget and technical comfort, there are two ways to solve this:
- The Free (but technical) Route: You can install a free virtual audio driver like BlackHole. It essentially creates a virtual bridge that routes the sound coming out of your Mac directly back into your screen recording software as an input. It takes a few minutes to configure in your “Audio MIDI Setup” app, but it works flawlessly once it’s going.
- The Easy Route: If you don’t want to mess with routing system audio, the best solution is to use a third-party screen recorder. Powerful free tools like OBS Studio, or premium apps like Screen Studio and Loopback, are built to bypass this limitation and capture your internal system audio seamlessly with the click of a button.
Loom
Loom, a free screen recorder extension for Chrome, offers up to 4K video recording quality and the ability to trim and stitch recordings. It’s ideal for simultaneous audio and voice recording.
Screen Studio
Screen Studio is a powerful screen recording app for Mac that’s perfect for capturing mouse movements, webcam footage, and basic editing. In my opinion Screen Studio is the best screen recording app on Mac. It has a user-friendly interface that lets you easily record specific windows, areas, or devices like iPhones and iPads. The built-in editor allows you to customize the background, cursor, and camera settings, as well as add captions and animations.

Screen Studio automatically zooms in on areas you interact with, providing a smooth and focused recording experience. It will even capture keyboard presses and mouse clicks as you do them in your recording. Its timeline editor makes it simple to trim, split, and adjust the speed of your clips. Overall, Screen Studio is an excellent choice for anyone needing to create professional-looking screen recordings on their Mac.
OBS
OBS (Open Broadcaster Software) is a versatile screen recording tool that is highly popular among content creators for Mac. It offers a wide range of features, including the ability to capture multiple sources such as screen, webcam, and audio inputs simultaneously. OBS provides customizable settings for recording quality, frame rates, and audio configurations, allowing users to fine-tune their recording setup according to their specific needs.
OBS also supports live streaming, making it a great choice for those who want to broadcast their screen recordings in real-time (this is the primary use case of OBS). With its user-friendly interface and robust functionality, OBS is a top choice for Mac users looking to create professional-quality screen recordings.
FAQs on How to Screen Record on Mac with Audio
Can QuickTime record screen and audio?
Yes. Select your preferred microphone in QuickTime before recording to include audio from any microphone on your Mac including AirPods.
How do I make a video of my computer screen?
Use QuickTime, the Screenshot toolbar, or a third-party app like the one mentioned above. There are many great options to record your Mac screen. The shortcut on MacOS to start screen recording on Mac is “Command + Shift + 5“.
Where do screen recordings go on Mac?
Recordings save to your desktop with the Screenshot toolbar. With the options button you can also select where the recording is saved. With QuickTime or other software, choose where to save when exporting or sharing.
Is It Possible to Record Both Audio and Video on a Mac?
Yes, you can record both audio and video on a Mac. There are several methods available, including using the built-in Screenshot toolbar or other screen recording software. Your choice will depend on the recording quality you’re aiming for.
Conclusion
Screencasting with audio on your Mac is a game-changer for content creators. The built-in QuickTime Player makes it easy to record your screen plus audio. But third-party apps unlock even more powerful features if you need them. Follow this guide to start capturing slick video tutorials, presentations, and other content that sounds as good as it looks.
With just a few clicks, you can take your creativity to the next level and share your knowledge with the world! Don’t just show – tell. Add pro-quality audio and watch your audience light up.

Article by
RightBlogger Co-Founder, Andy Feliciotti builds websites and shares his travel and photography on YouTube.
Automated SEO Blog Posts That Work
Try RightBlogger for free, we know you'll love it.


Leave a comment
You must be logged in to comment.
Loading comments...